If your Onn Roku TV keeps turning on and off by itself, trust me, I know exactly how it feels. You power on your TV only for it to turn on, get stuck on the Onn Roku TV logo screen and then turn off by itself again.
It doesn’t stop there, the TV keeps restarting while stuck in the same boot loop as long as it is plugged in.

In this guide, I am going to show you some proven ways to resolve the issue.
Without any further ado, let’s dive right in!
Onn Roku TV Keeps Turning On And Off By Itself
Follow the step-by-step troubleshooting procedures below to fix the issue.
1. Power Cycle Your TV
If your Onn Roku TV keeps restarting but remains stuck on logo and never boots completely, then the first thing you want to do is simply power cycle it. This is also known as a soft reset.
Here’s how to power cycle your TV:
- While your Onn Roku TV is on and stuck in the reboot loop, unplug the power cable directly from the power outlet
- Leave it unplugged for 60 seconds
- While unplugged, press and hold the power button on the TV for 30 seconds
- Plug the TV back into the power source
- Turn it on using the remote controller or the power button on the TV
If it’s still stuck in the reboot loop, try the power cycle again but this time, wait for 10 minutes after unplugging it before plugging it back in. Just be patient, a lot of users were able to fix it by waiting for up to 10 minutes.
If the issue is caused by some corrupt cache files on your Onn Roku TV, a simple power cycle (soft reset) will fix it. Otherwise, if it’s still turning on and off by itself, then you need to perform a hard reset.
2. Perform a Hard Reset
Although I’ve seen users who were able to fix the issue via a soft reset as I have shown you above (having waited for 60 seconds or an additional 10 minutes as the case may be). However, a hard reset was the solution for me.
In fact, this is what worked for most users who had the same issue from what I’ve seen. Since a factory reset will delete all your installed apps and restore all settings/configurations to factory defaults, it’s best that you try the soft reset option first.
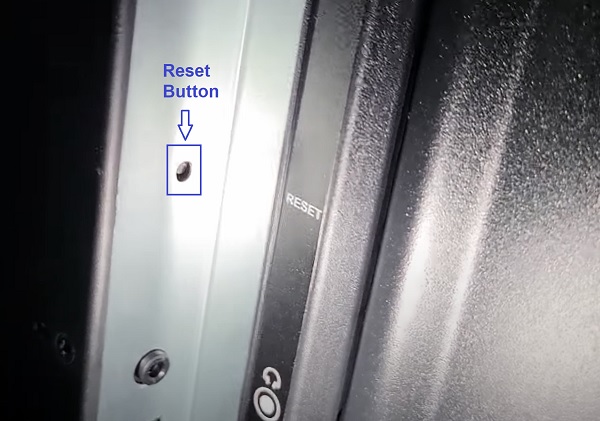
That said, you can reset your Onn Roku TV to factory settings. Since the TV won’t even boot up completely and you can’t access the settings, the only way to do this without a remote controller is to actually use the reset button on the TV.
If you hadn’t noticed, there’s a reset button on your Onn Roku TV (it even has a label ‘Reset’ next to it).
Here’s how to reset Onn Roku TV that keeps turning on and off by itself:
- First, locate the physical reset button on your Onn Roku TV (at the back of the TV, usually close to the HDMI port). You will need a pin or any tiny object to push the button.

- Once you locate the reset button, press and hold the button firmly for about 10-20 seconds while your device is powered on. When it shuts down, keep holding down the reset button until it powers on and shows the Onn Roku TV logo again. Then, you can release the button
- When the factory reset is complete, the TV will reboot twice and finally turn on without turning off again by itself
- Now, go ahead and set up your Onn Roku TV again – select language, select mode of use, setup network connection or skip it.
Then, you are good to go.
3. Replace Faulty Capacitors
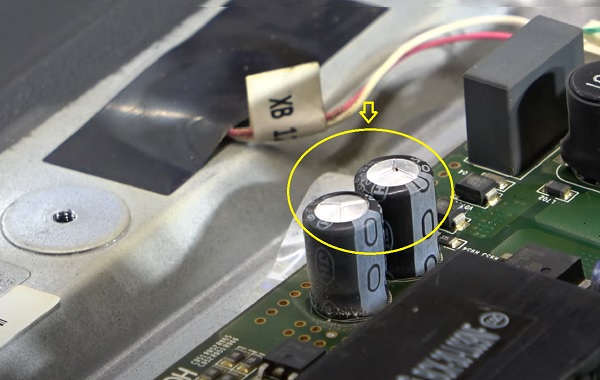
Another reason why Onn Roku TV keeps turning on and off is having faulty capacitors on the TV panel, usually on the main board.
What you simply need to do is replace the faulty capacitors with capacitors with same rating and the TV will fire up after that.
NOTE: Before you start, make sure you unplug your TV and leave it unplugged for 30 seconds. Also, press the power button on the TV for 30 seconds. This will help discharge the capacitors before you open up the TV panel (they can be dangerous otherwise).
Now, here’s a step-by-step process of what you need to do:
- Remove the screws and open the back cover of the TV.
- Next, unplug all the cables going into the main board like the speaker cable, Wi-Fi module cable etc.
- Then, do a quick visual inspection to see if there is any faulty capacitor. It’s quite easy to see this.
If a capacitor is faulty, some of the signs you might see include:
- The capacitor is bulging at the top
- The capacitor is leaking
- Corrosive layer on one or both legs of the capacitor

NOTE: The capacitor may be faulty and not show any visual sign. Hence, the most accurate way to check in such case will be to use a multimeter to check the voltage, and compare it to the expected/labelled voltage of the capacitors. If you see a wrong voltage reading on the multimeter, then it is faulty even if there is no visual sign.
Now, here’s how to remove the faulty capacitor(s):
- Carefully take note of the pin on the board that the capacitor is attached. You should do the removal with a soldering iron (do not force pull it out)
- With the heated soldering iron, carefully apply pressure from the back of the board on the pin for the faulty capacitor until it melts.
- Then, you can go ahead and remove it.
While replacing the capacitor, you should know the following:
- The new capacitor must be placed in exactly the same orientation as the old damaged one
- Ideally, you should replace the capacitor with a new one that matches the ratings (Voltage, Temperature and Micro farads). In case where you can’t get the exact value for the 3 ratings, you can get one that has voltage and temperature that is higher that that of the old capacitor but not lower. The micro farad can also be slightly higher, but not lower.
Once you have gotten the new capacitors, replace the old faulty one you removed using a soldering iron.
Remember: The capacitor needs to be placed exactly how the old one was placed.
- Once replaced, plug back all the cables you had disconnected from main board and assemble the TV back
- Now, plug in the TV, turn it on and the TV should fire up right away. The Onn Roku TV should now stop restarting by itself
If you can’t do this on your own, you can get it repaired. Depending on your location, it should cost between $100 – $200.
If that fixes the issue for you, great!
Otherwise, you will need to replace the main board and maybe the power board too.
4. Contact Onn Roku TV Support
If you have tried all the methods discussed in this guide, your Onn Roku TV should have stopped restarting on its own.
However, if the issue still persists, the only thing you can do is to contact Onn Roku TV support. You can call the Toll-Free Customer Service Line at (844) 334-2355.
If you found the content helpful, don’t forget to drop a feedback by using the comment section below. Also, kindly share the content with others using the share buttons.
