YouTube TV is one of the most popular live TV streaming services with over 100 channels available with no need for cable box. However, in recent years, a lot of users have complained about YouTube TV blurry picture issues.
You may experience this blurry picture quality whether you are using a streaming stick (Amazon Firestick, Roku streaming stick or Chromecast), watching on a smart TV (Samsung TV, LG TV or Vizio TV), gaming console, computer, mobile phone or other supported media players.
Even worse? You may notice that other channels like Netflix, Amazon Prime, Discovery Plus could be giving you full high definition resolution while you get a very fuzzy or blurry picture while on YouTube TV.
The good news is that I will show you some quick and proven ways to fix a blurry YouTube TV picture and improve your streaming experience.
First, let’s quickly look at some reasons why YouTube TV blurry picture quality or pixelation happens in the first place. Then, I will show you how to fix it.
Why Is My YouTube TV Blurry?
You may see a blurry YouTube TV picture if the Perceptual Quantizer (PQ) is set to ‘auto’, the channel does not support 1080p, slow internet connection speed, DNS server issue, corrupt cache files, outdated app or streaming device software or software glitches.
1. PQ is Set to ‘Auto’
One of the most common reasons why users see a blurry YouTube TV stream is having the Perceptual Quantizer (PQ) set to ‘auto’. Basically, the PQ is what allows SDR to be converted to HDR.
As a result, the ‘auto’ setting sometimes default to 480p even when you have very fast internet, which means that the picture will be very blurry on the YouTube TV channel.
In the next section, I will show you how to force the PQ setting to be fixed at HDR.
2. Channel Does Not Support 1080p
In case you didn’t know, not all the channels on YouTube TV actually support 1080p.
So, if you are trying to stream a channel on YouTube TV that does not support High-Definition Resolution (HDR), you may notice a blurry picture or large blocks of pixels (pixelation).
3. Slow Internet Speed
Another reason why you may notice a blurry stream on YouTube TV is having a slow internet connection speed.
When your internet speed drops, YouTube TV will automatically change the quality of the picture to a lower resolution to match the internet connection speed.
As you can see, below are the recommended download speed for YouTube TV depending on the quality you want to stream at.
| Download Speed | YouTube TV Streaming Quality |
| 25 Mbps + | 4K Plus subscribers: View 4K quality on available programs. |
| 13 Mbps + | Reliably stream HD video, even with other devices using the same network. |
| 7 Mbps + | Stream one-HD video. If many devices are streaming videos or using the network at the same time, you may run into some buffering issues. |
| 3 Mbps + | Stream standard definition video. |
| Under 3 Mbps | YouTube TV may load slowly or buffer. |
If you have an internet speed below 13Mbps, you may not be able to stream on HD quality seamlessly.
4. DNS Server Issues
DNS is one of the common culprits you find when it comes to issues with streaming, whether it’s low quality stream or not being able to stream at all.
By changing the DNS server records to a faster one like Google’s public DNS or Cloudflare’s DNS on your router and/or streaming device, you can quickly fix issues like this.
Again, I will show you how to do this and more in the next section.
5. Issues with Cache Files
Streaming devices often temporarily files temporarily on their local storage (cache files) which helps to speed up retrieval the next time such file is needed. These cache files also contain some of the saved settings or configurations on the device.
As a results, even after following some of the procedures which I will show you later in this guide, you may have cache files lurking around which causes your device to work with the old settings/configurations which may cause the “fix” not to work.
For example, you may switch your PQ setting from ‘auto’ to HDR and still have to go back to 480p which means YouTube TV is still blurry.
To get around this, you need to clear the cache files so that the new settings can be effected. Again, I will also show you how to do this.
6. App Is Outdated
Another common reason why YouTube TV may become blurry is if you have an outdated app on your streaming device (Smart TV, Amazon Fire stick, Roku stick, Chromecast, gaming console. Mac, Windows PC, Android phone or iPhone).
The way to fix this is quite obvious. Let’s continue.
7. Software Glitches
In some cases, there could be a software glitch that is causing YouTube TV stream to be blurry. In this case, you may also notice other apps on your streaming device having similar issues as well. Again, there is a way to get around this.
Now, let’s look at some practical and easy ways to fix the blurry YouTube TV stream issue.
YouTube TV Blurry: X Quick Fixes
To fix YouTube TV blurry stream issue, manually set the Perceptual Quantizer (PQ) to HDR, power cycle your network router and streaming device, update DNS record to Google DNS, update YouTube TV app and streaming device’s software, clear cache files and try ethernet cables.
Now, let me show you how to do each of these, one after the other.
1. Manually Set PQ to HDR
The first way to fix a blurry YouTube TV stream is to remove the Perceptual Quantizer (PQ) setting from ‘auto’ and set it to HD resolution.
That way, the ‘auto’ does not automatically drop the quality of the stream to SD resolution even when you have a fast internet.
Here’s how to do that:
- Open YouTube TV, select a channel and play
- On the media player screen, click ‘More’ and select ‘Quality’. You may also see an ‘HD icon’, click on it, select ‘Resolution’.
- Select an HDR video quality among the options (or 4K if you have the option)
You can do this on your smart TV, streaming stick, mobile device or PC.
If you can’t find the resolution button on the media player screen, try to pause the video so that the options at the bottom of the screen shows.
Once done, you should now have an high quality stream on YouTube TV.
However, you may have to do this for every channel when you switch channels. Alternatively, you may try to change the video quality permanently across your profile. To do that, open YouTube TV, click on your profile picture, select ‘Settings’, click on ‘Video quality preference’ and select video quality if available.
2. Power Cycle Your Device and Router
Power cycling your streaming device can help you quickly fix issues related to software glitches of corrupt cache files lurking around on your device.
I mentioned it in the previous section that you may switch the PQ setting from ‘auto’ to HDR and still have it revert back to SDR due to cache files or software glitches.
A simple power cycle can help you fix that and even software other issues that may be causing YouTube TV stream to be blurry or fuzzy.
The same thing applies to network related issues which may be fixed by simply restarting your network router.
Here’s how to do that:
- Power off your streaming device and network router
- Unplug them from the power outlet
- Wait for 30 seconds
- Plug them back into the power outlet and turn them back on
- If you are on your mobile device or PC, shut them down and restart them after waiting for 30 seconds.
Now, try streaming YouTube TV again.
NOTE: Make sure that the PQ setting has not been reverted to ‘auto’ after restarting your device. If it has, switch it back to HDR quality as show earlier. Then, look for the part where I show you how to clear cache on your devices later in this guide and follow that.
3. Update DNS Record
Another way to fix YouTube TV blurry stream issue is to change your DNS server in network settings. In this case, you need to switch the primary and secondary DNS servers to Google’s IP addresses or Cloudflare’s IP address.
You can do this directly on your router, on your computer or phone. In most cases, changing your DNS server on the router will do the trick. However, if it doesn’t or you are not connected to a router, then you need to change it directly on your computer or phone.
Therefore, I will show you how to do it on network router, Windows PC, MacOS PC, Samsung TV, LG TV, Apple TV, Fire TV, Vizio TV, Android phone and iPhone in that order.
What’s important is that once your change the DNS server, you should restart your network router and/or streaming device (smart TV, streaming stick, mobile phone or PC) so that the new DNS record is used.
Also, you have 2 options to pick from:
- Google’s DNS server: 8.8.8.8 and 8.8.4.4
- Cloudflare DNS: 1.1.1.1 and 1.0.0.1
While I personally prefer to use Google’s DNS (especially in this case since Google also owns YouTube TV), some users have been able to fix this blurry stream issue using Cloudflare’s DNS as well.
Now, let’s start with changing DNS server on network router.
Changing DNS Server on Router:
While connected to your network router, access your router dashboard by visiting the login URL. You can find this on the router manual or on your router. Some of the links can be found below:
- Linksys – http://192.168.1.1
- D-Link/Netgear – http://192.168.0.1
- Belkin – http://192.168.2.1
- ASUS – http://192.168.1.1/
- AT&T U-verse – http://192.168.1.254
- Comcast – http://10.0.0.1
Depending on the manufacturer of the router, look for DNS settings on the web interface. If you are having trouble finding the DNS server settings, check the router’s manual or search on Google for how to change DNS server for your router’s brand.
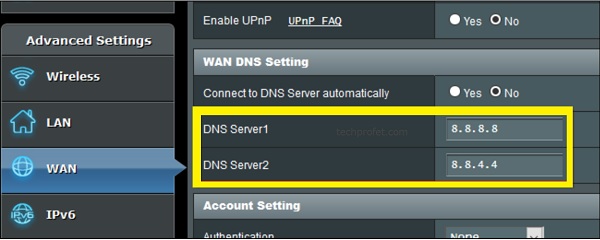
- Under DNS server 1 (or primary DNS), input 8.8.8.8
- Under DNS server 2 (or secondary DNS), input 8.8.4.4
- If there are options to input DNS server 3 and 4, leave them empty
- Save the settings
- Now, restart your network router and streaming device
Once done, try streaming YouTube TV again and you should no longer see a blurry or fuzzy stream.
Changing DNS Server on Windows PC:
- Go to Control Panel > View network status and task
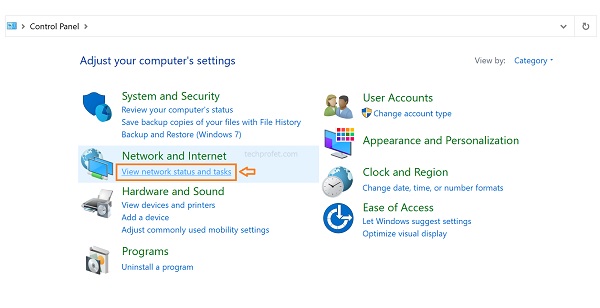
- Click on the connected network
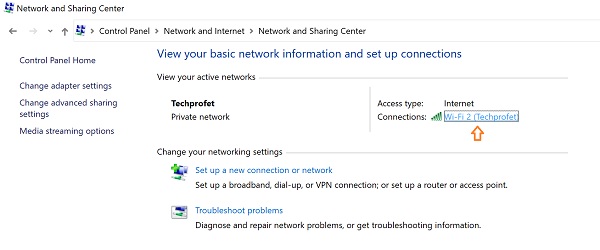
- Select ‘Properties’
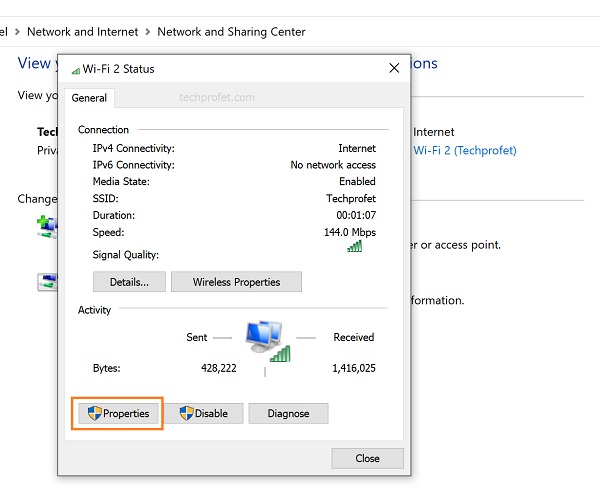
- Double click on ‘Internet Protocol Version 4 (TCP/IPv4)’
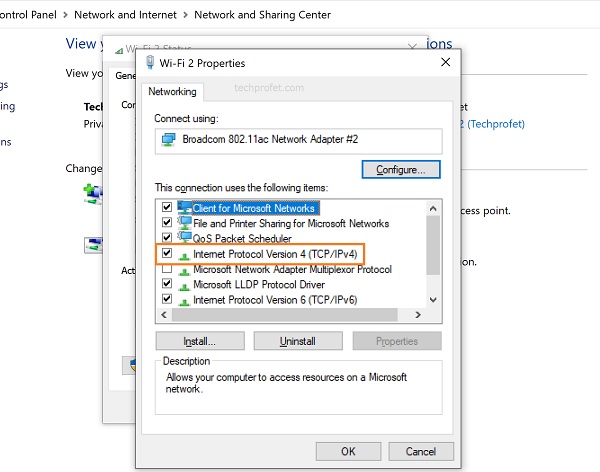
- Now, tick the box that shows ‘use the following DNS server addresses’. Next, enter 8.8.8.8 under ‘Preferred DNS server’, and 8.8.4.4 under ‘Alternative DNS server’
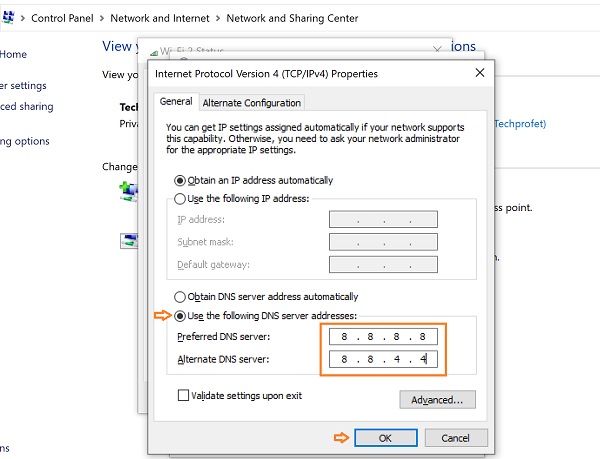
- Click on ‘OK’ to save it.
- Now, restart your PC.
Once done, try streaming YouTube TV again and you should have HDR stream.
Changing DNS Server on Mac OS:
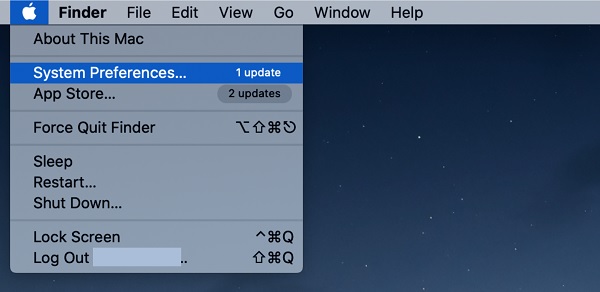
- To change DNS server on your Mac, go to Apple menu > System Preferences
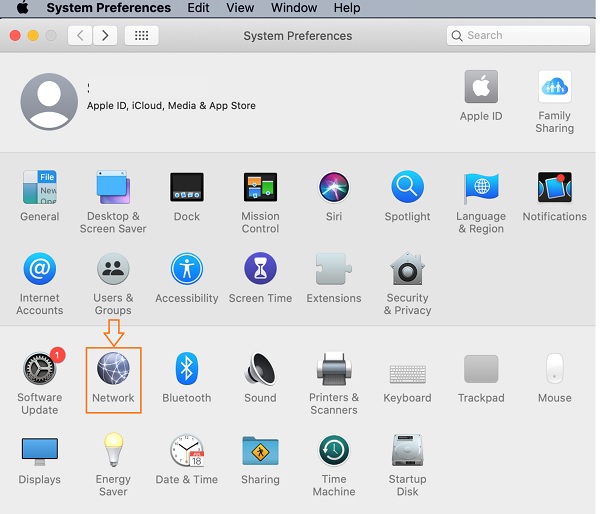
- Click on Network
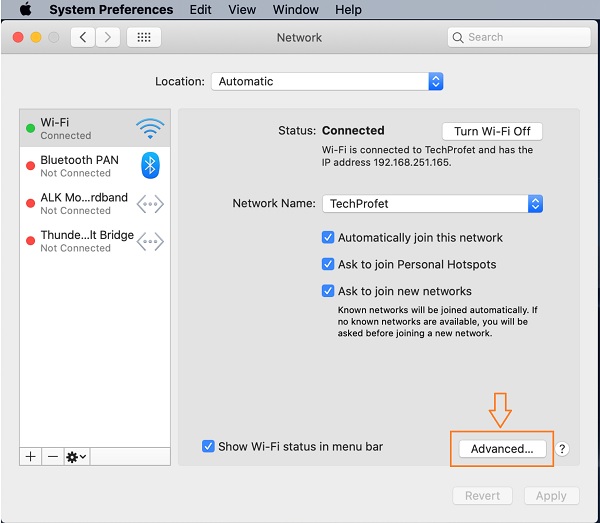
- Select the network service you are connected to in the list, then click on ‘Advanced’
- Switch to the DNS tab.

- If there’s a lock at the bottom left of the Network pane, click it to unlock the preference pane.
- Click the Add button at the bottom of the DNS servers list. Enter 8.8.8.8 on the first line and 8.8.4.4 on the second line.
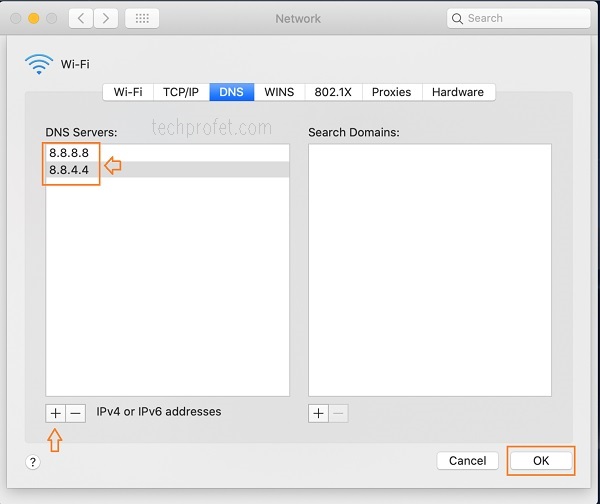
- Click on ‘OK’ button, then ‘Apply’

Changing DNS Server on Samsung TV:
- Go to Settings with your Samsung TV remote controller.
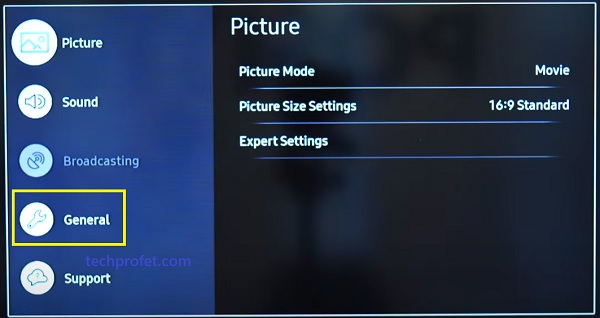
- From the settings page, click on the General tab
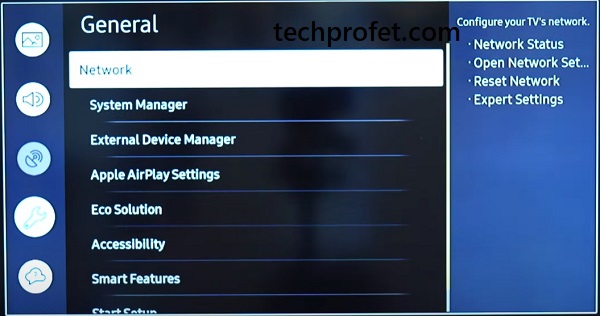
- Click on Network
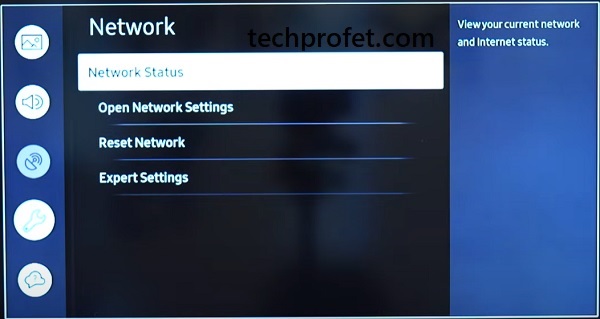
- Next, select Network Status
- Under your connected network, click on IP Settings
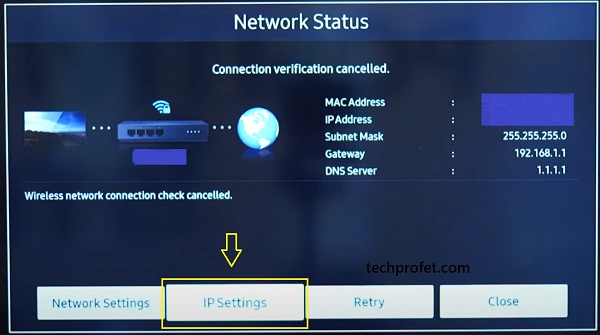
- Select the option to set DNS manually
- Finally, edit the DNS Server and change it to 8.8.8.8

- Finally, click on OK button
- Wait for it to be reconnected to the new DNS server and then restart your smart TV.
Changing DNS Server on LG Smart TV:
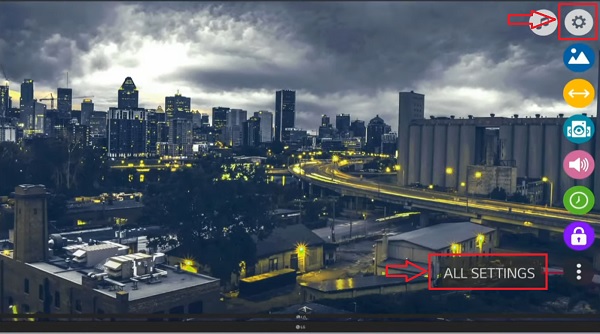
- Press the Home/Start button on your LG TV remote to show the launcher bar
- Click the Settings icon at the top right corner
- Click All Settings option at the bottom right corner
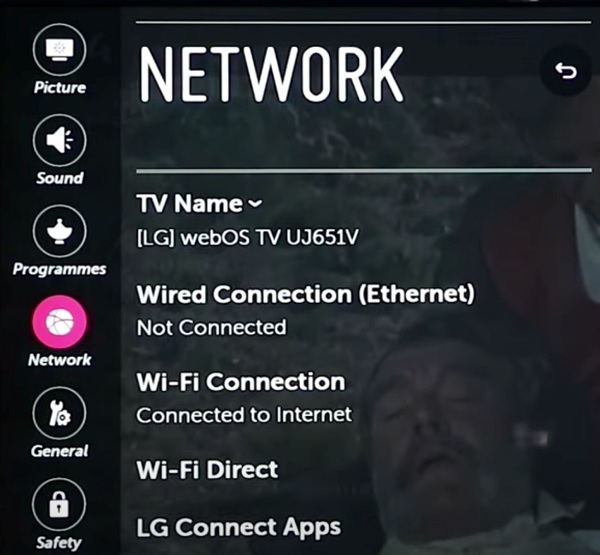
- Click on Network from the left bar options
- Select any of the networks that you are currently connected to (either wireless Wi-Fi network or wired ethernet network). The network must be showing connected to the internet at this point.
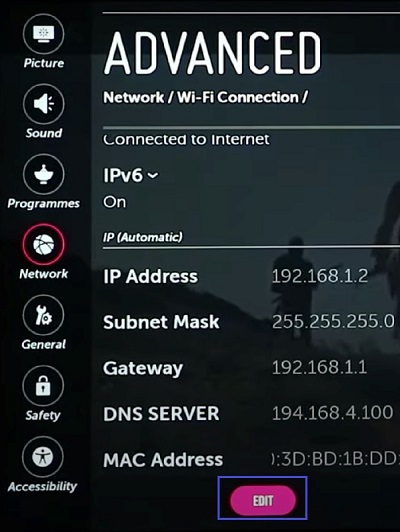
- Now, we will edit the network settings.
- Uncheck the option that says Set Automatically
- Then, edit the DNS Server and change it to 8.8.8.8
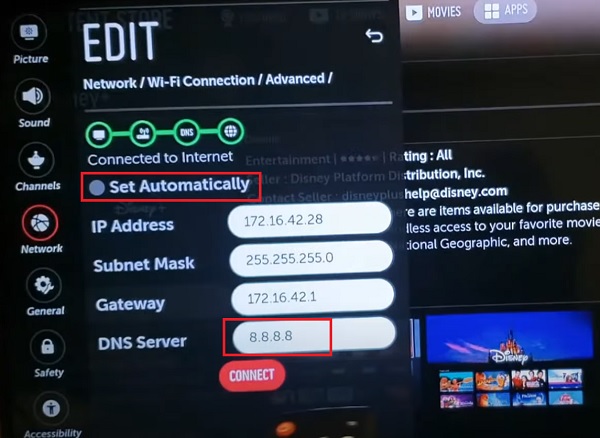
- Click on Connect
Wait for it to be reconnected to the new DNS server and then restart your smart TV.
Changing DNS Server on Apple TV:
- From the Apple TV main menu, select “Settings”
- Go to General > Network
- Select “Ethernet” or your Wi-Fi network, depending on which you are connected to.
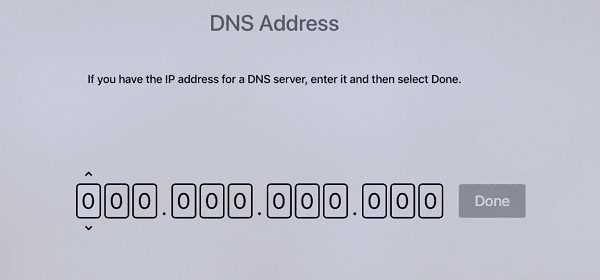
- Select “Configure DNS” and choose “Manual”
- Now, change the DNS addresses to 8.8.8.8
- Restart your TV and open YouTube TV again
Changing DNS Server on Fire TV:
- Go to Settings > My Fire TV > About > Network and take a picture of all the current settings or write it down (you will need the values later)
- Now, go to Settings > Network and select your Wi-Fi network
- Click the menu button (☰) on the remote to forget this network
- Click on the connection again and enter your network password (SSID). Instead of clicking connect, click on ‘Advanced’.
- Enter the “IP address” and “Gateway” values you had screenshot or noted down in the first step
- For “Subnet Mask” there can be a few options: enter 24 if the Subnet Mask value you noted in Step 1 was 255.255.255.0, or 32 if the “Subnet Mask” value was 255.255.255.255. Click on “Next”
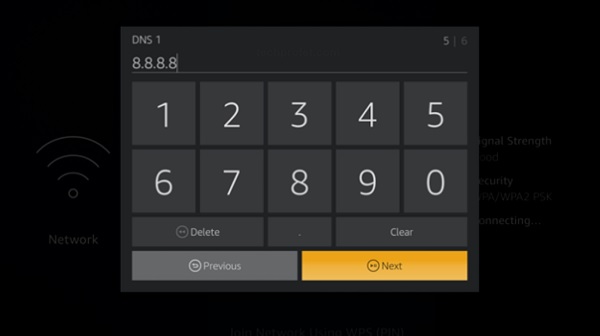
- Enter 8.8.8.8 as DNS 1 and 8.8.4.4 as DNS 2
- Save the settings
- Now, restart your Fire TV, make sure it’s connected to the same network and open YouTube TV app again.
Changing DNS Server on Vizio TV:
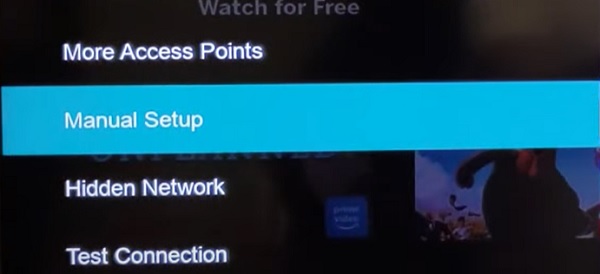
- Click on the Menu button on your TV remote and go to Network > Manual Setup.
- Under Pref. DNS server, enter 8.8.8.8
- Under Alt. DNS server, enter 8.8.4.4
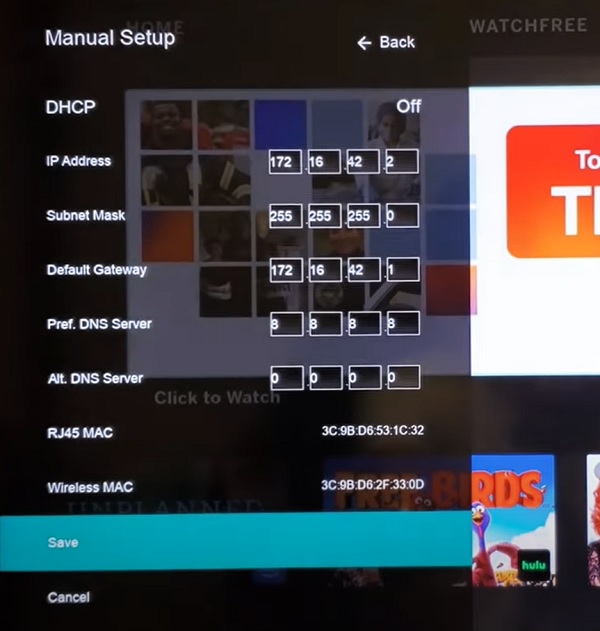
- Click on ‘Save’ check the network connection again.
Also, you can do the same thing on your Android or iPhone.
Once done, remember to restart your network router and/or streaming device before trying to access YouTube TV again. That should fix the streaming issue for you immediately.
4. Check Internet Connection Speed
Slow internet connection or an inconsistent connection can impact streaming and cause you to have a blurry YouTube TV stream.
For the best HD streaming experience, you should have at least 7 Mbps if you are only streaming one HD video and there are no other devices using your network at the same time.
However, if you have other devices on the same network and still want to stream HD videos reliable, you should have at least 13 Mbps.
For 4K stream, you should have at least 25 Mbps.
With these in mind, you need to check your internet speed to see if it’s actually fast enough to stream YouTube TV channels at the resolution that you want.
You can do that by simply visiting fast.com to run the speed test.
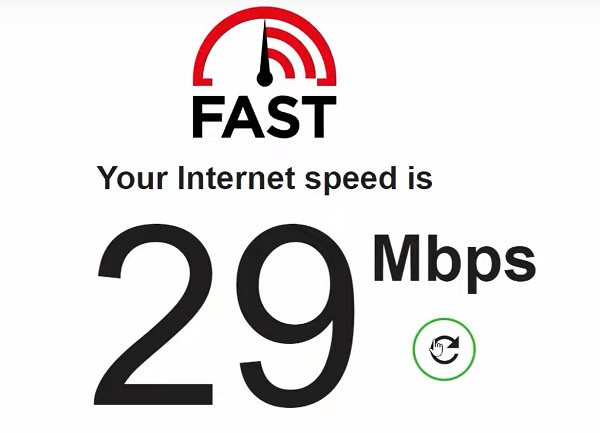
If your network speed is fast enough, then move to the next step. Otherwise, YouTube TV will drop the resolution to a lower quality if the PQ is set to ‘auto’ or you may experience buffering issues if you force it to an HDR quality.
In that case, here are a few things you can do:
- Restart your network router
- Switch to a faster network connection
- Use a dual-band router, and switch to the 5.0GHz band
5. Clear YouTube TV Cache on Streaming Device
Cache files build up and are stored as you use apps installed on your streaming devices. The longer you use them, the larger these cache files become.
In some cases, these cache files become corrupt and affect the performance of the apps on your smart TV. They can also cause pixelations.
In fact, it is recommended that you clear app cache files regularly for optimum performance.
To do that, you simply need to go to Application settings on your device, select the application (YouTube TV), and clear the cache and/or data.
Let me show you how to clear YouTube TV cache files on your Samsung TV.
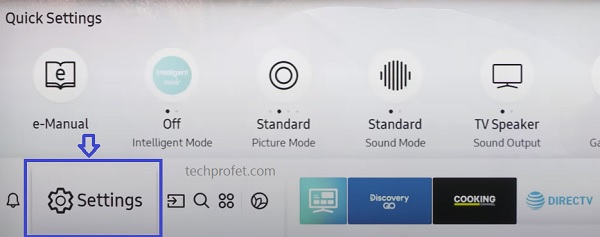
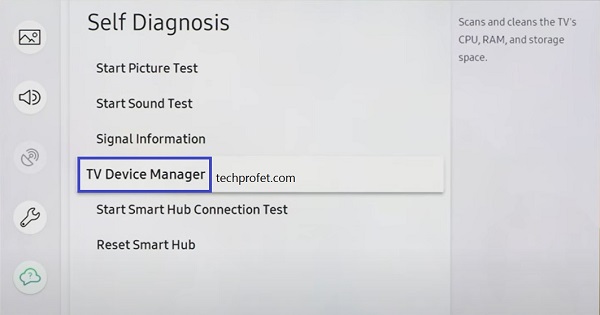
- Go to the settings by clicking on the settings button on your remote controller or the settings icon on the home screen
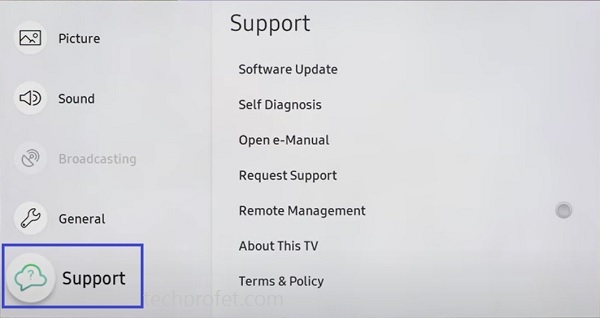
- Click on the ‘Support’ tab
- Select ‘Self Diagnosis’ tab
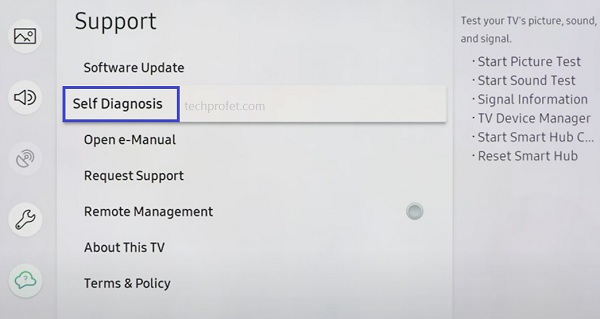
- Click on ‘TV device manager’
- On the next page, click on ‘Clean Now’ buttons under ‘Memory Boost’ and ‘Clear Running Apps’
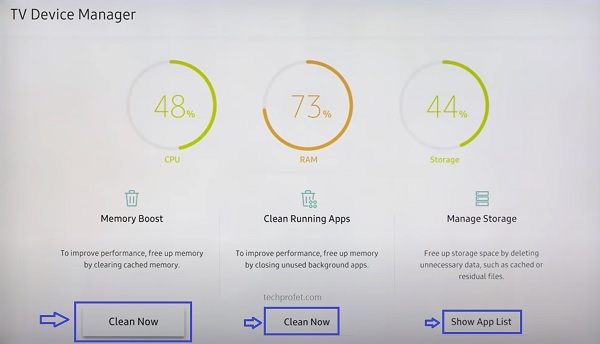
- Once cleaned, click on ‘Show App List’ under ‘Manage storage’
- On the next page, scroll through the app list until you find HBO Max, click on ‘View details’ under the app.
- Finally, click on ‘Clear Cache’ and ‘Clear Data’
In some other Samsung TV models, you can find this page by going to Settings > Support > Device Care > Manage Storage.
Although the interfaces will be different, you can follow a similar procedure for other smart TV brands, your PC or streaming sticks.
You can always check how to do that online for whichever streaming device you have.
Once done, open YouTube TV app, sign in with your account details again and you shouldn’t have any issues with blurry streams again! (unless you have a slow network or any of the other issues address already or the ones I am about to address).
6. Update YouTube TV App
Like many software apps, Disney Plus app becomes outdated with time and the team releases new versions usually with improvements while also fixing bugs in the older versions.
Once updated, you shouldn’t have any blurry stream issue on YouTube TV again. Alternatively, you can totally remove the YouTube TV app and re-install it afresh.
However, if it is a default app that cannot be removed on your streaming device, move to the next step.
7. Update Smart TV Software
Another way to fix streaming issues (especially caused by software glitches) is to update your streaming device – whether it’s your smart TV, streaming stick, or gaming console.
I will show you how to update the following OS softwares (in the order listed):
- Samsung TV’s tizenOS software
- LG TV’s webOS software
- Vizio SmartCast TV software
- FireOS (Firestick)
- Roku OS (Roku stick or Roku TV)
If you are on PC or mobile device, go to the settings and you should be able to update that easily.
Update Samsung TV (tizenOS):
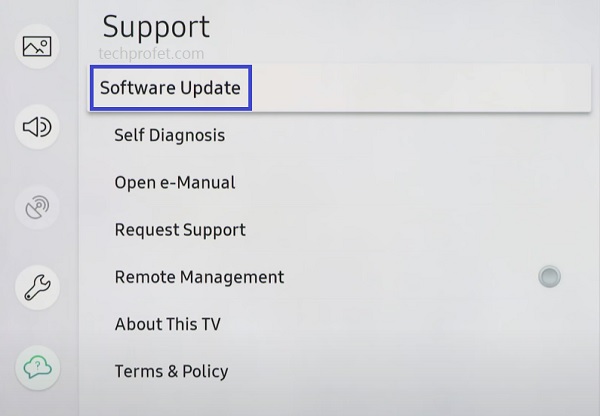
- Go to Settings, click on the Support tab and select Software Update.
- Click on ‘Update Now’.
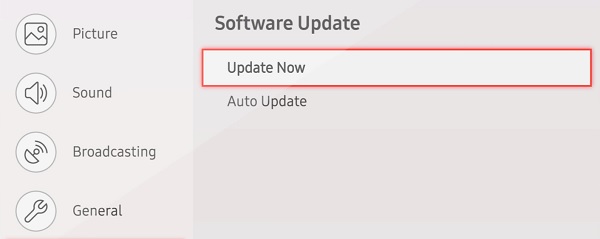
You can also update your Samsung TV manually using a USB drive.
Update LG TV (webOS):
- Press the Home button on your remote controller
- Click on the Settings icon from the top right corner, then click on the All Settings icon at the bottom right corner.
- Go to General tab, then scroll down to About This TV section and click on it
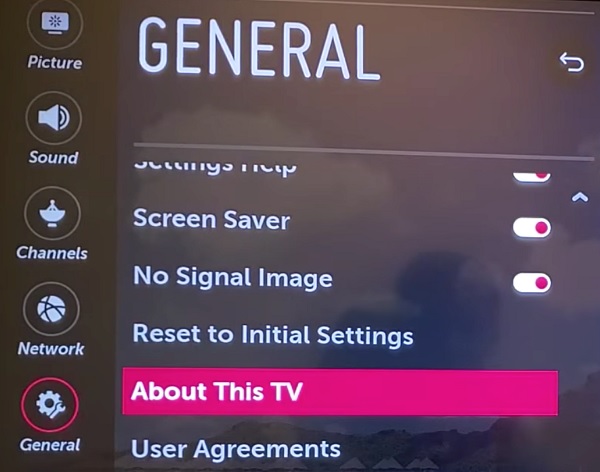
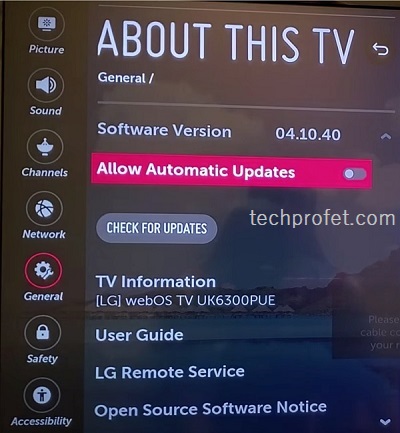
- You will see the current software version of your TV, click on Check for Updates (you can also enable ‘Allow Automatic Updates’)
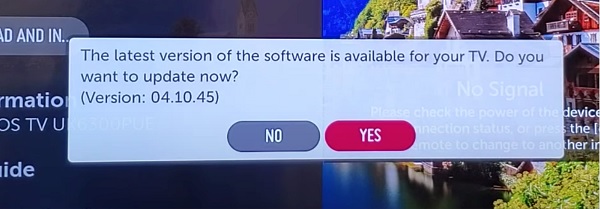
- If there is any update available, proceed to download it and allow it to be install completely.
- Once installed, your TV should reboot itself.
- Now, try to stream YouTube TV again and you shouldn’t have any issue.
Update Vizio SmartCast TV:
- Click on the Menu button on your Vizio TV remote
- Under TV settings, scroll down to ‘System’, select it.
- On the system settings menu, click on ‘Check for Updates’
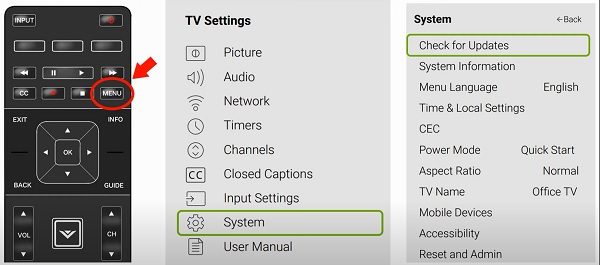
- If there is an available software, the TV will proceed to download and install it (as long as it is connected to the internet)
- Once done, the TV will reboot.
Update Firestick (Fire OS):
- Go to Settings > Device & Software
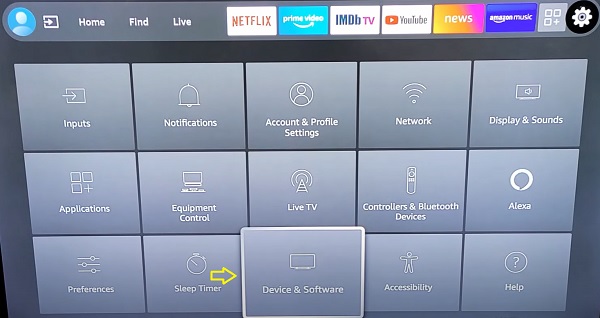
- Now, select About > Check for Updates
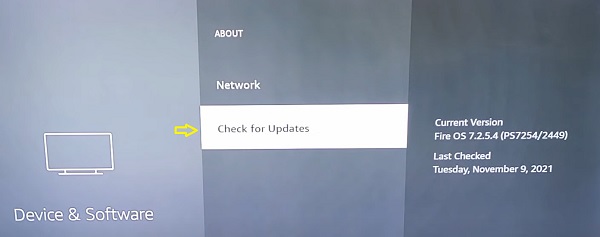
If there is available update for your Insignia Fire TV, the system update will begin and your TV will reboot once done.
Update Roku TV or Roku Stick (Roku OS):
- Click on the Home button on your Roku device remote
- Select Settings > System > System Update
- Click on Check Now to manually check for any update
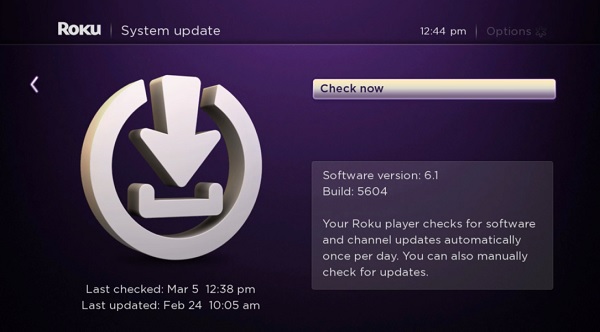
Once done, restart your TV (if it doesn’t automatically reboot itself after the update). Now, go ahead and open the YouTube TV app again and you should be good to go!
8. Switch to Ethernet Cable
If you still have a blurry YouTube TV stream, you may want to consider switching to an ethernet cable. Generally, you get a faster internet connection with hardwired connection compared to Wi-Fi.
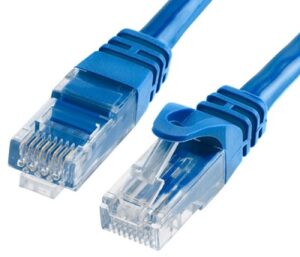
So, connect one end of an ethernet cable to your streaming device and the other to your network router. Set up the connection on your device via hardwire connection (ethernet) instead of Wi-Fi and try to stream YouTube TV after.
If the issue has anything to do with your network connection, using an ethernet cable will fix it quickly.
9. Upgrade to the 4K Subscription
YouTube TV has a subscription model with the 4K streaming option not being available to all base subscribers (only supports up to 1080p).
To get 4K, you need to sign up to YouTube TV 4K Plus upgrade which costs an additional $20 per month. In addition, you also get the option to download videos and also ability to stream videos on even more devices as the same time, as long as those devices are streaming from the same home area.
You can try upgrading to this to see if that fixes the issue by stream 4K contents instead. Again, you should know that the 4K stream option will only be available on channels that support 4K on YouTube TV.
Let me know which of these helped you fix the blurry YouTube TV stream issue in the comment section below.
FAQS
Why is YouTube TV blurry on my smart TV, phone or PC?
You may notice a blurry picture quality on YouTube TV if the internet connection is slow, streaming resolution is set to auto, the channel does not support 1080p, DNS server issue, corrupt cache files, outdated app or software, or software glitches.
How many YouTube TV streams are allowed at once?
You can use YouTube TV on up to three devices at the same time.
Why am I not seeing 1080p option on YouTube TV?
You may not see the 1080p option on YouTube TV if the channel does not support it (not all channels offer 1080p on YouTube TV).
Why am I not seeing 4K option on YouTube TV?
To get 4K streaming option on YouTube TV, you need to sign up to YouTube TV 4K Plus upgrade which costs more than the baseline subscription. However, even with 4K subscription, you will only be able to stream in 4K on channels that support it (not all YouTube TV channels support 4K).

Thank you! Fixed it!
Awesome overview! Clear, concise and easy to follow instructions even for a newbie like myself.
Thank you for your kind words!
Switched from auto to 1080 in the Perceptual Q. Seems to have fixed the problem of blurring and pixelating …may go to Ethernet cable for good measure..trying to figure out how to clear the cache files on my LG …but I’m very happy now thank you so much for the tips …awesome !
You are welcome Anna Marie, thanks for dropping a feedback.
Why should it be necessary to go through all this crap if you are paying $70 a month for a service? Shouldn’t they do it for you? Why are inferior resolutions available on the app in the first place? Just make it all 1080p and forget it.