Sony TV blinking red light is an indication of a system error. This applies to all Sony Bravia OLED and LED LCD TVs. In some cases, the red LED light flashes without picture and sound, and remains stuck in a reboot loop or standby mode. In other cases, the TV turns itself off with red light flashing and fails to turn back on.

In this guide, I am going to show you how to fix Sony TV with red flashing light. It doesn’t matter if it is flashing 3, 4, 5, 6 times or even more.
Contents
Why is My Sony TV Red Light Blinking?
If a red LED light is blinking on your Sony TV and it’s not working properly, it means that an error has been detected by the TV. The specific error usually depends on the number of times the light flashes before repeating again.
This can range from a simple software issue to minor hardware issue to much more technical hardware faults in the power supply board or main board, inline with the blinking red light codes. For example, if the light flashes 6 times, it’s likely to be a backlight issue, faulty main board, power supply board or inverter board.
Although the meaning of the blinking codes sometimes also vary with models, most of these issues can be fixed with the same set of procedures.
On this page, I am going to guide you through step-by-step troubleshooting procedures to fix the issue, starting with the easiest (but effective) methods.
With that said, let’s get into it.
How to Fix Sony TV Red Blinking Light
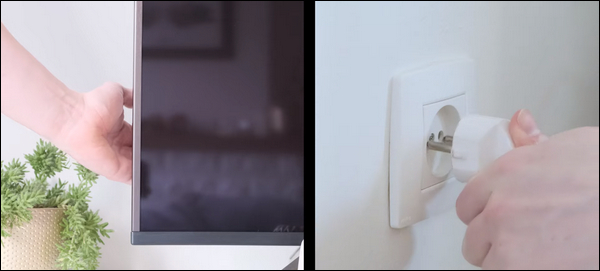
To fix a Sony TV with red flashing light, you need to power cycle it first. To do that, unplug your TV and wait for 60 seconds. While the TV is unplugged, press and hold the power button for 30 seconds. Then, plug your Sony TV back in and it should be fixed.
1. Power Cycle Your TV
You can fix Sony TV red flashing light issue by simply power cycling your TV, and that takes less than 2 minutes to do.
Here’s how to do that:
- Unplug your Sony TV from power outlet
- Leave it unplugged for 60 seconds
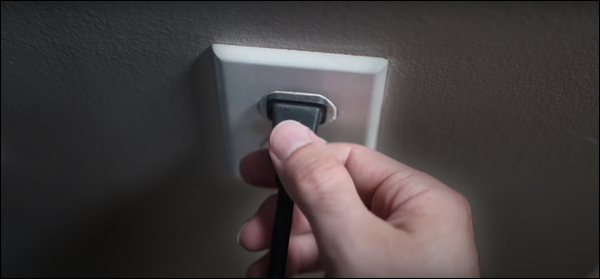
- While unplugged, press the power button on your TV for 30 seconds.
- Plug the TV back into the power source
The red light should stop blinking and your TV should start working normally.
NOTE: For a Sony projection TV that uses an internal lamp, wait 5 minutes after turning off the TV to allow the lamp to cool before plugging it back.

If that doesn’t work, check your power outlet.
If the TV is plugged into a power strip or surge protector, remove it and plug it directly into a wall outlet. If that resolves the issue, then the issue is coming from the power strip or surge protector and not the TV.
2. Perform a Forced Factory Reset
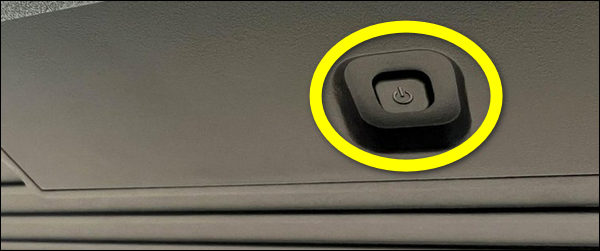
If your Sony TV won’t boot up and is blinking red light 3, 4, 5 or 6 times repeatedly, you can fix it quickly by resetting it. Since you can’t access the menu, you need to perform a forced factory reset first using the power and volume down button on the TV.
This works on Sony Bravia KDL TVs and other models with Android 6.0 Marshmallow or higher operating system installed. It also works on other Sony OLED and LCD models too.
Here’s what you need to do:
- Unplug your TV from the power outlet
- While unplugged, locate the power and volume down (Vol-) buttons on your TV (not on your remote). Depending on the Sony TV model, the buttons may be located on top of the TV, at the bottom or at the one of the sides. Also, if you have a model with only power button on your TV, hold the power button and continue with the same procedure.
- Once you find them, hold down the volume down (Vol-) and power button on the TV
- If your TV has 3 buttons, press and hold all of them at the same time.
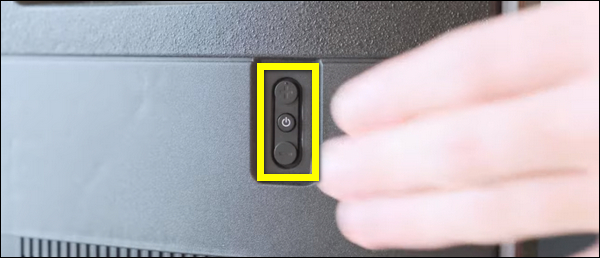
- While still holding the volume down button and power button, plug back the TV into a working power outlet
NOTE: Make sure you plug the TV into the power outlet while still holding both power and volume down buttons on the TV. If you can’t reach the wall outlet on your own while holding down the buttons, find someone to help you plug it in.
- Once plugged in, keep holding the buttons until the LED light turns green (or white in some models) which shows the reset is done. You may have to wait 15-60 seconds for the reset to be completed. Once done, you can release the buttons.

- If the reset was effective, the TV will restart itself, display the Sony and Android start-up animation screen/logos before and then show the BRAVIA initial setup screen.
- If the TV doesn’t turn back on automatically, press the power button to turn it back on.
NOTE: If this doesn’t work on the first try, repeat the whole procedure again. According to Sony, you may sometimes have to try this up to 5 times in some cases before the reset is successful. If it still doesn’t work after the 5th try, move to the next tip.
VERY IMPORTANT:
Once you are done with the forced factory data reset, you need to perform another reset immediately before doing any setup. If you fail to do this after the forced factory data reset, some applications and features on the TV may be lost.
- Hence, skip Google account sign-in, skip network setup and skip channel setup. You can set them up later. Instead, you need perform another factory reset from the TV menu this time around.
- To do this, press the HOME button on the remote controller. Then, go to Settings > Storage & reset > Factory data reset > Erase Everything > Yes.
For some other models, you will find the reset option under Settings > System > About > Reset. On other models, try Settings > Device Preferences > Reset.
Once the actual factory reset has now been done, go ahead and perform the setup at the welcome screen (tuning settings, Google account, network setup e.t.c)
And that’s it! You are good to go.
Your Sony TV should stop flashing red light now.
3. Reset Sony TV without Remote Controller
If your Sony TV is blinking red light, there is another way to reset your Sony TV using the remote controller even if you don’t have picture on your TV screen right now.
NOTE: This method of reset only works for projection, plasma, and non-Android LCD TVs only (HDTV). If you have an Android or Google TV model, use the method described earlier or move to the next tip.
That said, here’s how to go about this method of reset:
- Unplug your TV from the power outlet, and leave it unplugged for 60 seconds
- Now, plug it back in and the TV should turn on automatically. If it doesn’t, press the power button on the TV to turn it on
- Now, wait for 40-60 seconds for the TV to complete the startup
- Once done, press and hold the UP arrow button on your TV remote while pointing it at your TV
- While still holding the up arrow button, press and hold the POWER button on your TV until Reset appears on the screen. Depending on your TV, Reset may not appear on the screen.
- If you can’t press power button on the TV at the same time you are holding the up button on the remote (while the remote is being pointed at the TV), you can find someone to help you with one of the buttons
- Afterwards, the TV will turn off and then back on.
- Now, release the UP arrow button.
- If your TV remains off after the reset, press the POWER button to turn it on.
- The initial setup screen displays if the procedures were performed correctly. Follow the on-screen instructions to complete the initial setup.
Your Sony TV should have stopped blinking red light by now.
If the reset didn’t complete successfully, disconnect all devices from the TV, turn off or disable the network connection, then repeat the steps above.
4. Disconnect All Connected Devices
If you have devices that are connected to your Sony Bravia TV, then the issue could be from any of the devices. What you need to do here is simple.
- Turn off the TV
- Disconnect all connected devices from the TV

- With all devices disconnected, turn on the TV again and check whether red light is still blinking.
If it does not blink, the issue may be coming from the connected devices. However, if still blinks, move to the next step.
5. Check For Software Update
This is also applicable if you have access to the system menu on your TV (that is, you have picture on your TV screen but the red light is still flashing anyway). In that case, you need to check and update the firmware to the latest version.
If your TV won’t even show any picture for you to check for any available software update, move to the next tip.
Here’s how to update your Sony Bravia TV software:
- First, make sure your Sony TV is connected to the internet
- Go to Settings > Device Preferences > About > System Update

- Next, click on Software update

Your TV will proceed to check for updates. If you don’t have the latest one, it will then proceed to download the new update. Once done, your TV will reboot.
If that fixes the issue for you , great. Otherwise, if the red light is still flashing on your Sony TV or you can’t even update it because there’s no picture, then you need to check the backlight.
6. Warm Up TV through the Vent
If your TV is not turned on for many weeks or even months, the capacitor may start to discharge or even change capacitance. The normal way to fix it will be to change the whole board, which is quite costly.
The good news?
You can fix it in just 1 minute without even splitting your TV open or paying so much money to an expert!
All you need in this case is an hot air blower (like heat gun or hair dryer).
I will show you what you need to do and why this tricks works.
First, let’s look at how to do it.
- With your TV turned on with red light on (or while it keeps restarting), aim the hot air blower at the TV opening/vent (usually under the TV, and sometimes at the back or sides of the TV) for 30 to 60 seconds.
- Now, go ahead and power off the TV, then turn it back on.
And here’s why it works:
Other than what I explained earlier about capacitors, most components on the board are quite sensitive to cold environment. Routine use of your TV can help keep these components warm every now and then.
When not used for a long time or exposed to cold weather, these components start to suffer. Most capacitors for example suffer from this for sure.
This is why heating it up gets it to work again.
However, this process is sometimes just a temporary fix, and the best thing will be to change the faulty or discharged capacitors. I will show you how to do that later.
7. Replace Bad LED Strips
The TV’s backlight is the source of light that illuminates the screen and provide the necessary illumination for the pixels to produce the visuals, which makes it possible for you to see the images on the LCD TV screen.
It’s very common for backlight failure to cause Sony TV to blink red light 4 times.
Also, after a few months (or even a year) of grounding the backlight error wire as shown earlier, the LED strips will likely fail completely and the only way to fix and use the TV will be to replace the strips.
Therefore, you should check the backlight of your Sony TV for faults.
- To achieve the best results and be able to see any backlight defects clearly, ensure that the room in which your TV is located is completely dark.
- Turn on the TV and closely shine a flashlight on the TV’s screen and check to see if any images can be seen through. If you see a dark image, this indicates a backlight failure.


- Next, look for any signs of light bleeding from the edges of the screen. If you see any, that’s an indicator of a backlight failure.

- Don’t forget to also look for any dark patches or areas that appear dimmer compared to the rest of the screen.

NOTE: Not seeing any of the signs above does not necessarily rule out an issue with the backlight. What you can do to confirm is to open the TV, disconnect the backlight from the main board, plug the TV back in (while still open) and see if it’s still blinking red light.
If the issue persists despite unplugging the backlight, then you know it’s not an issue with the backlight (which likely indicates a fault in the main board or LED panel).
However, if your Sony TV stops blinking red light when the backlight is unplugged (even though you don’t expect to see a picture), you at least know the issue is confirmed to be from the backlight.
If you detect any signs of backlight defects or malfunctions, you need to replace the LED strips. If you don’t know how to do this, you can seek help from a TV repair service.

Once the backlight strips are replaced, your Sony TV should stop blinking red light 4 times and should turn on with images on screen.
Another way to check for faulty backlight is to actually disassemble the TV and test the backlight strips. Here’s how to do that:
- Open up the TV and test the lamps in the panel. You can use a 3V power source (2 AA batteries) to test each lamp one at a time. Once you find faulty ones, replace them. This will take you more time since you have to test each lamp and replace faulty ones.
- While it’s much cheaper to replace individual LEDs, the issue may happen again since this could indicate a bad batch.
- Your best bet is to replace the entire LED strip which is not only easier but also a better solution.
Here’s a video showing the process:
Once done, your Sony TV should stop flashing red light and should start working fine.
8. Replace Faulty Capacitors
If one or more capacitors on the board is faulty, it can cause your Sony TV to keep flashing red light and not show any picture. In that case, you need to remove and replace the faulty capacitors. To do this, you need to open up the back of the TV.
NOTE: I will advise that you take some pictures of your TV board before you tamper with anything. This will help you during re-assembly.
If a capacitor is faulty, some of the signs you might see include:
- The capacitor is bulging at the top
- The capacitor is leaking
- Corrosive layer on one or both legs of the capacitor
- Bottom bung of the capacitor is pushed out

NOTE: The capacitor may be faulty and not show any visual sign. Hence, the most accurate way to check in such case will be to use a multimeter to check the voltage, and compare it to the expected/labelled voltage of the capacitors. If you see a wrong voltage reading on the multimeter, then it is faulty even if there is no visual sign.
Once you see any of the above visible signs on the capacitor, then you need to remove and replace such capacitor.
To remove the faulty capacitor:
- Carefully take note of the pin on the board that the capacitor is attached. You should do the removal with a soldering iron (do not force pull it out)
- With the heated soldering iron, carefully apply pressure from the back of the board on the pin for the faulty capacitor until it melts.
- Then, you can go ahead and remove it.
While replacing the capacitor, you should know the following:
- The new capacitor must be placed in exactly the same direction as the old damaged one (this is why I advised taking some pictures of your board before removing anything earlier).
- Ideally, you should replace the capacitor with a new one that matches the ratings (Voltage, Temperature and Micro farads). In case where you can’t get the exact value for the 3 ratings, you can get one that has voltage and temperature that is higher that that of the old capacitor but not lower. The micro farad can also be slightly higher, but not lower.
Once you have gotten the new capacitors, replace the old faulty one you removed using a soldering iron.
Remember: The capacitors need to be placed exactly how the old one was placed.
Once that’s done, cover up the TV and turn it on.
Now, your Sony TV should turn on and stop blinking red light.
9. Replace the Regulator IC
The IC regulator on the main board maintains the voltage in and out of the board at a constant value, making it stable.
If there’s a fault with this, causing the voltage to be less than what is required, then your Sony TV might keep blinking red light 4 times without turning on.

In that case, you simply need to change the regulator IC on the main board, and you are good to go.

Here’s a video showing the process:
10. Inspect the Power Supply & Main Boards
Another thing you can do is inspect for visible damages in the power supply and main boards. Look for visible faults like:
- Faulty capacitors
- Blown fuses
Ideally, you should replace any faulty capacitor with a new one that matches the ratings (Voltage, Temperature and Micro farads). In case where you can’t get the exact value for the 3 ratings, you can get one that has voltage and temperature that is higher that that of the old capacitor but not lower. The micro farad can also be slightly higher, but not lower.
If there are no faulty capacitors, then replace the whole power supply board on the TV. Otherwise, replace the main board.
More importantly, make sure you get the exact power supply board for your TV model.
Once done, your Sony TV should stop blinking red light.
Depending on the cost of the getting these boards, your best bet might just be to get another TV.
11. Contact Sony
If a Red LED is blinking, try the troubleshooting procedures explained above. If the procedures do not solve the issue and the Red LED is still blinking, check how many times it blinks and then contact support.
If you have warranty, you can request for a fix under warranty at no cost. Otherwise, you may only be left with the option of buying a new TV.
You can contact Sony customer support here.
You can reach a support agent via call or text via 416-216-5607 during their hours of operation (Monday-Friday: 9:00 am – 9:00 pm ET, Saturday – Sunday: 10:00 am – 8:00 pm ET).

If you request for a warranty fix, you will be asked to check the number of times the red light blinks on your TV to know what specific error the TV is giving on based on the Sony TV blinking red light codes.
Sony TV Blinking Red Light Codes
Below is a table showing the number of flashes in Sony TV and what they mean:
| Number of flashes | Error |
| Red light flashes once | Not used for troubleshooting |
| Red light flashes 2 times | Faulty power board |
| Red light flashes 3 times | Bad main logic board or Power board |
| Red light flashes 4 times | Fault from power board, LED driver board, backlight or LED panel. |
| Red light flashes 5 times | T-Con board issue, Bad LCD panel connection or internal LCD short |
| Red light flashes 6 times | Backlight error or faulty inverter board |
| Red light flashes 7 times | Main board overheating |
| Red light flashes 8 times | Main board fault |
| Red light flashes 9 times | Unknown error |
| Red light flashes 10 times | Unknown error |
| Red light flashes 11 times | Trident IC or bad main board |
| Red light flashes 12 times | T-con error, bad T-con board or bad LCD panel |
| Red light flashes 13 times | Backlight balance error, bad LCD panel or inverter board |
| Red light flashes 14 times | HFR error, bad T-con or bad LCD panel |
With this, you can further narrow down the issue depending on the number of times the red light flashes on your Sony TV.
Bottom Line
Sony TV blinking red light is a very common issue. The red light is an indication of an error that needs to be fixed on the TV.
Depending on the number of times the red light flashes, there are a number of proven ways to fix the issue as explained in this guide. These fixes are listed below:
- Power cycle the TV
- Perform a forced factory reset on Sony Bravia Android TV. Alternatively, you can reset with remote controller on non-Android LCD TV models.
- Disconnect all connected devices, and reboot the TV
- Update TV to the latest firmware
- Warm up the TV through the vent for 60 seconds using hot air blower
- Check if backlight if defective
- Check and replace faulty capacitors
- Inspect the power supply and main boards
- Contact Sony for technical support
If you found this guide helpful, kindly use the comment section below. Also, let me know which of these methods fixed the issue for you.
My 3 year old sony TV flashed 6 times (this is how I found this article), and method 1 and 2 fixed it! Thanks so much for saving me the time and $$ with such simple DIY fix.
Glad to hear that.
The recommended fix works, thank you so much for saving me the trouble and $$!
IF you get 4 blinks on a Sony TV, GO SHOPPING and next time buy the 5 year extended warranty. Let the Insurance Company write you a check for what you paid.
You are an internet star mate. Dave
Thanks for the kind words Dave.