Are you experiencing the dreaded issue where Sony TV is blinking red light 3 times? If yes, you are not alone.
This is a common issue that many Sony TV owners face especially on Sony Bravia KDL models, and the good news is that it’s often fixable.

In this blog post, I will discuss some of the reasons behind the blinking standby red light, what it means for your TV, and most importantly, how to fix it.
Without any further ado, let’s dive right in!
Sony TV Blinking Red Light 3 Times
According to the Sony TV blinking codes, the standby light blinking red 3 times indicates either a bad main logic board or the power board.
However, before you go ahead and try replacing any of those, there are some proven fixes you could try first.
If none of those works for you, then you need to replace the main board or power supply board.
Let’s look at those initial troubleshooting methods first.
1. Power Cycle Your TV
Sometimes, a software glitch may be responsible for the blinking red light you are experiencing on your Sony TV.
The quickest way to resolve this is to actually power cycle your TV (also known as a soft reset).
Here’s how to do that:
- Unplug your Sony TV from power outlet

- Leave it unplugged for 60 seconds
- While unplugged, press the power button on your TV for 30 seconds.
- Plug the TV back into the power source
The red light should stop blinking and your TV should start working normally.
If your Sony TV continues to blink red light 3 times, then check the power outlet. If the TV is plugged into a power strip or surge protector, remove it and plug it directly into a functional wall outlet.
If that resolves the issue, then the issue is coming from the power strip or surge protector and not the TV. Otherwise, move on to the next step.
NOTE: For a Sony projection TV that uses an internal lamp, wait 5 minutes after turning off the TV to allow the lamp to cool before plugging it back.
2. Perform a Forced Factory Reset
If your Sony TV is blinking red light 3 times repeatedly, you may also be able to fix it quickly by hard resetting it.
In some cases, the TV will turn on for some time. In other cases, the TV many not even turn on at all.
I’m going to assume the worst (that is, your TV is not coming on at all), in which case the only way to reset it is to use the buttons on the TV.
This works on Sony Bravia KDL TVs and other models with Android 6.0 Marshmallow or higher operating system installed. It also works on other Sony OLED and LCD models too.
Here’s what you need to do:
- Unplug your TV from the power outlet
- While unplugged, locate the power and volume down (Vol-) buttons on your TV (not on your remote). Depending on the Sony TV model, the buttons may be located on top of the TV, at the bottom or at the one of the sides. Also, if you have a model with only power button on your TV, hold the power button and continue with the same procedure.
- Once you find them, hold down the volume down (Vol-) and power button on the TV
- While still holding the volume down button and power button, plug back the TV into a working power outlet
NOTE: Make sure you plug the TV into the power outlet while still holding both power and volume down buttons on the TV. If you can’t reach the wall outlet on your own while holding down the buttons, find someone to help you plug it in.

- Once plugged in, keep holding the buttons until the LED light turns green (or white in some models) which shows the reset is done. You may have to wait 15-60 seconds for the reset to be completed. Once done, you can release the buttons.
- If the reset was effective, the TV will restart itself, display the Sony and Android start-up animation screen/logos before and then show the BRAVIA initial setup screen.
- If the TV doesn’t turn back on automatically, press the power button to turn it back on.
NOTE: If this doesn’t work on the first try, repeat the whole procedure again. According to Sony, you may sometimes have to try this up to 5 times in some cases before the reset is successful. If it still doesn’t work after the 5th try, move to the next tip.
VERY IMPORTANT:
Once you are done with the forced factory data reset, you need to perform another reset immediately before doing any setup. If you fail to do this after the forced factory data reset, some applications and features on the TV may be lost.
- Hence, skip Google account sign-in, skip network setup and skip channel setup. You can set them up later. Instead, you need perform another factory reset from the TV menu this time around.
- To do this, press the HOME button on the remote controller. Then, go to Settings > Storage & reset > Factory data reset > Erase Everything > Yes.
For some other models, you will find the reset option under Settings > System > About > Reset. On other models, try Settings > Device Preferences > Reset.
Once the actual factory reset has now been done, go ahead and perform the setup at the welcome screen (tuning settings, Google account, network setup e.t.c)
And that’s it! Your Sony TV should stop blinking red light 3 times now.
Otherwise, try the next fix.
3. Warm Up TV through the Vent
The capacitors or the integrated circuit (IC) on your Sony TV main board may be faulty. If your TV has not been turned on for weeks or even months, the capacitors may also start to discharge or even change capacitance.
The normal way to fix it will be to change the whole board.
However, there’s a quick method you can use to fix the issue without even opening up your TV.
All you need in this case is an hot air blower (like an hair dryer).
Here’s what you need to do:
- While the TV turned on and flashing red light, aim the hot air blower at the TV opening/vent (usually under the TV, and sometimes at the back or sides of the TV) for 30 to 60 seconds.
- Now, go ahead and power off the TV, then turn it back on. Your TV should stop blinking red light 3 times.
And here’s why this method works:
Most components on the board are quite sensitive to cold environment. Routine use of your TV can help keep these components warm every now and then.
When not used for a long time or exposed to cold weather, these components start to suffer. Most capacitors for example suffer from this for sure.
This is why heating it up gets it to work again.
However, this process is sometimes just a temporary fix, and the best thing will be to change the faulty or discharged capacitors as shown in the next step.
Also, in some cases, the capacitor may be some damaged that heating it up doesn’t even fix it temporarily at all.
4. Replace Faulty Capacitors
Sometimes, instead of replacing the whole main board or power supply board when your Sony TV keeps blinking red light 3 times, you might only need to inspect for faulty capacitors and replace those appropriately.

To do this, you obviously need to open up the back of the TV.
NOTE: I will advise that you take some pictures of your TV board before you tamper with anything. This will help you during re-assembly.
If a capacitor is faulty, some of the signs you might see include:
- The capacitor is bulging at the top
- The capacitor is leaking
- Corrosive layer on one or both legs of the capacitor
- Bottom bung of the capacitor is pushed out
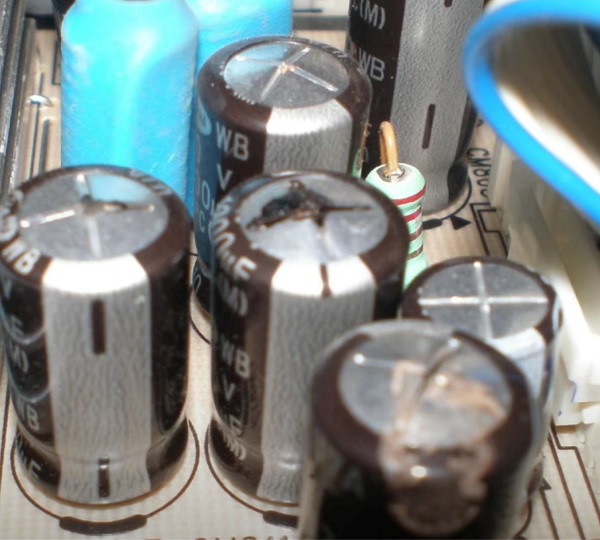
NOTE: The capacitor may be faulty and not show any visual sign. Hence, the most accurate way to check in such case will be to use a multimeter to check the voltage, and compare it to the expected/labelled voltage of the capacitors. If you see a wrong voltage reading on the multimeter, then it is faulty even if there is no visual sign.
Once you see any of the above visible signs on the capacitor, then you need to remove and replace such capacitor.
To remove the faulty capacitor:
- Carefully take note of the pin on the board that the capacitor is attached. You should do the removal with a soldering iron (do not force pull it out)
- With the heated soldering iron, carefully apply pressure from the back of the board on the pin for the faulty capacitor until it melts.
- Then, you can go ahead and remove it.
While replacing the capacitor, you should know the following:
- The new capacitor must be placed in exactly the same direction as the old damaged one (this is why I advised taking some pictures of your board before removing anything earlier).
- Ideally, you should replace the capacitor with a new one that matches the ratings (Voltage, Temperature and Micro farads). In case where you can’t get the exact value for the 3 ratings, you can get one that has voltage and temperature that is higher that that of the old capacitor but not lower. The micro farad can also be slightly higher, but not lower.
Once you have gotten the new capacitors, replace the old faulty one you removed using a soldering iron.
Remember: The capacitors need to be placed exactly how the old one was placed.
Once that’s done, cover up the TV and turn it on.
Now, your Sony BRAVIA TV should turn on and stop blinking red light 3 times.
5. Replace Power Supply Board or Main Board
Like I said earlier, the Sony TV standby light blinking red 3 times indicates either a bad main logic board or the power board.
Determining whether the fault is coming from the main board or power supply board can be a bit tricky, but there are a few things you can do to help narrow down the issue.
First, you can start by looking for any visible signs of damage such as bulging capacitors, burnt components or loose connections, on both the main board and power supply board.
Next, try to isolate the problem by checking the power supply board. If the TV is not turning on at all, then it’s likely that the issue is with the power supply board.
You can also use a multimeter to check the voltage output from the power supply board to ensure that it matches what is labelled on the board.
If the TV turns on but is not displaying any picture or sound, then the issue may be with the main board.
However, it’s not always that simple – it’s very easy to replace the wrong board with no avail.
The video below by TampaTec explains the power board, main board, voltage testing for and main logic board testing in more details.
The video below also explains the Sony BRAVIA 3 blinking red light issue as well.
Depending on what the results of the tests show as in these videos (as well as the initial explanation), you should be able to narrow down the issue to one particular board to replace in order to fix the Sony TV blinking red light 3 times issue.
Finally, you can contact Sony TV support team directly to see if they can help you in any way.
You can reach them at 1-239-245-6354 (Monday – Friday: 9:00 am – 9:00 pm ET; Saturday – Sunday: 10:00 am – 8:00 pm ET).
You may also reach out to a professional technician to help you fix the issue.