If your Sony TV is blinking red light 5 times, stops for a second and then the LED light blinks 5 times again without any picture on the screen, then you are not alone.

In this guide, I am going to show you two things:
- Why your Sony TV blinks red light 5 times or what it means (based on the Sony blinking red light codes)
- 4 proven ways to fix it once and for all
If that sounds like what you are looking for, let’s dive right in!
Sony TV Blinking Red Light 5 Times Meaning
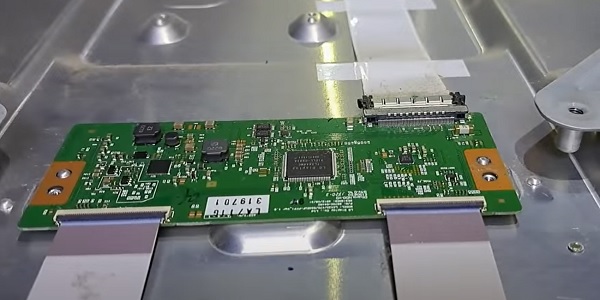
According to the Sony TV blinking red light codes, 5 blinks is usually indicating of an issue with the T-Con board, often commonly associated with short in the circuit. This can either be from a blown fuse or shorted capacitor(s).
In some other cases, it may be an issue coming from the main board instead. For example, there could be a short in the circuit leading from the main board to the T-Con board. Again, this can be due to a blown fuse or faulty capacitor on the main panel.
However, there have been some cases where the issue was caused by something less technical and were fixed without having to open the TV at all.
In fact, that’s why the first 2 fixes I will show you have nothing to do with opening your set, yet reportedly effective in fixing the issue.
That said, let’s look at 4 proven ways to fix a Sony TV that’s blinking red light.
Sony TV Blinking Red Light 5 Times Fix
Below are 4 ways to fix a Sony TV that is blinking red light 5 times, without picture on the screen.
1. Warm up Sony TV through the vents
“Whoa! Slow down, what are we talking about here?” I won’t be surprised if that’s your first reaction after reading the title.
I know I clearly stated that a Sony TV blinking red light 5 times is most likely an issue with the T-Con board (which we will get to in a second by the way).
However, I also mentioned that there are simpler ways to fix the issue that do not require you to get to the T-Con board or main board (by the way, this might not work for everyone but it’s definitely work a try).
“Yeah, but why does this even work and how exactly do I go about it?”
First, here’s why it works:
Various components on the TV boards (main board, T-Con board, power board e.t.c.) are quite sensitive to cold environment. Through routine use of your TV, these components are kept warm every now and then.
However, if your set is placed in a cold part of the room (e.g. close to the window that’s often open) or you haven’t used your TV set in a while, components like the capacitors may begin to discharge or change capacitance.
This is why heating it up gets it to work again, and can extend the life of your TV set for a while.
Now, here’s how to go about it:
All you need to do this is an hot air blower (like hair dryer).
- With your TV turned on with red light flashing 5 times, aim the hot air blower at the TV opening/vent for 30 to 60 seconds.
- Now, go ahead and power off the TV, then turn it back on.
- Your Sony TV should turn on and stop flashing red light 5 times.
This also works if your Sony TV keeps restarting by itself.
However, if that doesn’t work for you, move to the next fix.
2. Factory Reset without Remote
This is another way to fix a Sony TV that keeps blinking red light 5 times. After this, I will show you how to troubleshoot the T-Con board and main board next (which are a bit more technical).
Since your Sony TV won’t show any picture on screen, the only feasible way to reset it to factory settings is without a remote.
To do that, you will be using the buttons on the TV instead.
Factory Reset Sony BRAVIA TV without Remote:
This works on Sony BRAVIA KDL TVs and other models with Android 6.0 Marshmallow or higher operating system installed. It also works on other Sony OLED and LCD models too.
However, if you have a Sony Google TV, there is a different procedure which I will show next after this.
That said, here’s how reset your Sony BRAVIA TV to factory settings:
- Unplug your TV from the power outlet
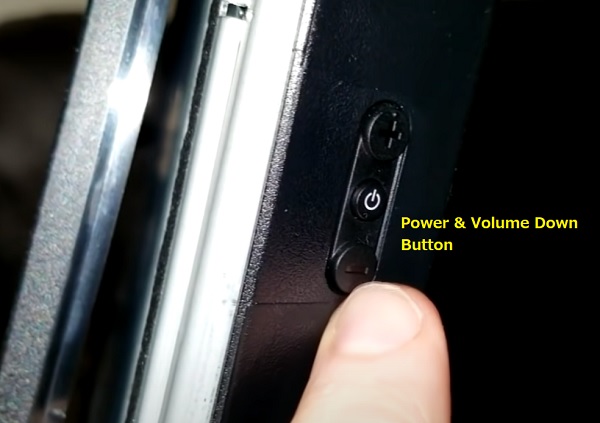
- While unplugged, locate the power and volume down (-) buttons on your TV (not on your remote). Depending on the Sony TV model, the buttons may be located on top of the TV, at the bottom or at the one of the sides. Also, if you have a model with only power button on your TV, hold the power button and continue with the same procedure.
- Once you find them, hold down the volume and power button on the TV
- While still holding the volume and power button, plug back the TV into a working power outlet
NOTE: Make sure you plug the TV into the power outlet while still holding both power and volume down buttons on the TV. If you can’t reach the wall outlet on your own while holding down the buttons, find someone to help you plug it in.

- Once plugged in, keep holding the buttons until the LED light turns green (or white in some models) which shows the reset is done. You may have to wait 15-60 seconds for the reset to be completed. Once done, you can release the buttons.
- If the reset was effective, the TV will restart itself, display the Sony and Android start-up animation screen/logos before and then show the BRAVIA initial setup screen.
- If the TV doesn’t turn back on automatically, press the power button to turn it back on.
NOTE: If this doesn’t work on the first try, repeat the whole procedure again. According to Sony, you may sometimes have to try this up to 5 times in some cases before the reset is successful. If it still doesn’t work after the 5th try, move to the next tip.
VERY IMPORTANT:
Once you are done with the forced factory data reset, you need to perform another reset immediately before doing any setup. If you fail to do this after the forced factory data reset, some applications and features on the TV may be lost.
- Hence, skip Google account sign-in, skip network setup and skip channel setup. You can set them up later. Instead, you need perform another factory reset from the TV menu this time around.
- To do this, press the HOME button on the remote controller. Then, go to Settings > Storage & reset > Factory data reset > Erase Everything > Yes.
For some other models, you will find the reset option under Settings > System > About > Reset. On other models, try Settings > Device Preferences > Reset.
Once the actual factory reset has now been done, go ahead and perform the setup at the welcome screen (tuning settings, Google account, network setup e.t.c.)
However, if you have a Sony Google TV, there is a different forced factory reset procedure which is shown below.
Factory Reset Sony Google TV without Remote:
- Unplug the Sony Google TV’s power cord from the power outlet
- Press and hold the power button on the TV (not on the remote control)
- While holding the power button on the TV, plug the AC power cord back in and continue to hold the button until the white LED light appears.
- Release the power button after the white LED light appears.
NOTE: It will take approximately 10-30 seconds for the LED light to turn white. If the LED light doesn’t turn white within 30 seconds, start all over again (from unplugging the TV).
- Wait a few minutes for the Factory data reset process to take place.
- Your Sony TV will reboot (turn on and off) twice.
- NOTE: If the TV doesn’t turn back ON automatically, press the Power button to turn the TV back ON.
- When the welcome setup screen appears, perform the setup. However, if the welcome setup screen doesn’t appear, unplug the AC power cord and then plug it back in.
Once the reset is done, your Sony TV should now be up and running once again. Otherwise, you need to open up the TV and check the T-Con board next.
3. Check for Shorted Capacitors in T-Con Board
Now, this will involve you opening the back of the TV. If you are not sure about this, you can take you TV to a service technician.
NOTE: Unplug your TV from the power outlet before you open the back cover.
Once you open the TV, you will find the T-Con board at the lower part of the TV.

That said, here’s what you need to do:
- Get a multimeter and set it to continuity mode
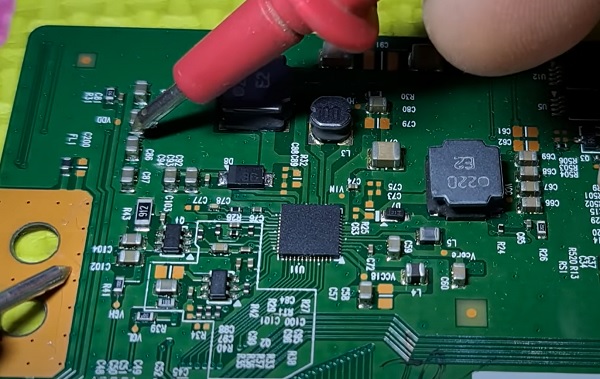
- Tap the negative probe of the multimeter (black) to the ground and the positive probe (red) on every ceramic capacitor’s terminals.

- Usually, only one terminal of the capacitor is connected to the ground circuit and the other terminal is connected to the voltage rail line. Therefore, only one of the terminal in each capacitor should beep when the positive probe of the multimeter is placed on it.
- However, if both terminals in a capacitor beep when the positive probe is placed against them, then it is likely shorted.
- Once such capacitors have been identified, remove them from the board with soldering iron
- Finally, find capacitors of similar capacitance and replace them on the board.
NOTE: You may similarly check for shorted capacitors on the main board as well just in case there is any. However, it’s mostly an issue associated with the T-Con board as I mentioned earlier.
Here’s a video showing the whole process:
To remove the faulty capacitor:
- Carefully take note of the pin on the board that the capacitor is attached. You should do the removal with a soldering iron (do not force pull it out)
- With the heated soldering iron, carefully apply pressure from the back of the board on the pin for the faulty capacitor until it melts.
- Then, you can go ahead and remove it.
While replacing the capacitor, you should know the following:
- The new capacitor must be placed in exactly the same direction as the old damaged one (this is why I advised taking some pictures of your board before removing anything earlier).
- Ideally, you should replace the capacitor with a new one that matches the ratings (Voltage, Temperature and Micro farads). In case where you can’t get the exact value for the 3 ratings, you can get one that has voltage and temperature that is higher that that of the old capacitor but not lower. The micro farad can also be slightly higher, but not lower.
- Also, the capacitors need to be placed exactly how the old one was placed.
Once done, assemble the TV, plug it in and turn it on. It should show picture now and stop blinking red light 5 times!
4. Check for a Blown Fuse
Unlike the previous fix which is often more associated with the T-Con board, a blown fuse can be from the T-Con board or main board.
Unlike a glass fuse which you can visually inspect to know when it’s blown, a ceramic fuse does not show that.
To check if the fuse on the T-Con board or main board is blown, you also need a multimeter.
Here’s how to check for blow fuse on your Sony TV T-Con and Main boards:
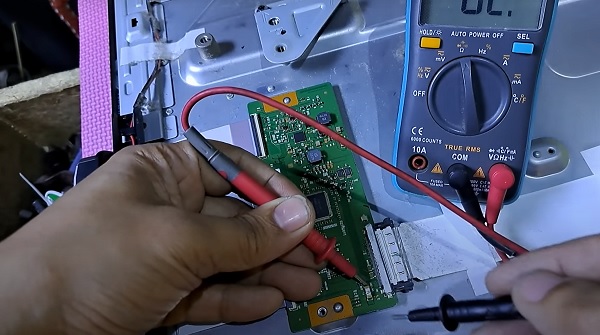
- Set the multimeter to diode mode
- The meter reading should show as open (‘OL’ i.e Open Loop on the screen)
- Place each multimeter probe on each side of the fuse

- If the meter now shows 0.000 while placing the probes against both sides of the fuse, then you have a good fuse.
- However, if the meter shows OL (i.e open loop) on the screen while placing the probes against both sides of the fuse, then you have a bad fuse.
- If any of the fuse is blown, you need to replace it with a good fuse of the same rating. For example, if you find a bad 4A fuse, you need to replace it with a good 4A fuse.
- Once everything has been checked, go ahead and assemble the TV.
- Plug it back into the power source, turn it on and it should stop blinking red light 5 times.
Here’s a video showing how to test a fuse on your TV boards:
Bottom Line
Sony TV blinking red light 5 times is an issue that is common associated with the T-con board. However, in some cases, it can be caused by other things like a blown fuse on the main board.
If you have a Sony TV that blinks red light 5 times, some of the proven ways to fix it include:
- Warm up the TV through the vent with an hot air blower
- Perform a forced factory reset
- Find and replace faulty/shorted capacitors
- Find and replace blown fuses on main or T-Con board
If you found this guide helpful, kindly use the comment section below. Also, let me know which of these methods fixed the issue for you.

Wow..first step works like charm. Never thought it would work but i gave it a try. I have experienced it quite a while and i tried many things but no use. Then i came across this website, i thought i can give it a try since its so simple. Voila. Thanks a lot.
Glad I could help Niam, thanks for the feedback! Appreciated.
The warm air treatment worked. We watched tv for a couple of hours then left it on standby overnight.
We have gone back to the flashing 5 red lights.
Tried factory reset 5 times. Still the same.
Any ideas?
Hi there Mike
5 blinking red lights
I did the warm air treatment and it worked. it only works if I unplug the ribbon cable connection from the T-board to the main board. The white light will come on no Red. The power will go off after 20min. Also, when the power comes on all the led lights come on but not enough to have power to have a full lighted screen. Help!!!!
Paul
You may need to replace the T-Con or power board in that case.
Wow. You explained that very well! Even I can understand it lol. Thank you
That’s what I always try to aim for in my contents, glad you found it informative.