If you are dealing with Sony TV connected no internet issue, then you are on the right page.
When this happens, your TV is connected but has no internet access. As a result, most or all of the apps on your Sony TV will not work.
You may see this message on your Sony TV network screen after you turn off the TV, after a power outage or after leaving your TV disconnected for some time.

In this guide, I am going to show you all the proven ways to fix the issue and restore your Sony TV internet access quickly.
Without any further ado, let’s dive right in!
Sony TV Connected No Internet
Follow the step-by-step guide below to restore internet access on your Sony TV.
1. Power Cycle the TV & Restart Router
The first thing you need to do is to restart your network router and power cycle the TV.
This will get rid of corrupt cache files and fix network connectivity issues on your Sony TV.
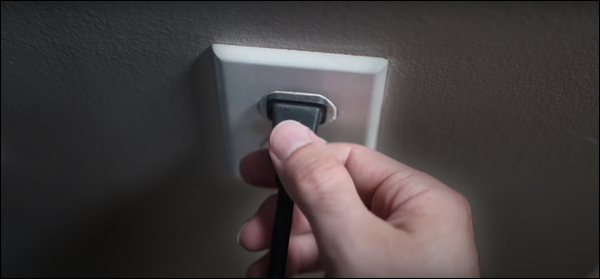
- First, turn off the network router and unplug it from the wall outlet.
- Leave it unplugged for 60 seconds. Then, plug it back in and turn it on.

- Wait for the router to come online.
To power cycle or power rest your Sony smart TV, simply follow these steps:
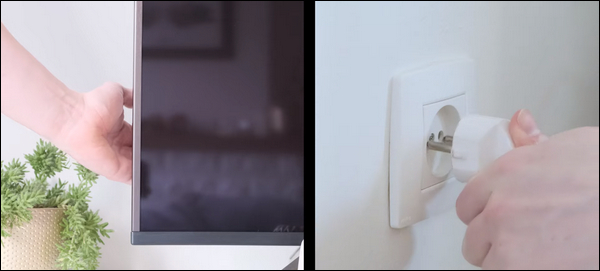
- Turn off your Sony TV by directly unplugging the power cord from the power outlet.

- Press and hold the power button on your TV for 30 seconds to fully discharge any residual power.

- Now, wait for at least 60 more seconds and then plug to TV back into the power outlet.
- Then, turn on the TV.
- Finally, go back to the your Sony TV network settings screen and connect the TV to the Wi-Fi.
Now, your Sony TV should stop showing “connected, no internet”. Otherwise, move to the next step.
2. Update DNS Server on Sony TV
Another way to resolve Sony TV connected no internet issue is to update the DNS server on the TV to Google’s DNS servers.
Being one of the fastest DNS servers, Google DNS servers are commonly used to resolve network connectivity issues like this one (such as when the Wi-Fi connects, but apps don’t work because there’s no internet access).
Here’s how to update the DNS servers on your Sony TV:
- Go to Settings > Network & Internet, then select the network you are connected to.

- On the next screen, take note of the IP address. Then, select on “IP settings”.

- On the next screen, when you see the IP address, leave it unchanged. Then, click on “Next”.

- On the Gateway input screen, leave it unchanged as well and click on “Next”.
- Also, leave Network prefix length unchanged and click on “Next”
- Now, on the DNS 1 screen, enter 8.8.8.8

- On the DNS 2 screen, enter 8.8.4.4
- Finally, click on “Next” and you should see the message “Saved successfully”.

Go back to the network screen and check if your TV now shows “Connected”.
However, if it still shows “Connected, no internet”, then you need to update the TV date and time automatically with the network as shown in the next step.
3. Update TV Date and Time with Network
One of the most common reasons why Sony TV shows “connected no internet” is when the date and time are misconfigured and differ from the actual network time.
This can happen after turning off the TV, after a power outage or after leaving the TV disconnected for a long period of time.
What you need to do is to simply update the date and time automatically with the network, and the issue will be resolved.
Here’s how to do that:
- From the home screen, click on the “Settings” (gear icon) on your Sony TV screen.
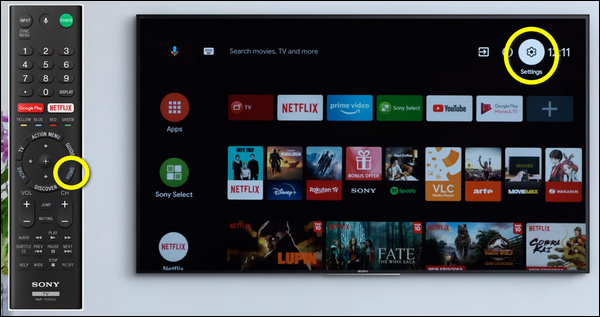
- If you have the version of the remote with the settings button on it, you can use that as well.

- On the settings screen, scroll down until you find “Date & Time” and select it (it’s under the system preferences tab).

- Select “Automatic date & time”

- Choose “Use network time”

- Now, go back to the settings screen, scroll up and select “Network”. Then, select “Network setup”.

- Select “Expert”

Wait for a few seconds and your Sony TV will change from “connected, no internet” to “connected”.
- If your Sony TV keeps showing “connected, no internet”, what you need to do is turn off the Wi-Fi, then turn it back on.


Now, wait for a few seconds after it re-connects to the Wi-Fi, and your Sony TV will become connected with internet access.

If that fixes the issue for you, great! (let me know in the comment section below). Otherwise, move on to the next fix.
4. Turn Off Data Saver
You might see “Connected, no internet” on your Sony TV if the data saver feature is turned on and you have reached the set limit.
In that case, you will need to turn off the data saver feature on your Sony Android TV.
Here’s how to do that:
On Sony TV with Android 8.0 or 9.0
- Go to Settings > Network & Internet > Data usage > Data saver

- Turn off the data saver feature.

On Sony TV with Android 7.0, 7.1 or 7.1.1
- Go to Settings > Data usage > Data saver.
- Tap the slider to turn off the data saver feature.
Once the feature is on, your Sony TV Wi-Fi should once again have internet access and the “connected, no internet” message should change to “connected”.
5. Reset Network Settings
Resetting the network settings is another way to fix Sony TV connected no internet issue.
This is same as telling your TV to forget the connected network, then you connect again to the network (in which case you will be required to enter the password again if the Wi-Fi is protected).
Here’s how to do that:
- Go to Settings > Network & Internet, and select the network you are connected to.
- Scroll down and click on “Forget Network”

- Once done, go ahead and connect to the network again. The steps to do that will depend on your TV model. Follow the steps below according to your TV menu options:
-
- Select Network & Internet > Wi-Fi.
- Select Network & Internet > Easy setup > Wi-Fi.
- Select Network → Network setup > Easy > Wi-Fi.
- Select your network from the list of available networks.
- Enter the correct password and click on “Connect”
Once you connect your Sony TV back to your Wi-Fi after resetting the network, then you should no longer see “connected, no internet” on your Sony TV.
6. Update System Software
If you are still dealing with Sony TV connected no internet issue at this point, then you need to update the system software on your Sony BRAVIA TV.
Here’s how to do that:
For Sony Google and Android TV models:
- On the remote control, press the HELP button or the (Input) button.
- Select Help. (Note: If Help is not shown in the Input selection screen, select Edit and add Help).
- The next steps will depend on your TV menu options (depending on the model and version you have):
-
- Select Status & Diagnostics > System Software Update > Software Update.
- Select System software update > Software update or Check for a system software update.
-
- For KD-32W830K, KD-X75K, and KD-X75H Series: On the remote control, press the Quick Settings button (gear icon), and select Settings > System or Device Preferences > About > System Update.

- Next, click on Software update

- If a new software update is found, the TV will display a Software update is ready message. Follow the on-screen instructions to proceed with the update. Once done, your TV will reboot.
NOTE: During the installation of the update, do not press any buttons, power off the TV, or disconnect it from the AC power outlet. Loss of power during the installation of the firmware update may cause the TV set to become unresponsive or require repair.
For Other Sony TV models:
If the ‘Help’ icon is displayed in the top-right corner of the screen:
- Select the ‘Help’ icon > Customer Support > Software Update > Network.
- Note: If Network is not shown, skip this step.
- Click on Yes or OK to start installing the update.
If the ‘Help’ icon is NOT displayed in the top-right corner of the screen:
- Select Settings > Customer Support, Setup, or Product Support > Software Update > Network.
- Note: If Network is not shown, skip this step.
- Click on Yes or OK to start installing the update.
Updating Manually with a USB Drive:
You can also update your Sony BRAVIA TV manually with a USB drive formatted in the FAT16, FAT32, exFAT, or NTFS format and with sufficient space to accommodate the file.
Here’s how to update your Sony TV system software manually:
- Go to the support website.
- Type your TV model name in the search box. If you don’t know your model number, check the sticker at the lower left corner of your TV’s back panel.

- Go to the Downloads section and proceed to the update page.
- Follow the instructions on the website to download the update to a USB flash drive and perform the update on your TV.
NOTE: The update file must be saved in the root directory of the drive.
Also, if the update does fail, delete other files from the drive and try again, with only the update file saved in the root folder of the USB flash drive. If the update still fails, format the USB flash drive to FAT32 and try again. If the update fails again, try using a different USB flash drive formatted in FAT32.
You can verify that the latest software version has been installed on your Sony TV by following the procedures below:
On the remote control, press the HOME button, and select Settings or Help > Customer support or Product Support. Compare the latest software available with the one on your TV, and if the available software is newer, download and install the update.
Once the software is updated on your Sony BRAVIA TV, the network connectivity issue should be fixed and you should no longer see “connected no internet”.
In other words, you should now have internet access on your TV and should be able to stream apps on your Sony TV.
7. Reset to Factory Settings
The last thing you can do to fix Sony TV “connected, no internet” issue is to reset the TV to factory settings.
Due to the fact that the process of resetting a Sony TV to factory settings varies by model, I cannot provide a single set of instructions. Instead, I will demonstrate various methods to do this.
First, I will show you how to reset Sony Android TV models (with a remote and without a remote).
Then, I will do the same with Sony Google TV models and finally other Sony TV models in that order.
How to Reset Sony Android TV models:
- Press the HOME button on the remote control, and select Settings.
- The next steps will depend on your TV menu options (depending on the model and version you have):
-
- Select Device Preferences >Reset.
- Select Device Preferences > About > Reset, Factory reset, or Factory data reset.
- Select Storage & Reset. Select Factory data reset or Reset.
-

- Select Erase Everything.

- Select ‘Yes’ when asked to confirmed factory reset

- If asked to provide a password, enter the password for the Parental lock (Broadcast). For X7, and W8 series: Skip this step
NOTE: If the HOME button on the remote control does not work, follow the procedures below:
- For Sony X74H_X75H, X7, and W8 series: Press the ACTION or Quick Settings button on the remote control, then select Settings > Device Preferences.
- The next steps will depend on your TV menu options
-
- Select About > Factory reset, or Factory data reset > Factory data reset.
- Select About > Reset.
-
Factory Reset without Remote on Sony Android TV:
This is another way to reset your Sony TV to factory settings without the remote control.
This works on Sony BRAVIA KDL TVs and other models with Android 6.0 Marshmallow or higher operating system installed. It also works on other Sony OLED and LCD models too.
Here’s what you need to do:
- Unplug your TV from the power outlet
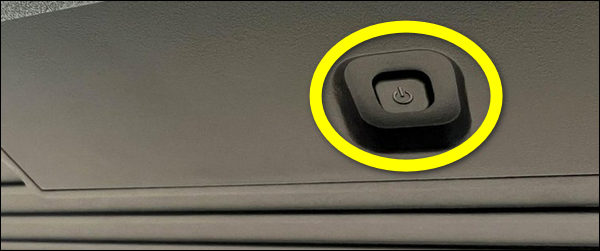
- While unplugged, locate the power and volume down (-) buttons on your TV (not on your remote). Depending on the Sony TV model, the buttons may be located on top of the TV, at the bottom or at the one of the sides. Also, if you have a model with only power button on your TV, hold the power button and continue with the same procedure.
- Once you find them, hold down the volume and power button on the TV
- While still holding the volume and power button, plug back the TV into a working power outlet
NOTE: Make sure you plug the TV into the power outlet while still holding both power and volume down buttons on the TV. If you can’t reach the wall outlet on your own while holding down the buttons, find someone to help you plug it in.

- Once plugged in, keep holding the buttons until the LED light turns green (or white in some models) which shows the reset is done. You may have to wait 15-60 seconds for the reset to be completed. Once done, you can release the buttons.
- If the reset was effective, the TV will restart itself, display the Sony and Android start-up animation screen/logos before and then show the BRAVIA initial setup screen.
- If the TV doesn’t turn back on automatically, press the power button to turn it back on.
NOTE: If this doesn’t work on the first try, repeat the whole procedure again. According to Sony, you may sometimes have to try this up to 5 times in some cases before the reset is successful. If it still doesn’t work after the 5th try, move to the next step.
VERY IMPORTANT:
Once you are done with the forced factory data reset, you need to perform another reset immediately before doing any setup. If you fail to do this after the forced factory data reset, some applications and features on the TV may be lost.
- Hence, skip Google account sign-in, skip network setup and skip channel setup. You can set them up later. Instead, you need perform another factory reset from the TV menu this time around.
- To do this, press the HOME button on the remote controller. Then, go to Settings > Storage & reset > Factory data reset > Erase Everything > Yes.
For some other models, you will find the reset option under Settings > System > About > Reset. On other models, try Settings > Device Preferences > Reset.
Once the actual factory reset has now been done, go ahead and perform the setup at the welcome screen (tuning settings, Google account, network setup e.t.c.)
How to Reset Sony Google TV models:
- Press the Quick Settings button on the remote control
- Select Settings > System > About > Reset > Factory data reset > Erase everything.
NOTE: If the Quick Settings button on the remote control does not work, follow the procedures below:
- Press the HELP button or the Input button on the remote
- Select Help > Manual (Help Guide) > Settings > Using the Quick Settings > Settings > System > About > Reset > Factory data reset > Erase everything.
Factory Reset Sony Google TV without Remote:
If the normal reset does not work, you can perform a forced factory reset for Google TV models without remote. Here’s how to do to that:
- Unplug the TV’s power cord from the power outlet
- Press and hold the power button on the TV (not on the remote control)
- If your TV has 3 buttons, press and hold all of them at the same time.

- While holding the power button (or three buttons) on the TV, plug the AC power cord back in and continue to hold the button(s) until the white LED light appears.
- Release the power button after the white LED light appears.
NOTE: It will take approximately 10-30 seconds for the LED light to turn white. If the LED light doesn’t turn white within 30 seconds, start all over again (from unplugging the TV).
- Wait a few minutes for the Factory data reset process to take place.
- Your Sony TV will reboot (turn on and off) twice.
- NOTE: If the TV doesn’t turn back on automatically, press the Power button to turn the TV back ON.
- When the welcome setup screen appears, perform the setup. However, if the welcome setup screen doesn’t appear, unplug the AC power cord and then plug it back in.
How to Reset Other Sony LCD TV models:
-
- Press and hold the UP ARROW button on the remote control.
- While holding the UP ARROW button, press and hold the POWER button on your TV until Reset appears on the screen.
- The power button may be on the front, top, or side of the TV. If your TV has an Energy Saving switch, be sure to press the POWER button rather than the Energy Saving switch.
- Afterwards, the TV will turn off and then back on. If your TV remains off after performing a factory reset, press the POWER button to turn it on.
- Release the UP ARROW button.
- The initial setup screen displays if the above procedures were performed correctly. Follow the on-screen instructions to complete the initial setup.
- If the reset didn’t complete successfully, disconnect all devices from the TV, turn off or disable the network connection, then repeat the steps above.
Once your Sony TV has been reset to factory settings, you should now have internet access on your Sony TV.
Let me know which of the methods discussed in this guide helped you fix the Sony TV connected no internet issue in the comment section below.