If you have a PlayStation 5 console with a very loud disc drive, then you are not alone. You probably hear the buzzing noise on start up, when you put a disc in, when downloading or installing games, while copying disc, or while playing games on your console.
This can becomes really unbelievably loud and sounds load like your console is grinding your disc. For some users, this only happens with PS4 disc games, while other users experience the issue with both PS4 and PS5 disc games.
The good news is, I have found 4 effective ways to fix the loud PS5 disc drive issue permanently in 2024. Even better, the procedures are very easy and don’t require you to be technical in any way.
So, if that sounds like what you are looking for, let’s dive right in!
PS5 Loud Disc Drive Fix
Unless your disc drive is damaged and needs to be replaced, then one of the 4 methods I will be showing you in this guide will surely fix the issue for you.
NOTE: Out of these 4 methods, the 4th method has proven most effective in fixing the issue. However, the first 3 methods are way easier and have also worked for a lot of users.
By the way, I am not putting the most effective method as the fourth method to keep you reading or anything. It’s just that you do need to remove your console’s bottom panel in this method (it’s nothing technical at all and all you need is a screw driver as I will show you later).
I just thought it’s best I show you the easier methods first (after all, they work too!).
First, place your console horizontally and make sure it is placed on the stand correctly. Next, adjust the side panel to reduce the vibration noise from the disc drive. Then, update the system software of your console. Finally, manually eject the disc drive from the console.
1. Change Console’s Position
Now, the fact is that you can experience the loud disc drive issue whether your console is placed horizontally or vertically. However, among the users who experienced the loud disc drive issue, a larger percentage of them had their console placed vertically.
That said, a number of users have reported that the disc drive only makes the loud noise when the console is placed vertically, and become as quiet as anything once the console is placed horizontally. In addition, you want to make sure that the console is placed on the stand correctly.
To test this, the next time the disc is spinning and making the loud noise, place your hand on the console’s panel on the side where the disc drive noise is coming from. Press against it gently and see if the noise stops. If it does, then the noise is caused by vibrations rather than any issue with the disc drive itself.
The way I see it, the position of the console (and stand) can amplify the vibrations coming from the disc drive causing it to be very loud.
This same observation was made with some PS5 consoles with loud buzzing noise. So, go ahead and place your console horizontally and that should fix your issue in this case.
However, if that doesn’t fix the issue for you or you just don’t have enough space to have the console placed horizontally, then move to the next method.
2. Adjust the Side Panel
If the first method didn’t work for you at all or you don’t have enough space to place your console horizontally, then you can still reduce the loud noise without changing the position of the console.
This method was posted on Reddit by a user, and as “basic” as it may look like, a lot of other users reported that the procedure fixed the loud PS5 disc drive issue.
That said, here’s what you need to do:
- First, eject the disc from the drive
- Tap the side of the PS5 console where the disc drive is located repeated. If the PS5 is placed vertically, tap the right bottom side of the console where you put the disc.
- Do this repeatedly a number of times, tap is hard enough as if you are consciously trying to make something fix it place, but definitely not too hard that it can damage your console.
- Once done, put the disc back in and your disc drive should not be making the loud noise again
If that fixes the issue for you, great! Otherwise, move to the next method.
3. Check for System Software Update
The disc drive loud noise issue was fixed in PS5 consoles after a software update. A lot of users have reported that the noise stopped after updating their system software.
In that case, if the issue is coming from software in your case, then this will fix it. However, if it’s coming from hardware, then the fourth method will definitely fix the issue for you.
To update your software, follow the procedures below:
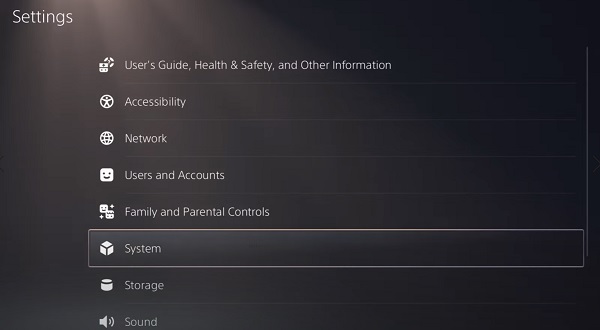
- Go to Settings > System
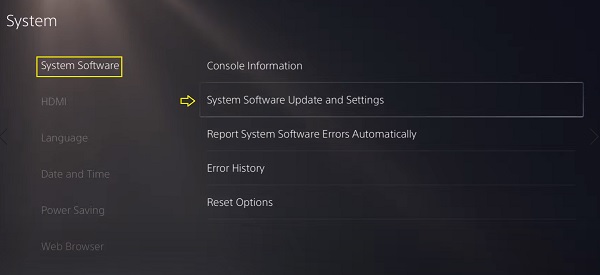
- Select System Software > System Software Update and Settings
- Click on ‘Update Using Internet’

- On the next page, click on ‘Update’ button
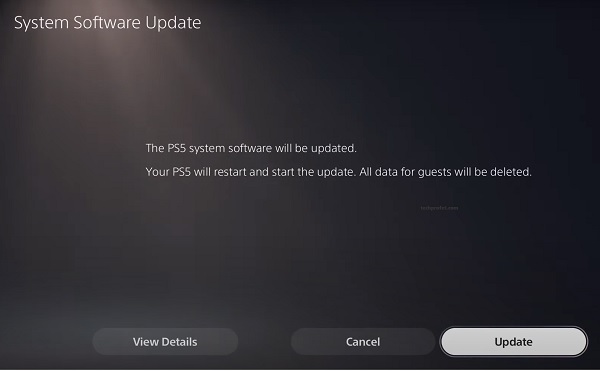
- Wait for the update to be installed (don’t turn off your console during this)
- Once done, your PlayStation 5 will restart itself and the noise will stop.
Now, if after updating the system software, you can you still hear loud noise coming from your disc drive, you need to ask yourself two questions.
First, is the noise from the disc drive very often, or is it only when you put the disc and after every few hours during occasional checks? If it’s the latter and the disc drive noise is still very loud, then this last method will definitely fix the issue for you.
By the way, even if it’s the occasional noise, and you will to make it go away, you can also proceed with the next method.
- PS5 Controller Blinking Blue & Won’t Connect (Found a Quick Fix)
- Checking for Saved Data on Cloud Storage on PS5 Keeps Loading (Quick Fix)
4. Manually Eject Disc Drive
Like I mentioned earlier, this method has proven to be the most effective way to fix the issue. This will totally get rid of the vibration and your console will stop making the loud noise from the disc drive.
What you need to do is eject the disc drive manually, and all you need for that is a #1 Phillips or cross-hatch screwdriver.
Now, here’s how to manually eject the disc drive and fix the loud disc drive noise:
- Turn off the PS5 console by holding the power button for 3 seconds. Then, disconnect all the cables and devices from the console. Also, remove the stand
- Place the console on a cloth on a flat surface. For proper orientation, the top panel which has the PS5 logo should be facing the table, and the screw hole for the base should be facing you and the disc slot is on your left side
- Place your palms near the top corner and grip the edge of the cover with your fingers. Gently pull the cover up and toward yourself. You should hear a click, then lift the cover away
- With the cover removed, look for four circular pieces on the bottom of the optical drive. Beside these is a circular dust cover of black plastic film (newer consoles may not have this plastic film). If your console has a black plastic film, carefully peel it to remove the screw beneath
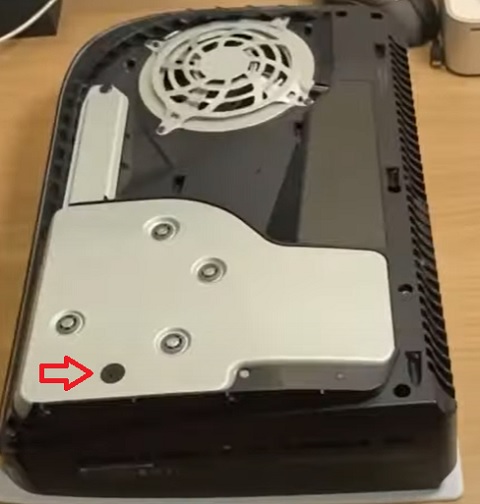
- Now, with the #1 Phillips or a cross-hatch screwdriver, turn the screw clockwise until the disc can be seen peeking out of the disc slot, just so you can remove it with your finger.
NOTE: The screw is very easy to find and even easier to lose. If you have to apply force to turn the screw, then you have the wrong screw. Also, just turn the screw clockwise until the disc drive is out barely enough to remove the disc with your finger. Don’t keep turning it after this to avoid breaking the disc drive.
- Remove the disc gently from the optical drive
- Now, put the bottom cover back. To do this, position it about 2 -3 cm away from the top edge and slide it back into place. You should hear an audible click when the cover is secured in position.
- Reconnect all cables and the AC cord. Then, turn the console back on.
If you need a visual demonstration, then watch the video below.
Once done, your PS5 console will stop making loud buzzing noises from the disc drive.
PS5 Disc Drive Broken?
If your PS5 disc drive was broken or you did the last procedure wrongly and ended up breaking the disc drive, then it may stop accepting discs in. In that case, there are 3 ways to fix the broken disc drive.
- First, you can get it fixed by Sony if you are still under warranty
- Alternatively, go to the game that you had as disc in drive when you turned the screw and eject it. Then, put the disc back in and it should be sucked in
- Finally, do the exact opposite of manually ejecting the disc drive as explained above. This time around, put the disc into the drive and turn the screw the other way so that it manually pulls the disc. In fact, this can also fix the disc drive noise as reported by users who had to do this when the disc drive wouldn’t pull
That said, manually ejecting your disc drive has proven to be very effective in fixing PS5 consoles with loud disc drive noise. However, you always have the option to get it fixed or replaced by Sony if you are still under warranty.
Some users have also said that they just ignore the noise while others say they can barely hear the noise as long as they have their headset on while gaming. If you decide to go down that path and ignore noise, check out the PlayStation PULSE 3D Wireless Headset.
Finally, to request for a fix under warranty, you need to get a return authorization and shipping instruction. To get that, visit playstation.com/service or call 1-800-345-7669. You can also return it to the store where you got it from.
Bottom Line
PS5 disc drive can get really loud and unbearable. Most commonly, the loud buzzing noise comes up on startup, when copying, while installing games and sometimes when playing games on the console.
Some users reported that the noise becomes really loud with specific games, especially PS4 disc games.
Over time, users have been able to fix it using different methods. Some of these include:
- Place your console horizontally and make sure it is placed on the stand correctly
- Adjust the side panel to reduce amplification of the vibration noise from the disc drive
- Update the system software of your console
- Manually eject the disc drive from the console
Let me know which of these methods worked for you in the comment section.
