If your Nintendo switch is showing a blue screen and remains stuck, then you are not alone. The blue screen of death issue is a common problem among Nintendo and Nintendo Lite users even in 2024.
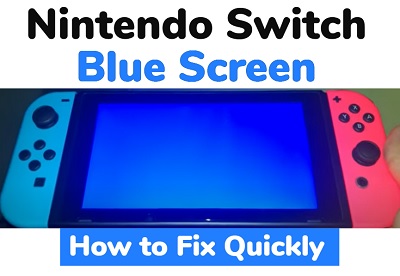
In this guide, I am going to show you 6 proven methods to fix the blue screen issue on Nintendo switch. I will start by showing you the easier and quicker methods. Later on, I will show you one technical method to fix the issue which requires you to open up your switch.
Not to worry, I am going to break down each method step-by-step and make it as easy as it can get.
First, let me quickly explain why you are seeing a blue screen on your Nintendo switch or Nintendo switch lite.
What Causes Nintendo Switch Blue Screen of Death?
The blue screen on Nintendo switch is often caused by board bending which can result from dropping the switch, hitting it or placing an heavy weight object on it. As a result, solder balls on the system become loose, causing a communication issue between the CPU and RAM. In other cases, it might just be a software issue.
Whichever case it may be, I am going to show you how to fix it permanently.
Without any further ado, let’s dive right in!
How to Fix Nintendo Switch Blue Screen
You can fix the Nintendo switch blue screen issue by initializing console in maintenance mode, power cycling the console, updating the system software in recovery mode, reflowing the CPU and/or RAM, resetting the switch to factory settings or performing an IC reball.
1. Initialize Console in Maintenance Mode
You can fix blue screen on Nintendo switch (or lite) by initializing the console in maintenance mode. This is different from a factory reset, and all your saved data will not be deleted.
First, you need to boot your console into maintenance mode. Here’s how to do that:
- Power off your Nintendo switch by pressing and holding the power button
- Once turned off, press and hold the volume up (+) and volume down (-) buttons at the same time, then press the power button.
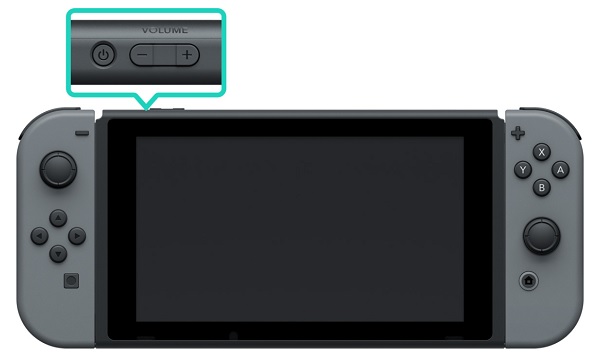
- Continue holding the buttons until the switch boots up into maintenance mode
- Once in maintenance mode, select ‘Initialize Console Without Deleting Save Data’
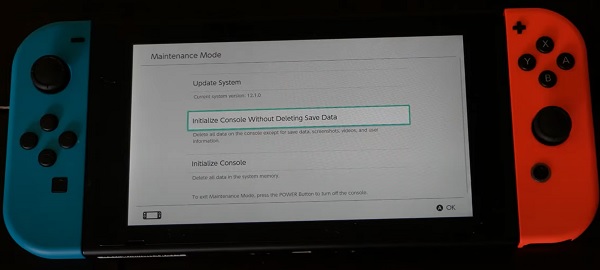
- On the next page, click on ‘Next’
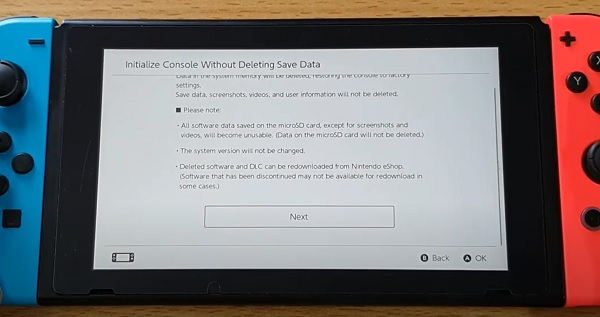
- Finally, click on ‘Initialize Console Without Deleting Save Data’ to confirm the process.
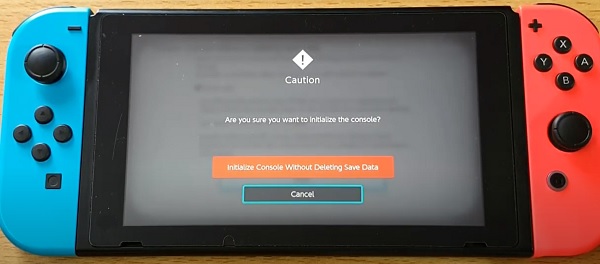
Once the process has been completed, reboot the switch and the blue screen of death will be fixed.
If your switch fails go into maintenance mode and goes back into the blue screen instead, try pressing the power button first. Then, as soon as the Nintendo logo shows, let go of the power button and hold down the volume buttons until the maintenance mode menu shows.
If it still doesn’t go into recovery/maintenance mode, then move to the next applicable method.
2. Update System Software
Since you can’t access the settings dashboard, the only option to update system software here is via the recovery/maintenance mode menu again. Again, if you couldn’t get your console to boot into maintenance mode, then this does not apply to you.
That said, boot your Nintendo switch into maintenance mode by following the procedure highlighted earlier.
Once you are there, select ‘Update System’
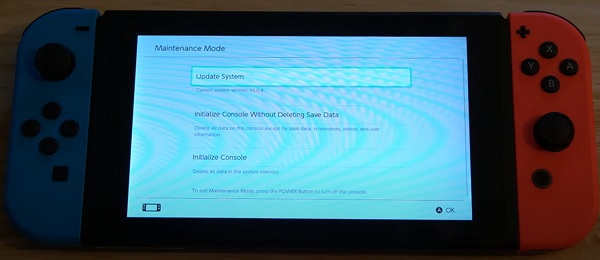
You will see a popup loading and showing ‘Preparing to update system’
If a new software version is available, go ahead and download it. Otherwise, if you already have the latest version of the software installed but you are still experiencing blue screen on your Nintendo switch when you turn it on, then move on to the next step.
3. Allow Power to Drain from the Switch
Another way to fix the blue screen of death on Nintendo switch is to allow the power to drain completely from it, then charge it back. This is a soft reset/power cycle, and will manually remove corrupt cache files in the system software.
To do this, allow the battery to drain by keeping it turned on with the blue screen and not charging it. Once the battery is drained, press the power button for 15 seconds. Finally, charge the switch fully and turn it on afterwards.
Depending on how much power you have on your Nintendo switch, it may take up to a day for the switch to shut down especially since you are not gaming with it. It’s just like standby mode, and the power will drain more slowly.
If you don’t want to do this just yet, you can always come back to it and try the next method to fix the Nintendo switch blue screen issue first.
4. Reset Nintendo Switch to Factory Settings
Unlike the initialization where saved data was not deleted earlier, you are going to be doing a hard reset/factory reset this time around. That said, all your saved data/progress will be removed from the console. Again, this will be done in maintenance mode.
You can boot your Nintendo switch into maintenance mode and reset it to factory settings by following the steps below:
- Turn off your Nintendo switch by pressing the power button (hold it for a few seconds if necessary)
- Once powered off, press and hold the volume up (+) and volume down (-) buttons at the same time, then press the power button.
- Continue holding the buttons until the switch boots up into maintenance mode
- Once in maintenance mode, select ‘Initialize Console’ and click on ‘Continue’
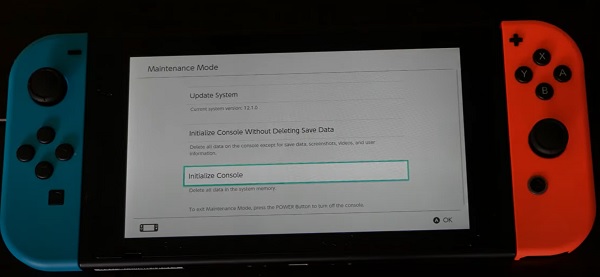
Wait for the process to be completed, and make sure not to touch the power button during this process.
5. Perform a CPU and/or RAM Reflow
Like I said earlier, blue screen on Nintendo switch is usually a hardware issue. This can be caused by dropping the console, raging on it or placing an heavy object on it. The panel is relatively fragile and can bend from stress. In such case, reflowing the CPU and/or RAM will fix the issue.
Most times, a CPU and/or RAM reflow is more than enough to permanently fix a blue screen of death on Switches since this will re-connect loose solder balls from the board bending.
First, you can check to see if a CPU reflow will fix the issue. To do that, power off your Nintendo switch. Once off, go ahead and open up the system with a screw driver. Now, apply some pressure on the CPU and turn on the console while still applying pressure. If your Switch turns on without blue screen, then a CPU reflow will definitely fix the issue.
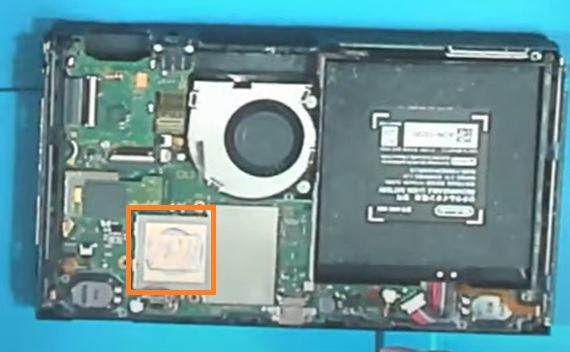
What this means is that balls have have knocked off the board and by reflowing it, these points will be re-soldered.
If you are not very technical and don’t want to do the procedure yourself, you can contact Nintendo support for a fix or replacement if you are still under warranty. Otherwise, you can get it fixed for a price or just get a new switch.
The video below will show you step-by-step how to open your Nintendo switch, reflow it and everything in-between.
In some other cases, you need to take it a step ahead by re-balling the switch. However, unless you bend the console extremely, the reflow will be more than enough.
6. Contact Nintendo Switch Support
At this point, your best option is to contact Nintendo to get your switch fixed or replaced. If you are still under warranty, there is no repair cost for this and you will get it fixed or replaced in within a couple of days depending on your location.
Alternatively, you can also get it fixed at any Nintendo switch repair shop near you.
Blue Screen on Nintendo Switch Repair Cost
The repair cost for a Nintendo switch with the orange screen issue is between $99.95- $110 depending on your location and where you are repairing it from. If you are getting it fixed from Nintendo’s official factory service repair, you will be given a price quote.
Your repaired or replaced system will also receive a 100-days repair warranty, starting from the day it is shipped back to you.
If you found this guide helpful, kindly drop a comment below. Also, let me know which of these methods fixed the issue for you.
