If your Nintendo switch fan makes an unusual noise and you don’t know why or how to fix it, then you are on the right page.

Just like most switches, consoles (and electronic gadgets) that use a fan, there is a normal sound they all make. However, you can have a situation where you Switch starts making a loud buzzing, gurgling or grinding noise. If you have the latter, there’s a problem.
The good news, is that there are many ways to fix a Nintendo Switch with loud buzzing noise which I will show you in this guide. First, I will quickly explain why this happens. Then, we will quickly look at some ways to stop the noise.
Without any further ado, let’s dive right in!
Contents
Why Is My Nintendo Switch Making a Loud Buzzing Noise?
There are 2 main reasons why a Nintendo Switch fan can make buzzing noises: Overheating & Manufacturing fault.
-
Overheating
Most Switches, consoles (and some other tech gadgets with internal fan) make loud noises when they are overheating. In my experience, one of the main causes of overheating is dirt in the internals especially around the heat exhaust or the fan.
As a result, there’s clogging up and heat is not expelled as it should be, causing the fan to overwork. You will experience this even more after extended use of the Switch. Even worse, this can damage your switch beyond the noise.
-
Manufacturing Fault
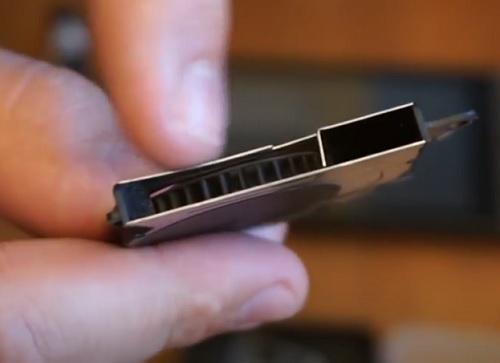
If your Nintendo Switch fan has always been making the buzzing noise since you got it, then it’s probably a manufacturing error. In some cases, the metallic case surrounding the may be pressed against the blades of the fan. As a result, when the fan rotates, you it rubs against the case causing it to make the loud buzzing noise.
Now, let’s look at some quick ways to fix the issue.
Nintendo Switch Fan Noise Fix
To fix the Nintendo Switch fan noise, you can attach an external fan/cooler that reduces the heat in the internal components thereby reducing overheating and the fan noise. You can also clean and blow out the internal components of the switch especially the heat exhaust and fan. Finally, you can replace the fan with a new one.
Now, I will show you how to do all of these, one after the other.
1. Use an External Fan
The easiest way to fix the Nintendo Switch fan noise is to get an external USB power cooler for Nintendo Switch. It has an adaptor which fits into the fan ports on the top and bottom of the Switch, and helps to cool it down.
By reducing (and also expelling the heat coming the Switch), the internal fan isn’t overworked and hence, does not make the loud noise.
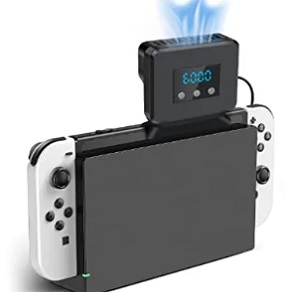
This will not only stop the buzzing noise, but also help to avoid other potential issues that could arise on the Switch due to overheating.
It will also show the temperature inside the Switch on the screen (of the external cooler, not your Switch), and you can adjust the rate at which the external Switch also blows out air from your Switch.
While this will fix the Nintendo Switch fan noise when caused by overheating, it won’t fix it if your fan is actually faulty itself.
2. Clean or Blow Out the Internals
Another way to fix) overheating and hence the fan noise on your Nintendo Switch is to actually clean the internals with isopropyl alcohol and Q-tip or blow it out with compressed air.
What you need:
- A tri head screw driver
- A philips head screwdriver
- Isopropyl alcohol and cotton buds (for cleaning) and/or compressed air (for blowing)
Now, here’s what you need to do:
- Use the tri head screwdriver to loosen the screws at the corners and back of the Switch
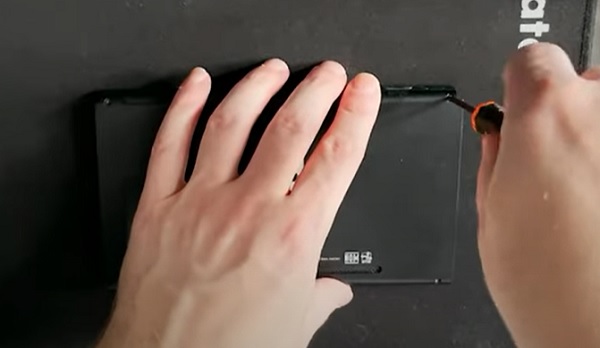
- Use the philips head screw driver to remove the screws at the bottom of the Switch, just beside the charging port and on the top beside the cooling vent and the middle screws on both sides
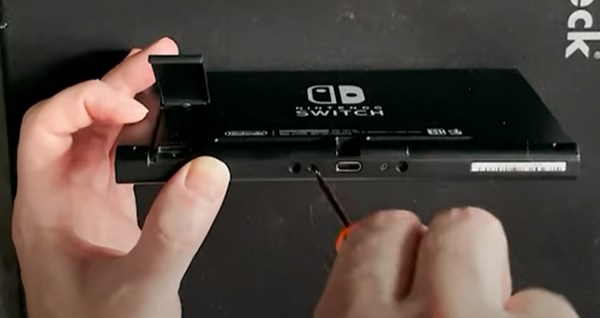
- Once all the screws have been removed, lift the back cover.
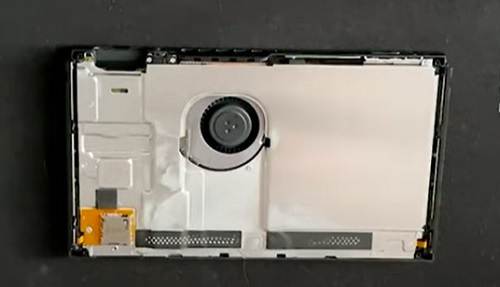
- Now, you need to remove the screws holding the cover of the heat sink so that you access the heat sink and the fan.
Clean with Isopropyl Alcohol:
- Once the Switch has been opened, dip the cotton bud (Q-tip) in the isopropyl alcohol and use it to clean the internal components especially around the fan, the heat exhaust and the heat sink (especially the heat exhaust!)
Blow with Compressed Air:
- You may also blow it out with compressed air to removed all clogged up dirt around the fan blades and the heat exhaust.
Once done, cover up your Switch and put back all the screws in the right port. Now, the Nintendo Switch fan noise should no longer be a problem.
3. Replace the Fan
Finally, if your fan is damaged (either due to manufacturing fault) or other reasons, then you need to replace it with a new fan. The whole procedure is quite simple and you can complete it under 20-30 minutes. (I have also attached a video at the end for visual demonstration).
What you need:
- A tri head screw driver
- A philips head screwdriver
- A replacement fan
By the way, you can easily find a replacement fan that comes with both screw drivers as a package online on Amazon.
Step 1: Open up the Nintendo Switch
Use the tri head screwdriver to loosen the screws at the corners and back of the Switch. Then, use the philips head screw driver to remove the screws at the bottom of the Switch, just beside the charging port and on the top beside the cooling vent and the middle screws on both sides. Then, lift the back cover once all the screws have been removed.
Step 2: Remove the Board Cover
- Now, you need to remove the screws holding the cover of the board so that you access the heat sink and the fan
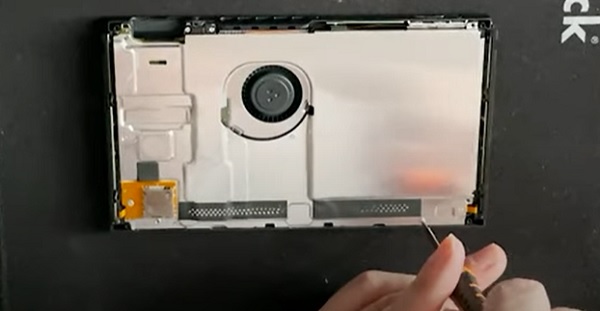
Step 3: Remove the Heat Sink
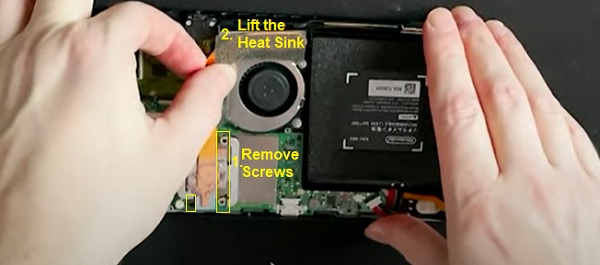
Now that the heat sink and fan are now more exposed, you need to remove the heat sink which is holding the fan in place.
- To do that, use the philips head screw driver to remove the screws holding the heat sink itself, then lift it up carefully.
Step 4: Remove the Old Fan
Again, the fan is also head by 3 screws which you need to loosen before you lift the fan.
- Two of the screws are exposed and easily to see just on the edges of the fan. Go ahead and loosen those ones.
- The third screw is hidden under a small board just beside the fan. To access this, remove the small plastic cover on the small board.
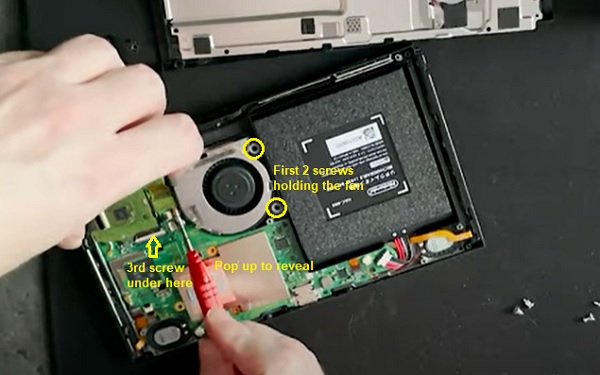
- Then, using a flat head screw driver, pop up the little attachment holding the small board. Once it pops up, you should see the third screw. Loosen it, and now you can lift the fan up.
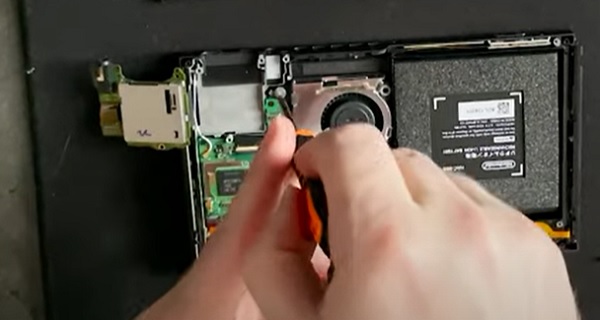
- Now, you should be able to remove the old fan. However, don’t discard it yet!
Step 5: Put in the New Fan
- First, the new fan may not come with rubber washers, and so you will need to remove those in the old fan and put them into the screw slots of the new fan you got. These washers help to ensure that the fan doesn’t move around while using the Switch.
- Now, carefully put the new fan back into the slot. Take your time here and ensure you do it properly.
- You can also apply some thermal paste on the heat sink before you close everything.
Step 6: Screw & Close the Switch
Now, go ahead and close everything back up in the reverse order in which you removed them.
Here’s a video showing the whole process:
4. Return It (If You Still Have Warranty)
If you still have warranty covering your Switch, then you may want to consider returning it to get it fixed or get a new system before it runs out of warranty,
Alternatively, you can also get it fixed at any Nintendo switch repair shop near you especially if you are already out of warranty.
If you found this guide helpful, kindly drop a comment below. Also, let me know which of these methods fixed the issue for you.
