Do you have a white screen on your TV? Then, this troubleshooting guide is for you.
Whether your TV has a solid white screen (or with lines), white screen with sound or it even looks hazy, this guide covers everything you need to know.

We’ll explore some of the most common causes of this screen issue, and and more importantly, how to fix it.
Without any further ado, let’s dive right in!
TV White Screen: Causes & How to Troubleshoot
There are various reasons why your TV might be showing a white screen.
Some of these include HDMI connection issue, screen saver or power save feature, issue with connected external devices, dislodged LED diffuser lenses, LVDS cable connection issue, faulty power supply unit, bad IC chip on T-Con board, faulty T-Con board or even a faulty display panel.
Unless the panel is completely damaged, there’s a reliable solution to every single cause listed above which I will discuss in this troubleshooting guide.
At the end of this guide, I will also reveal 2 tricks to you that could help you fix the white screen on your TV if it happens to be that you have a faulty display panel (in which case it’s just more practical to replace the TV anyway than replace the panel).
However, these 2 tricks will be left as last resort “fixes” because they are only temporary and the white screen may come back after some time.
With these, you may be able to get a few months of TV time before you finally have to replace it (remember only if all the other reliable/permanent fixes we will be discussing first don’t work for you).
Let’s begin.
1. Check the HDMI Connection & External Devices
A white screen on TV can be caused by something as simple as the HDMI cable or port, or may even be coming from a device that is attached to the TV via HDMI.
Therefore, you need to first check for any issues with the HDMI connection.
There’s a proven 3-step process I use for checking HDMI connection issues:
Step A: Disconnect & Reconnect the HDMI Cable
The first thing to do is unplug the HDMI cable from your TV and plug it back in. The same thing applies if you have an external device like Roku stick or Fire stick plugged into your TV’s HDMI port.
Before plugging the stick or cable into the HDMI ports, blow out the port to remove dust or particles that might be interfering with the HDMI connection.
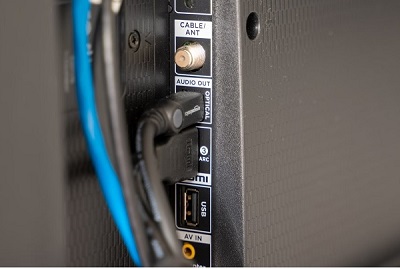
Also, if you are connected via an HDMI cable, inspect for any visible damages in the HDMI cable.
If the issue does not stop, move to the next step.
B. Switch HDMI Port
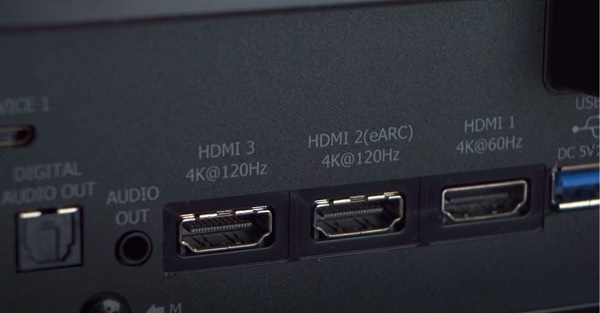
The next thing you need to do is to switch the HDMI port.
In the case where the HDMI port you have the HDMI cable or stick plugged into is faulty, switching the ports might just help get rid of the white screen on your TV.
Also, remember to switch the input source that matches the HDMI port where the device is plugged into.
C. Replace the HDMI Cable
Finally, if you have a spare HDMI cable, try using another HDMI cable just in case the one you currently use has developed a fault.
By the way, HDMI cables are not all the same, and what you want to get is a premium high speed quality HDMI cable.

However, if you don’t have a spare HDMI cable, move on to the next fix for now before you go ahead and buy a new HDMI cable that may or may not fix the issue (in case it has nothing to do with HDMI in your own case). You can always come back to this later.
2. Turn Off Screen Saver, Power Save or Ambient Mode
There are several features on various TV brands that help to save power or prevent image retention.
One of such feature is the ambient mode feature on Samsung TV. Another one is the screen saver feature, Daydream or power save mode on Sony TV and other TV brands.
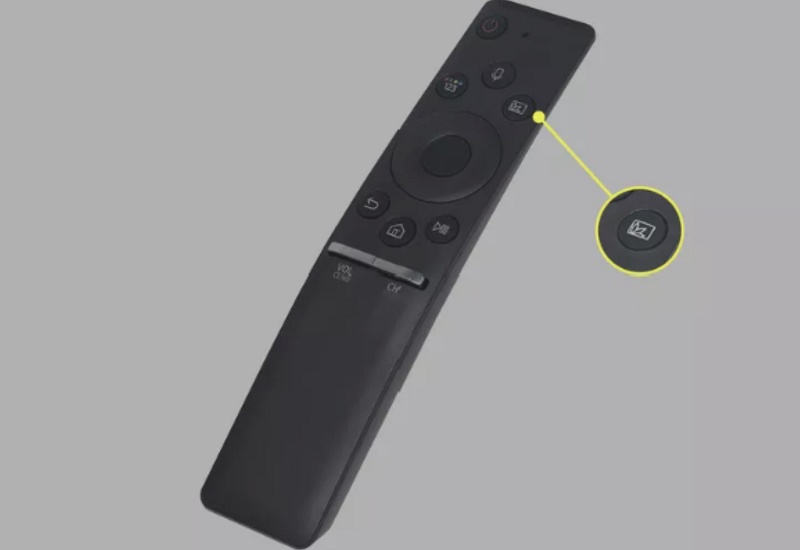
If you have a Samsung QLED or Frame TV that is displaying a white screen, it is often as a result of ambient mode being enabled, and this can be fixed easily.
The reason why this happens is that when the TV is first set up, it may take a while for Ambient mode to completely download all of its included content especially if the connection is slow or unstable. Because of this, the Ambient mode screen will appear white if it is accessed right after completing the initial setup.
To fix it, you simply need to exit ambient mode.
- To do that, press the Ambient mode button on the remote (the button looks like a flower). If your remote does not have that, press the Return/Back button on the remote and then choose TV as the source.
Similarly on a Sony TV, a blank white screen is sometimes displayed when the TV enters Screen saver or Daydream. Again, you need to exit this feature and turn it off to fix the white screen issue, unless your Sony TV is stuck on screensaver.
- To turn it off, press the home button on the remote control, and then press “Settings”.
- The next steps will depend on your TV menu options:
- Select Device Preferences > Screen saver > Screen saver > Turn screen off. (Android™ 9)
- Select Screen saver > Screen saver > set to Sleep. (Android 8.0 and Android 7.0)
- Select Daydream > Daydream > set to Sleep or None. (Android 6.0 or earlier)
NOTE: If the TV does not respond to the remote and keeps showing a white screen, then you need to troubleshoot the remote itself as there might be an issue with it (in which case it’s actually not sending a signal to the TV). The guides below will help you with that:
If the white screen issue persists or has nothing to do with any of these features in your case, then move to the next step.
3. Check the LVDS Cable
LVDS stands for Low-Voltage Differential Signaling, and it is a type of cable used to transmit video signals between a TV’s main board and its display panel.
The LVDS cable typically connects to a connector on the main board, and then runs to a connector on the back of the display panel.
In some cases, the cable is connected from the main board to the T-Con board (which itself is then connected directly to the display panel).
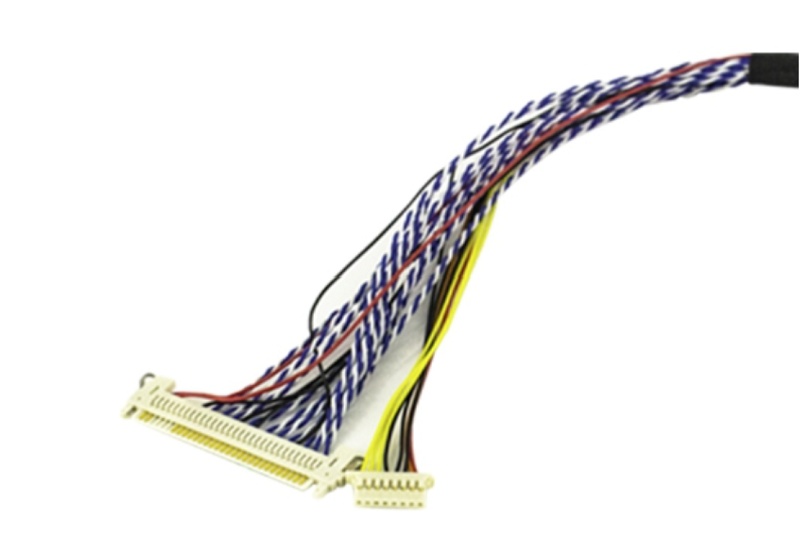
If the LVDS cable connection is loose (not making good contact on one or both ends) or the cable is faulty, no signal will be sent from the main board to the display panel which can cause your TV to show a white screen, flickering white screen or white hazy screen.
Here’s what you need to do:
- First, open up the TV and check the LVDS cable
- Remove the cable from both ends and wipe the ends with a soft clean brush.
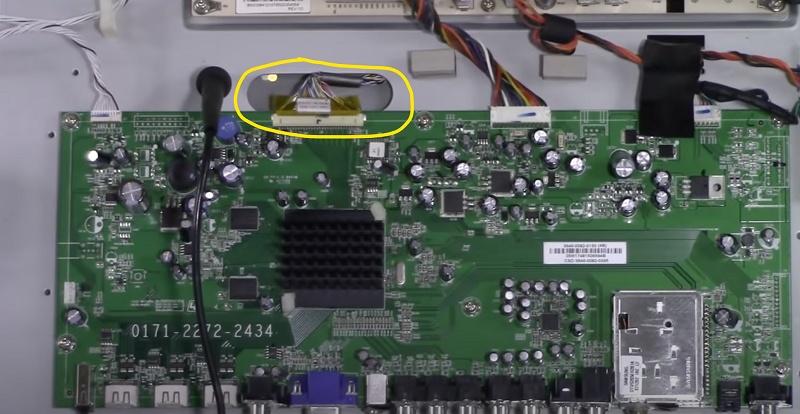
- Plug the cable back into the connectors, ensuring that it fits tightly into the connectors.
If that doesn’t fix the issue, you might have to replace the LVDS cable.
4. Check Voltage Supply to T-Con Board
If there’s a missing 12Volts supply from the main board to the T-Con board (which is connected to the panel), you will most likely see a white screen on your TV.
In fact, the missing voltage is one of the most common causes of white screen on TV. It needs to be exactly 12V or at least very close to 12V.
The T-Con board can be recognized by the ribbon cable(s) attached to it.
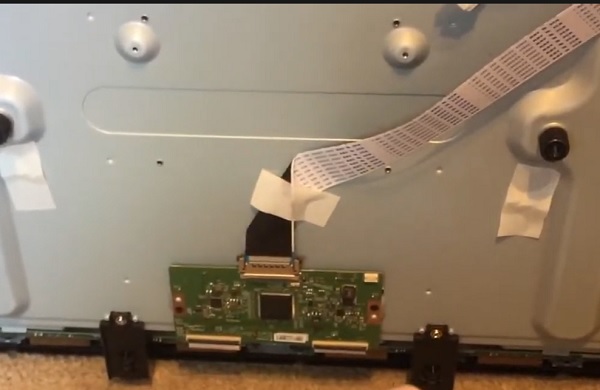
To check this voltage going to the T-Con board, you will need a multimeter.
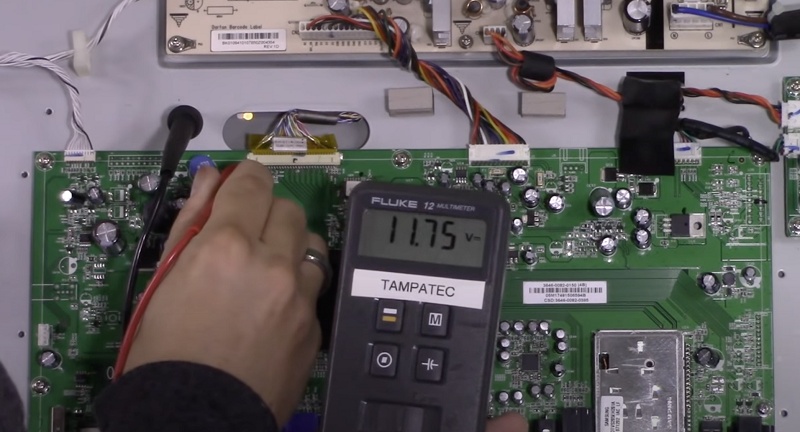
In some TVs, it may be a different value but whatever voltage is expected will be labelled on the TV board.
NOTE:
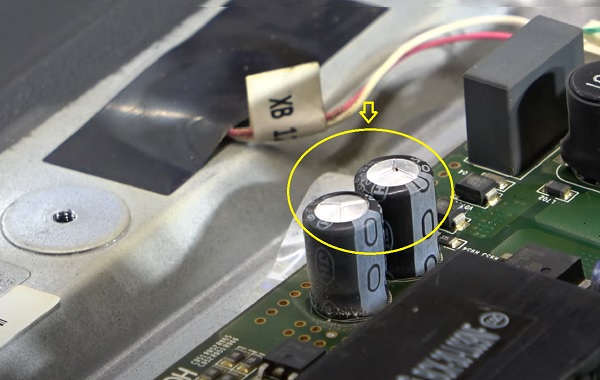
- If you check the voltage and it is far from the expected value, then it is likely an issue with the main board. In some cases, you may have a faulty capacitor on the main board. If not, you may need to replace the main board as a whole.
- If a capacitor is faulty, some of the signs you might see include:
- The capacitor is bulging at the top
- The capacitor is leaking
- Corrosive layer on one or both legs of the capacitor
- Bottom bung of the capacitor is pushed out
- However, if you measure the voltage going from the main board to the T-Con board again after unplugging the T-Con board and you get 12V (or the expected value), then the issue is with the T-Con board and it needs to be replaced.
The video below shows you how to check the voltage supply:
5. Replace IC Chip on T-Con Board or T-Con Board Itself
The integrated circuit (IC) chip on the T-Con board is another common culprit when it comes to TV white screen issue.
The IC on the T-Con board is responsible for receiving video signals from the main board and processing them to display the images on the screen.
It also controls the timing of the signals to ensure that the images are displayed correctly on the screen.
In addition, the IC on the T-Con board can perform other functions such as color correction, scaling, and image enhancement to improve the overall picture quality of the TV.
When this IC chip is faulty, the TV can show a white screen.
To fix it, you simply need to replace the IC chip.
Here’s how to remove and replace the IC chip on your T-Con board:
Step 1: Removing the Chip
- Turn off and unplug the TV from the power source to prevent any electrical shocks.
- Locate the IC chip on the T-Con board. It is usually a small black or silver rectangular chip with several metal pins on either side.
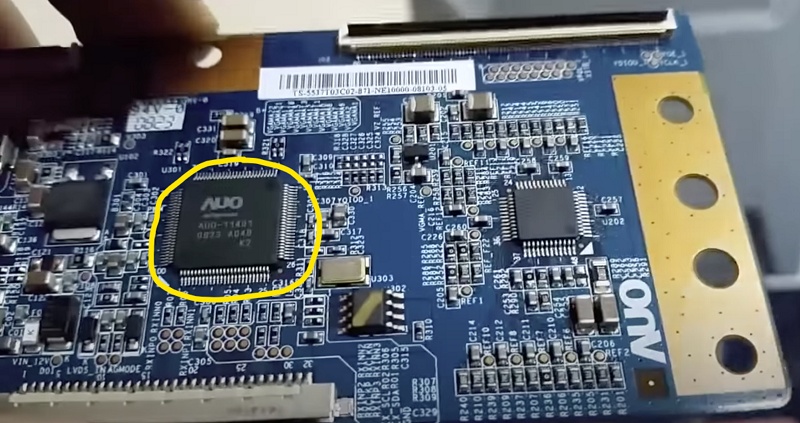
- Use a hot air rework station or a soldering iron with a fine tip to heat the pins of the IC chip. This will help to loosen the solder that is holding the chip in place.
- Use a pair of tweezers or a small flathead screwdriver to gently lift the IC chip from the board. Be careful not to damage the surrounding components or the board itself.
- Once the IC chip has been removed, clean the area around it with a solder wick or a desoldering pump to remove any excess solder.
Step 2: Replacing the Chip
- Get a new IC chip (check the label on it)
- Install the new IC chip onto the board, making sure to align the pins correctly. Apply a small amount of flux to the pins to help the solder flow.
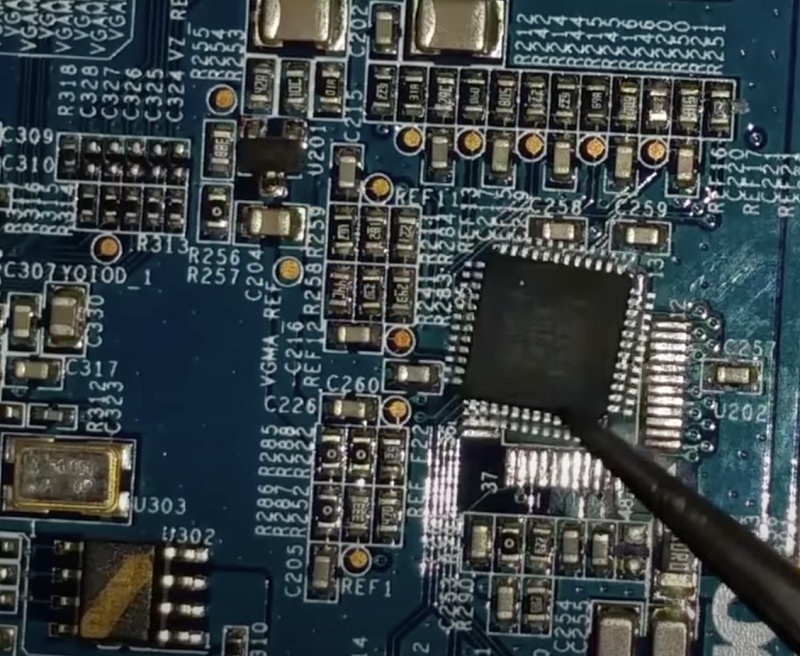
- Use a hot air rework station or a soldering iron with a fine tip to solder the new IC chip onto the board.
- Once the IC chip has been soldered onto the board, clean the area around it with a solder wick or a desoldering pump to remove any excess solder.
It is important to note that removing an IC chip from a T-Con board can be a difficult and risky process, and there is a risk of damaging the board or other components.
If you are not confident in your ability to perform this task, it is best to seek the help of a professional technician.
However, if you are comfortable working with electronics and have the necessary tools, the process of removing an IC chip from a T-Con board typically involves the steps highlight above.
The video below also shows you how to do that:
Alternatively, you may replace the whole T-Con board.
- Turn off and unplug the TV from the power source, then remove the back cover to access the internal components.
- Locate the T-Con board, which is usually located near the center of the TV and connected to the main board and the display panel with ribbon cables.
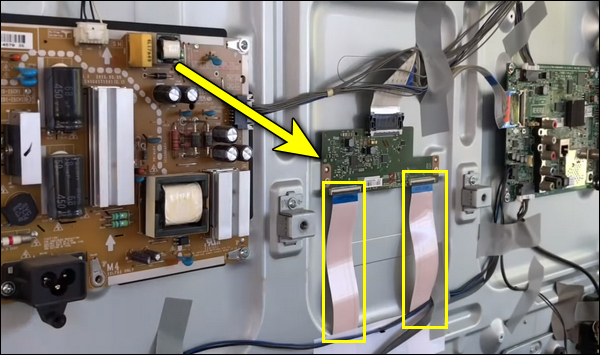
- Disconnect the ribbon cables that connect the T-Con board to the main board and the display panel. Be careful not to damage the cables or the connectors.
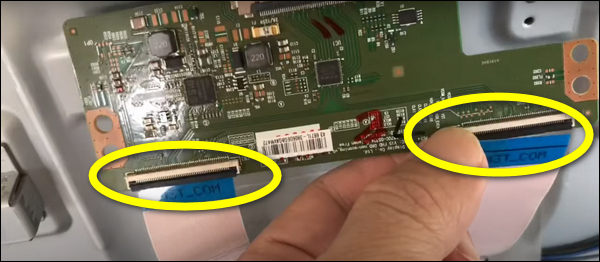
- Remove any screws or clips that hold the T-Con board in place. Be careful not to damage the board or other components.
- Install the new T-Con board onto the TV, making sure to align the connectors and the screw holes correctly.
- Reconnect the ribbon cables that connect the T-Con board to the main board and the display panel. Make sure the cables are securely connected and in the correct orientation.
- Replace any screws or clips that hold the T-Con board in place.
- Replace the back cover of the TV and secure it with the screws or clips.
Turn on the TV and you should no longer see a white screen on the screen.
6. Press the Edges of Your TV
If the issue with your TV is not caused by the T-Con itself and you own an older model, it is highly probable that the issue is originating from the boards that are connected to the T-Con, which are bonded to the display panel during the manufacturing process.
You can identify this problem if applying pressure on the top or bottom edge of the panel temporarily resolves the issue with your TV.
The root cause of this problem is the heat generated by your TV, which destabilizes the factory bonds, causing them to deteriorate over time.
Although applying pressure or using tape can restore the contacts and bring back the picture, it is only a temporary solution, and the underlying issue will still remain.
In most cases, the cost of replacing the display panel exceeds the cost of a new TV, making it more practical to purchase a new TV instead of attempting to repair the old one.
- Where Are Samsung TVs Made? (All Sites REVEALED!)
- Who Makes LG TVs (Here’s the TRUTH!)
- Who Makes Roku TVs? (Everything You Should Know)
7. Heat the TV Up
No, I don’t mean that you should cook your TV or anything like that. Still, this trick might surprise you.
By the way, there’s a video attached at the end showing the whole process and you can see for yourself. But before that, let me explain what we are trying to achieve here, why and how it works.
“How did we go from heat being a potential cause of the issue to heat being a potential fix?”
Heating up a TV can sometimes fix a screen issue because it can temporarily improve the connections between the components inside the TV.
Over time, the connections between the various components in a TV can become loose or weakened causing issues such as white screen, white haze, flickering screen or other color/picture issues.
When a TV is heated up, the heat can cause the metal components inside the TV to expand slightly, which can improve the connections between the components.
This can sometimes fix the screen issue temporarily. However, this is not a permanent fix, and the issue may return once the TV cools down.
We actually want to achieve two things with this method:
- Check if the display panel is damaged (if damaged, it’s more practical to replace the TV that try to fix the panel).
- Fix the issue for some time with this trick
How’s that? Continue reading.
First, to heat up the TV, you have two options:
- Open up the back of the TV and expose the boards, and leave the TV outside in the sun for up to an hour
- Apply heat continuously to the boards using a heat gun until all the boards at heated to about 100ºC.
Once the boards are heated up, go ahead and plug in the TV, turn it on and the white screen should magically disappear (you should now have pictures on the TV).
If heating up the TV fixes the white screen and restores picture, then you can use this trick to check if the display panel is damaged.
- First, allow the TV to cool down. Once this happens, the white screen on TV will most likely return. In some cases, the issue might not come back for some time.
- Now, detach ONLY the power supply board from the TV and repeat the heating up process. Once all the other components have been heated up, attach the power supply board (not heated) to the TV again and turn it on. If it white screen is fixed again, then it proves that the issue had nothing to do with the power board (and hence not heating up the power board did not affect the outcome)
- Repeat the process for every board on the TV one at time, with the alternate heating and cooling periods.
- If the results are all the same, then it proves that the display panel.
- However, if at any point, a particular board was not heated up and the TV still has a white screen despite heating every other board, then the issue is with the board that was not heated at that time. In that case, replacing the board should fix the white screen on TV
The whole procedure is a try-and-error and can be time-consuming.
At the end, you will know whether the display panel is bad or if the issue is with another board.
If the display panel is bad, then there’s only one trick you can try to fix it.
Here’s a video showing what I just explained:
Conclusion
A white screen on TV can be a frustrating issue to deal with, but it is usually fixable with the right approach. The causes of a white screen can vary, from simple issues like loose connections or screen saver feature to more complex issues like faulty components.
If you are experiencing a white screen on your TV, it is important to troubleshoot the issue carefully, starting with the simplest solutions and working your way up to more complex ones.
This may involve checking the HDMI connection, external devices attached to the TV, or replacing faulty components like the T-Con board.
It is also important to note that attempting to fix a white screen on your own can be risky, and it is recommended that you seek the help of a professional technician if you are not experienced in electronics repair.
With the right approach and the right help, however, you can get your TV back to working properly and enjoy your favorite shows and movies once again.
