If your Roku TV is stuck on updating software or is unable to update software, then you are not alone. This can happen whether you have a TCL, Hisense, Onn, Sharp, Philips or other Roku TVs, a Roku express stick or Roku ultra.
In some cases, your Roku may fetch the update from the internet, restart only to revert back to the old software version or go back to the software update screen in a repeating loop. In some other cases, the software update screen may remain stuck on installing final updates for hours or at 0 progress.

The first case which is more common looks at first as if the software update was successful after a restart only for you to realize that your Roku still has the same old software version that needed to be updated. Your device may even show a black screen/no signal on restart until you unplug it and plug it back in.
In this guide, I am going to show you 11 ways to fix the issue quickly. Without any further ado, let’s dive right in!
Roku TV Stuck on Updating Software
Here are 11 quick and proven ways to fix a Roku TV that is stuck on updating software:
1. Restart Your Network Router
One of the most common reasons why Roku TV becomes stuck on software update screen is having a slow/unstable network connection. In this case, you may also see the “unable to update” error.

You can quickly fix this by restarting/power cycling your network router.
Turn off your network router and unplug it from the power source. Wait for 10 seconds and plug it back into the power source. Then, turn it on and allow up to 2 minutes for the router to be connected. Once connected, connect your Roku TV and try updating the software again.
Here’s how to update the software:
- Click on the Home button on your Roku device remote
- Select Settings > System > System Update
- Click on Check Now to manually check for any update
If that fixes the issue, great! Otherwise, move to the next step.
2. Power Cycle Roku TV
If your Roku TV is still stuck on software update, then you should try power cycling it.
Here’s how to power cycle your Roku TV:
- While the TV is on, unplug it directly from the power outlet
- Leave it unplugged for 30 seconds
- Now, plug the TV back into the power source and turn it on
Once your Roku TV turns on, go ahead and try updating the software again.
3. Clear Roku TV Cache
Another common reason why Roku TV might become stuck on software update is having corrupt cache files on your TV. That said, you can fix it by simply clearing your Roku TV cache using a combination of keys on your Roku remote controller.
By the way, clearing your cache is not the same as resetting your TV (all your settings and installed channels will still be intact).
That said, here’s how to do that:
- First, navigate to the Home dashboard
- Press the ‘Home’ button on your TV remote 5 times
- Press the ‘Up arrow’
 button on your remote once
 - Press the ‘Rewind’
 button twice
 - Finally, press the ‘Fast forward’
 button twice

After a few seconds, your TV will shut down and boot up again. Once the TV restarts, make sure it’s connected to Wi-Fi and try updating the software again.
NOTE: If this doesn’t work on the first try, try it 2-3 more time, connect to Wi-Fi on each reboot and try updating the software. While this will fix the issue for most people on first try, a few other users reported that had to try this a couple of times before it finally worked.
4. Check Network Connection Signal Strength
Like I mentioned earlier, a slow/unstable internet connection can cause your TCL, Hisense or Onn Roku TV to be stuck on the software update screen. Therefore, you need to check if the router is really online and connected.
One quick method to check the network connection is to try to connect your other devices (phone, computer, gaming console, smart TV e.t.c) to your network router.
Once connected, you need to see if the internet actually works. For example, try to load a web page on a browser or stream an app/a channel on these other devices.
You can also check the network connection signal strength from the Roku TV network settings. Here’s how to do that:
- To do that, go to Settings > Network > About, and see if it’s showing ‘Connected’ or not.
- On the same page, you will find the signal strength, is it showing ‘Poor’, ‘Good’ or ‘Excellent’?
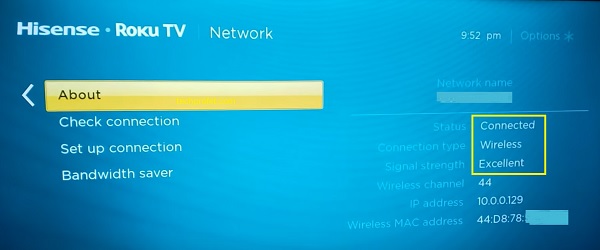
If the network is not connected or the signal strength is poor, then you need to check your network router and try again.
- Finally, click on Check Connection.

- You Roku device will start checking your Wireless/Wired connection and Internet connection.

- Once the check is complete, you should see a prompt showing ‘Connection check was successful‘
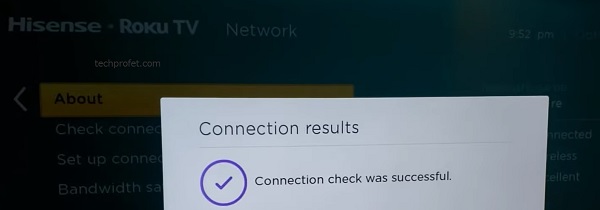
- If the network check is successful, try the update again and you shouldn’t have any issue again.
However, if the connection check is not successful, you need to troubleshoot your network router.
5. Reset Network Connection
The next thing you need to do is to reset the network connection on your Roku device and restart it afterwards (to clear out any corrupted cache or data).
This also means that you will need to connect to your network device(s) like you had never connect to it before (i.e you will be required to enter the correct password to any network you choose to connect to after the restart).
Here’s how to reset network connection on Roku TV:
- Press the settings (gear icon) on the remote. Under settings, select System > Advanced System Settings > Network Connection Reset and press the OK button.
- Your Roku TV should reboot after this. If it does not, reboot it yourself by going to Settings > Power > System Restart.
Next, you need to set up a network connection on your Roku TV. Here’s how to do that:
- Press Home button on Roku remote
- Scroll and select Settings
- Select Network
- Select Set up connection
- Choose Wireless
- Select your Wi-Fi network from the list of available networks. If you do not see your network, select Scan again to see all networks.
- Enter your correct network password
- Finally, select Connect

- Once connected, go ahead and try update the software again.
6. Connect to a Different Network Connection
The next thing you want to do is connect to a different network connection. There are three options here:
- Connect to phone hotspot
- Switch to ethernet cable
- Connect to another network router
Try all the options and see which works for you. Once you are done updating the software, you can always switch back to your default network connection on your Roku device.
Option A: Connect to an Hotspot
In this case, you should try to force your hotspot to connect to the 2.4GHz frequency.
Once connected to your hotspot, try to update the software again.
If it still doesn’t work, try follow the alternative route to update your Roku software:
- Navigate back to the Roku Home Screen (after connecting to the hotspot)
- With your remote, Press Home button at least 5 times, then Fast-Forward button 3 times and finally Rewind button 2 times
- Select Cycle Software Update Server (this refreshes the Server)
- Finally, select ‘Update Software’ > ‘Update Now’.
Option B: Switch to Ethernet Cable
Another option is to switch to an ethernet cable to update your Roku TV.
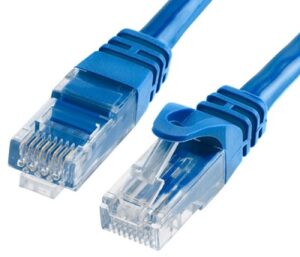
Here’s how to do this:
- Connect one end of an ethernet cable to your Roku TV and the other to an ethernet port on your Wi-Fi router.
- Press Home button on Roku remote
- Scroll and select Settings
- Select Network
- Select Set up connection
- Choose Wired
- Your Roku TV will automatically connect to your network.
- Once connected, try updating the software again.
Finally, you can also try switching to a different network router. Once connected, try updating your Roku software again.
7. Manually Update Your Roku OS
To manually update your Roku device, you need to:
- Download the latest Roku OS software on your computer
- Format a USB drive to FAT32/FAT16 or Windows PC or MS-DOS (FAT) on Mac (this step is not necessary if your USB flash drive is already in the correct format)
- Copy the downloaded software to the USB flash drive
- Insert the flash drive into the USB port on your Roku TV and install the software
Step 1: Download the Latest Roku OS Software
- Open a web browser on your computer and visit tvupdate.roku.com.
- Choose the brand of your Roku TV e.g TCL, Hisense, Onn, Sharp, Philips e.t.c.

- Enter your Roku Model Number and Serial Number. To find these, go to Settings > System > About on your Roku TV. The model appears as 4 numbers followed by a letter (e.g. 6104X), and the serial number is a combination of 12 numbers and/or letters. Then, click on ‘Next’.
- Click on ‘Download Software’ to get the installer file on your computer (it will be named ‘update.roku‘)
Step 2: Format the USB Drive
Like I mentioned earlier, if your USB drive is already formatted as FAT32, FAT16 or MS-DOS (FAT). So, if you don’t want to format your USB drive, go ahead and jump to the next step. If a format is required, you can copy your files to another location, come back to this step and proceed onwards from here.
On windows:
- Plug the USB flash drive into your computer.
- Open the File Explorer and go to ‘This PC’.
- Right-click the USB flash drive and select ‘Format’.
- If the flash drive capacity is more than 2GB, select FAT32. If it is less than 2GB, select FAT16.
- Then, select ‘Start’

On Mac:
- Plug the USB flash drive into your computer.
- Open Finder and search for ‘Disk Utility’
- Select the USB flash drive from the left panel.
- Click on the Erase tab on the right panel.
- Select MS-DOS (FAT) from the drop-down menu.
- Click the Erase button and click Erase button again when prompted to format your drive.
Step 3: Copy the Downloaded Software File to USB drive
- Now, locate the update.roku file on your computer (should be in the Downloads folder by default unless you changed the storage location)
- Insert the USB flash drive and copy the update.roku file to the flash drive (do not put it in a subfolder)
- Eject the flash drive and remove it from the port of your computer
Step 4: Insert USB Drive Into Roku TV & Update
- Insert the flash drive into the USB port on your Roku TV
NOTE: If you see the message “Update file could not be opened. Please try again”, the format of the USB flash drive is likely not recognized. In that case, you need to format it. To do that, go back to step 2 above (if you skipped it earlier and proceed from there).
- Press the Home button on Roku remote on your Roku TV remote, and select Settings > System > System update > I can’t connect.
Your Roku TV validates the file on the USB flash drive and displays a 12-digit code on the TV screen. If you see the message “Contents of the update file are invalid”, your Roku TV is already running the latest software version.
- Go back to your computer and enter the code and click on next.
- After you enter the code correctly, a new 6-digit code appears on your computer screen
- Return to your Roku TV and enter the 6-digit code using your Roku TV remote. The software update begins immediately, and your Roku TV restarts once the software update is complete.
- After your Roku TV restarts, you can remove the USB flash drive.
The video below will show you the whole process:
8. Try It Again Later
Sometimes, when Roku TV won’t update the software, it may be due to server issues from Roku associated with the software update system. When that happens, no matter what you do, the software update won’t work.
In that case, the only thing you can do is try again.

That is why when you see some of the error codes associated with software update issues like error codes 001, 002, 003, 004, 005, 006, 007, 008 or 011, you will often see the prompt to “try again” later. You may also see error 023.2.

Therefore, turn off your Roku TV, wait for a few hours, turn it back on and try to update the software again.
To check and update your Roku software:
- Click on the Home button on your Roku device remote
- Select Settings > System > System Update
- Click on Check Now to manually check for any update
9. Reset to Factory Settings
If your Roku device is stuck on software update loop (i.e it fetches the software update from the internet, “updates”, reboots only to go back to the software update page) whether it’s during an initial setup or for some other reasons, then you need to reset it to factory settings.
Here’s how to do that:
- Click on Home button on Roku remote
- Scroll and select Settings
- Select System > Advanced system settings > Factory reset

- Enter the code displayed on the TV and click on ‘OK’
Alternatively, you can reset your Roku TV without remote by using the physical reset button on the TV. Here’s how to do that:
- First, locate the physical reset button on your Hisense Roku TV. You will need a pin or any tiny object to push the button.
- Once you locate the reset button, press and hold the button firmly for 10 – 20 seconds while your device is powered on. When it shuts down, keep holding down the reset button until it powers on again and shows the Roku TV logo. Then, you can release the button.
- When the factory reset is complete, the TV will reboot twice and finally turn on.
- Once it restarts, connect to your Wireless network
- A popup should come up immediately showing “Updating software” dialog. If you have a good network connection, the update should be successful and you should not experience the software update loop again. If it shows the update dialog again, wait for it to be completed one more time and restart.
- Now, the loop should no longer happen.
10. Use Store Mode to Get Software Update & Return to Home Use
I saw a user who reported online that he had a Roku TV that was stuck on updating software loop and was able to install the software successfully by using the store mode of the TV.
Once the software was installed in store mode, he then returned the TV back to home use and there was no software update dialog again. To do this, you need to take your Roku TV to the initial set up screen (like you just purchased it).
Here’s how to do that:
- Unplug the Roku TV from the power outlet
- Hold the physical power button on the TV for a minimum of 30 seconds (while it’s still unplugged), then plug it back directly to the power outlet.
- Once the Roku TV turns on, you should be taken to the initial set up screen.
- While setting it up, choose ‘Set up for store use’
- In store mode, allow the software update to be done (make sure you connect to a network so that the TV can update the software)
- Once updated, you need to return it to ‘home use’. To do that, you need to repeat steps 1-3.
- Unplug it again from the power outlet, hold the power button for 30 seconds and plug the TV directly into the power outlet.
- Proceed with the set up again, but thus time, select ‘home use’ during the setup.
- The update from the store mode should still remain on your set and you should not see any software update popup.
Just like that, your Roku TV software update should be done and should no longer be stuck on software update.
11. Contact Roku Support
If you have followed all the tips above, your Roku TV should not be stuck on updating software.
However, if you still have an issue with the software update, you can contact Roku for support.
Bottom Line
Roku OS required to be updated every now and then when new software versions are released. When they are not updated, apps like Disney Plus, HBO Max, Netflix, Hulu and others may stop working on your Roku device until after a successful update.
However, when you try to update your Roku TV software only to become stuck on software update, it can be really frustrating. You may also see any of the error codes like error 001, 002, 003, 004, 005, 006, 007, 008, error 023.2, and others usually without any specific instruction other than mostly to “try again”.
In some cases, Roku keeps updating and restarting, will usually eventually show “software update failed”.
This can be caused by issues with network connection, software bugs, cache files e.t.c.
By following all the procedures explained in this guide, you should be able to fix the software update issue on your Roku TV.
Let me know which of these methods fixed the issue for you in the comment section below.