Are you tired of seeing a green screen on your Roku TV while streaming Netflix, Hulu, Paramount+ or other apps? Then, you are not alone.
The Roku green screen issue can be quite frustrating, and can leave you clueless on what to do. As frustrating as it can be, this problem is quite common and there are ways to fix it.
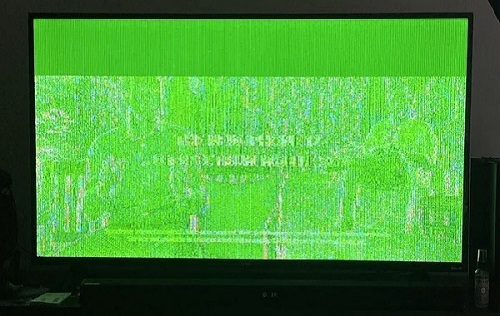
In this troubleshooting guide, I’ll walk you through the steps to get your Roku TV back to normal without any issues.
Whether you have a TCL Roku TV, Hisense Roku TV, Onn Roku TV, Westinghouse Roku TV or any of the streaming sticks, one of these methods should help fix the issue.
Without any further ado, let’s dive right in!
Why is My Roku TV Screen Green?
If your Roku TV screen appears green, it could be due to a few different reasons.
Here are some possible causes:
- Loose or damaged cables: If the cables connecting your Roku TV to other devices or to the power source are loose or damaged, it can cause the screen to appear green.
- Display settings: It’s possible that the display settings on your Roku TV are causing the green screen.
- Software issues: Sometimes, software updates or glitches can cause the Roku TV screen to appear green.
- Hardware issues: If there is a problem with the internal components of your Roku TV, it could cause the screen to appear green. This could be due to a variety of issues, including a faulty display panel or a damaged motherboard.
- Environmental factors: Environmental factors such as magnetic interference or exposure to extreme temperatures or humidity can also cause the screen to appear green.
If you are unable to resolve the issue on your own, it’s best to contact Roku customer support or a professional repair service to diagnose and fix the issue.
Now, let’s look at how to get rid of the green screen on your Roku TV.
How to Fix Roku TV Green Screen Issue
Below are some quick and proven ways to fix Roku TV green screen issue:
1. Power Cycle Roku TV
When faced with the dreaded green screen issue on your Roku TV, the first troubleshooting step you should try is power cycling your device.
Whether you have a TCL Roku TV, Hisense Roku TV, Onn Roku TV, Westinghouse Roku TV or any of the streaming sticks, this simple fix can often resolve the Roku green screen issue by clearing out any glitches or temporary bugs in the system.
Here are the steps you need to follow to power cycle your Roku TV:
- Unplug the power cable from the power source.
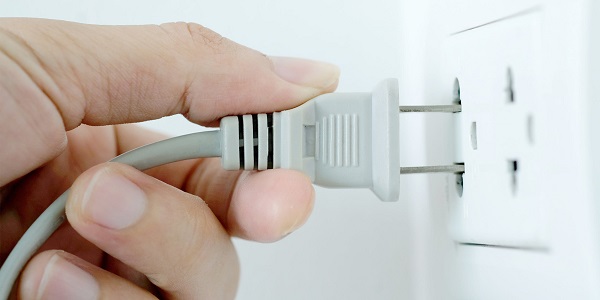
- Leave it unplugged for 60 seconds
- While unplugged, press and hold the Power button on your TV for about 30 seconds. This will allow any residual power in the device to dissipate.
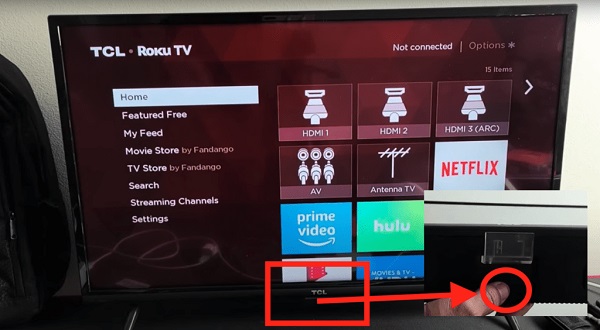
- Plug the power cable back into the power break and wait for your Roku TV to restart.
- Once your Roku TV has fully restarted, try streaming a show or movie again and the issue should have been fixed.
Power cycling your Roku TV is an easy and effective fix that can resolve many common issues.
Whether the issue happens while you are streaming YouTube TV, Netflix, Paramount Plus, Hulu, Apple TV or any other app, make sure to try this first.
If the green screen issue persists after power cycling your TV, move on to the next troubleshooting step.
2. System Restart Roku TV
If power cycling your Roku TV didn’t resolve the Roku TV green screen issue, the next troubleshooting step you should try is a system restart from the settings.
Restarting your Roku TV from the settings is a simple and effective fix that can resolve many common software-related issues.
Here’s how you can restart your Roku TV from the settings:
- Press the Home button on your Roku remote to go to the home screen.
- Scroll up or down and select Settings.
- Scroll down and select System > Power > System Restart.
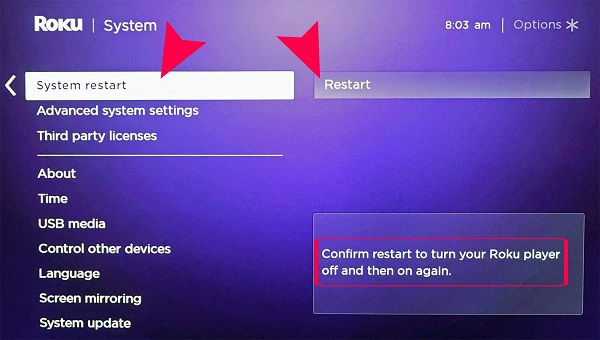
- Click “Restart” to confirm and then wait patiently. Doing so can help resolve any underlying software issues that may be causing the problem.
Once your TV has restarted, stream again to see if there is still a green screen on your Roku TV. If the issue persists, don’t worry, I have other fixes available for you.
3. Clear Cache using the Remote
If the green screen issue on your Roku TV persists, the next step is to clear cache of your Roku TV using a button combination on the remote.
Here’s how you can do that quickly:
- Access the Roku TV home screen by pressing the Home button.
- Once done, press the Home button again five times.
- Press the Up button once, the Rewind button twice, and then the Fast Forward button twice.
- Follow the exact combination and wait for your Roku TV to restart.
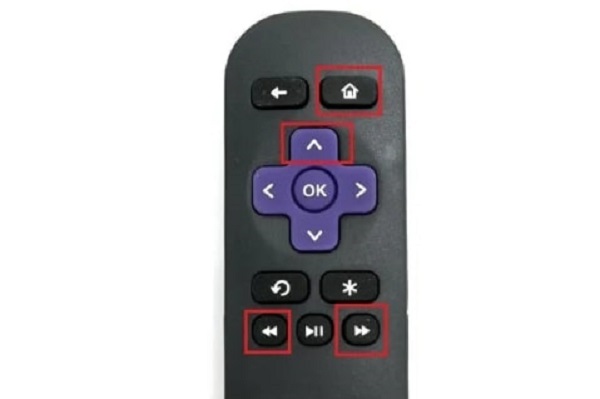
- After the refresh, try streaming your favorite show or movie again. If the green screen issue persists, move on to the next troubleshooting step.
Clearing cache on your Roku TV using button combinations on the remote is a relatively simple fix that can resolve many common system-related issues.
4. Switch Between Local TV and Streaming Apps
Another troubleshooting step that you can try is switching between the local app and the streaming app.
First, exit the streaming app you’re currently using and return to the Roku home screen. Then, switch to a live antenna feed channel for a while.
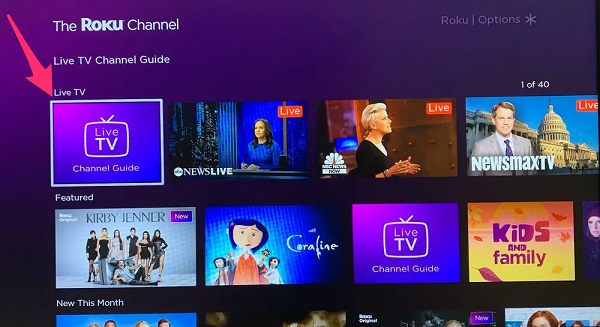
Wait for a few seconds, then switch back to the streaming app you were using before. Following that, try streaming your favorite show or movie again to see if the green screen issue is resolved.
If you’re experiencing this issue on YouTube, Hulu, Paramount Plus, Apple TV or any other streaming app, switching to an antenna-fed channel and then back to the app might be the solution you need.
Give it a try and see if it works for you!
5. Disable Fast TV Start
Another troubleshooting step to fix the Roku TV green screen issue is to disable the “Fast TV Start” option.
This option is designed to reduce the amount of time it takes for your Roku device to turn on and start streaming content. However, in some cases, this feature can cause the green screen problem.
To disable the “Fast TV Start” option, follow these steps:
- From the home screen, navigate to “Settings.”
- Scroll down and select System > Power.
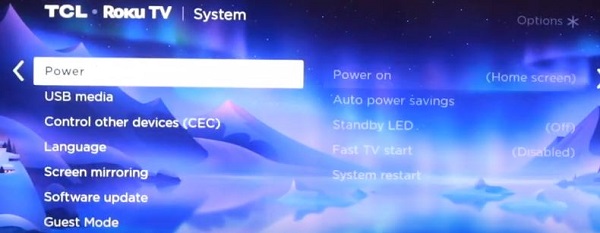
- Now, turn off the “Fast TV Start” option.
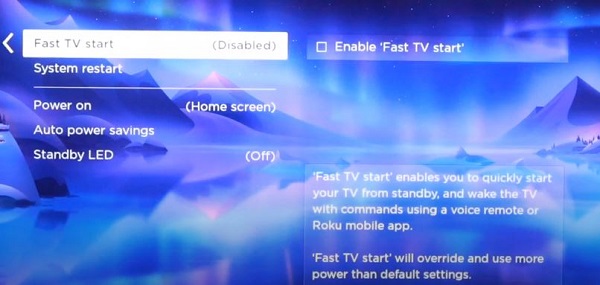
Finally, exit the menu and restart your Roku device. Once your device has restarted, check to see if the Roku TV green screen issue has been resolved.
6. Troubleshoot HDMI Settings
If the previous steps didn’t solve the issue, there’s something you can try to fix the Roku Roku TV green screen issue. This step involves troubleshooting the HDMI settings on your device.
To troubleshoot the HDMI settings on your Roku TV, follow these steps:
- Go to your Roku TV settings by pressing the home button on your remote and selecting “Settings” from the menu on the left-hand side of the screen.
- Scroll down and select “TV inputs”
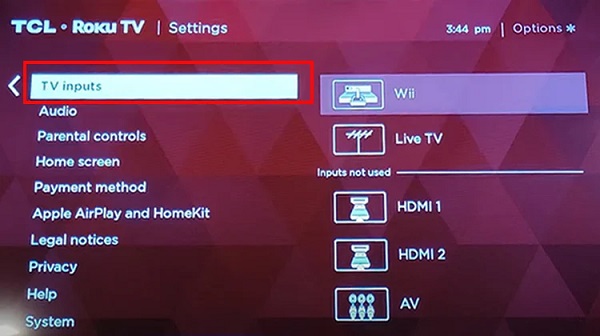
- Select “HDMI” and then select “HDMI mode“
- Now, change the setting to either HDMI 1.4 or HDMI 2.0 and see if this fixes the green screen issue.
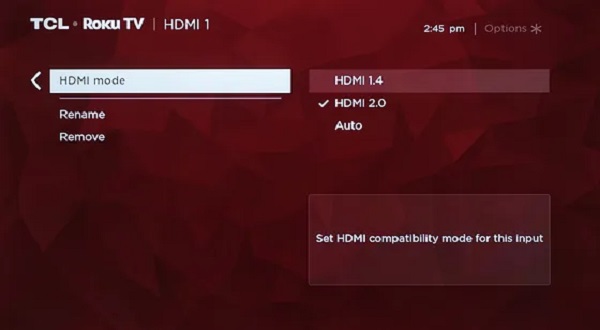
- You can try both HDMI 1.4 and HDMI 2.0 to see which one works best for you.
If the issue still persists, you can also try changing the HDMI port on your TV that your Roku device is connected to. Sometimes, certain HDMI ports may have compatibility issues with specific devices, so switching to a different port might help.
By troubleshooting the HDMI settings on your Roku TV, you can resolve many issues related to picture quality and streaming performance.
7. Update Roku TV OS
Another troubleshooting step you can take to fix the Roku TV green screen issue is to make sure that your TV’s operating system is up to date.
Updating your TV’s OS can help ensure that your device is running smoothly and can often resolve any software-related issues that may be causing the green screen problem.
To update your Roku TV’s OS, follow these steps:
- Press the Home button on your Roku remote.
- Scroll down and select “Settings” > “System”
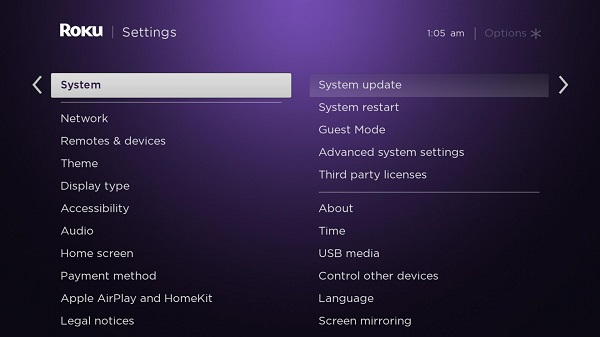
- Select System update > Check now.
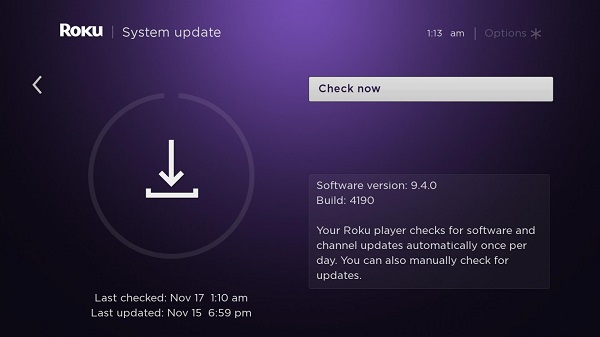
If an update is available, your Roku TV will begin downloading and installing it automatically. This process may take a few minutes, so be patient and don’t turn off your TV during the update.
Once the update is complete, check to see if the green screen issue has been resolved. If not, you can try the other troubleshooting steps listed below.
You can also use the manual method if your Roku TV becomes stuck on software update while using the first method.
Here’s how to update your Roku TV system software manually:
Step 1: Download the Latest Roku OS Software
- Open a web browser on your computer and visit tvupdate.roku.com.
- Choose the brand of your Roku TV e.g TCL, Hisense, Onn, Sharp, Philips, Westinghouse etc.
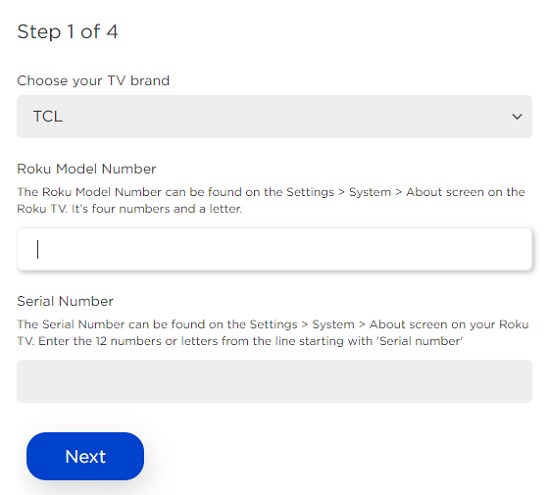
- Enter your Roku Model Number and Serial Number. To find these, go to Settings > System > About on your Roku TV. The model appears as 4 numbers followed by a letter (e.g. 6104X), and the serial number is a combination of 12 numbers and/or letters. Then, click on ‘Next’.
- Click on ‘Download Software’ to get the installer file on your computer (it will be named ‘update.roku‘)
Step 2: Format the USB Drive
Like I mentioned earlier, if your USB drive is already formatted as FAT32, FAT16 or MS-DOS (FAT). So, if you don’t want to format your USB drive, go ahead and jump to the next step. If a format is required, you can copy your files to another location, come back to this step and proceed onwards from here.
On windows:
- Plug the USB flash drive into your computer.
- Open the File Explorer and go to ‘This PC’.
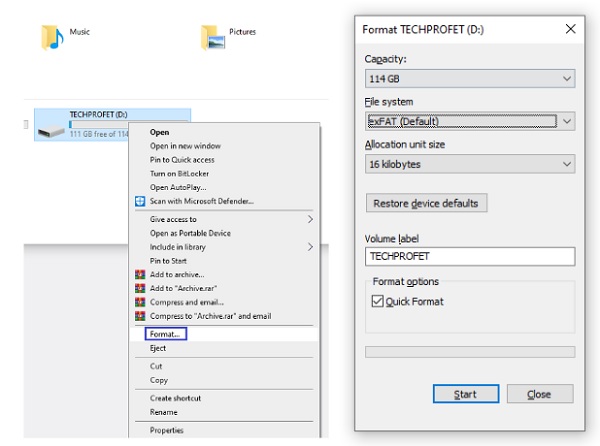
- Right-click the USB flash drive and select ‘Format’.
- If the flash drive capacity is more than 2GB, select FAT32. If it is less than 2GB, select FAT16.
- Then, select ‘Start’
On Mac:
- Plug the USB flash drive into your computer.
- Open Finder and search for ‘Disk Utility’
- Select the USB flash drive from the left panel.
- Click on the Erase tab on the right panel.
- Select MS-DOS (FAT) from the drop-down menu.
- Click the Erase button and click Erase button again when prompted to format your drive.
Step 3: Copy the Downloaded Software File to USB drive
- Now, locate the update.roku file on your computer (should be in the Downloads folder by default unless you changed the storage location)
- Insert the USB flash drive and copy the update.roku file to the flash drive (do not put it in a subfolder)
- Eject the flash drive and remove it from the port of your computer
Step 4: Insert USB Drive Into Roku TV & Update
- Insert the flash drive into the USB port on your Roku TV
NOTE: If you see the message “Update file could not be opened. Please try again”, the format of the USB flash drive is likely not recognized. In that case, you need to format it. To do that, go back to step 2 above (if you skipped it earlier and proceed from there).
- Press the Home button on your Roku TV remote, and select Settings > System > System update > I can’t connect.
Your Roku TV validates the file on the USB flash drive and displays a 12-digit code on the TV screen. If you see the message “Contents of the update file are invalid”, your Roku TV is already running the latest software version.
- Go back to your computer and enter the code and click on next.
- After you enter the code correctly, a new 6-digit code appears on your computer screen
- Return to your Roku TV and enter the 6-digit code using your Roku TV remote. The software update begins immediately, and your Roku TV restarts once the software update is complete.
- After your Roku TV restarts, you can remove the USB flash drive.
The video below will show you the whole process:
8. Factory Reset Roku TV
If you’ve tried all of the previous troubleshooting steps and still haven’t been able to fix the Roku green screen issue, a factory reset may be your last resort.
Keep in mind that a factory reset will delete all your settings and return your Roku device to its original state.
To factory reset your Roku TV, follow these steps:
- Press the home button on your remote to access the main menu.
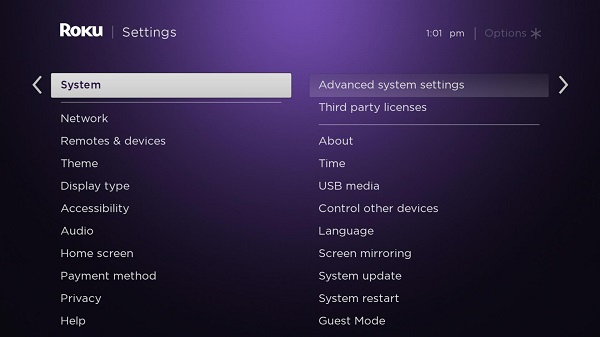
- Select “Settings” and then scroll down and select “System”
- Select Advanced system settings > Factory reset.
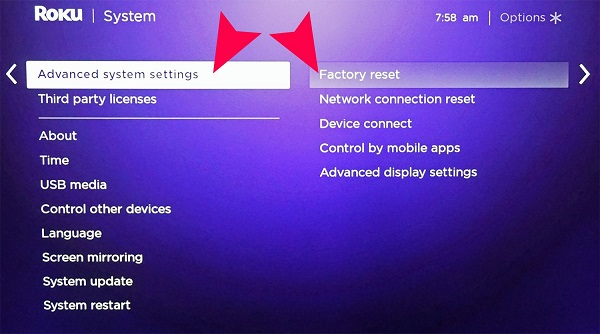
- You will be asked to confirm that you want to proceed with the factory reset. Select “Yes” and then enter the Roku password for confirmation.
- Wait for your Roku device to reset, which may take a few minutes.
Once the factory reset is complete, you’ll need to set up your Roku device again, just as you did when you first bought it. This means that you’ll need to re-enter your Wi-Fi information, sign in to your streaming accounts, and set up any custom settings you had previously.
9. Contact Roku Support
Remember, if all else fails, contacting Roku support can be a great resource for resolving your Roku TV green screen issue.
Their support team is available 24/7 to help you with any issues you may be experiencing with your Roku device.
To contact Roku support, you can visit their website via support.roku.com and select “Contact us” to chat with a representative or submit a support request.
You can also call them directly at 1-816-272-8106.
When you contact Roku support, be sure to have your device’s serial number handy, as well as all the relevant information about the issue you’re experiencing.
The support team will work with you to troubleshoot the problem and find a solution.
The Bottom Line
In a world where streaming has become an essential part of our daily lives, nothing is more frustrating than facing the green screen issue on your Roku TV.
When this happens, do the following to fix it:
- Power cycle your Roku TV
- Perform a system restart
- Clear your Roku TV cache using remote key combination
- Switch between local TV and streaming apps
- Disable Fast TV start
- Troubleshoot HDMI settings
- Update Roku TV system software
- Factory reset Roku TV
You may also contact Roku support to help further if the issue still persists after doing all of these.
If you found the guide helpful, let me know which of these methods helped fix the Roku green screen issue in the comment section below.
