Amazon Prime Video black screen issue is one of the most common streaming issues that users complain about while streaming Prime Video app.
In a lot of cases, Prime Video shows a black screen with sound in the background. In other cases, there’s no sound as well.
This happens on various devices such as Samsung TV, LG TV, Sony TV, TCL TV, Vizio TV, Apple TV, Fire TV, Roku TV, Android TV, as well as on PCs, iOS and Android mobile devices.
The good news is that there are a number of quick and proven ways to fix the issue, all of which I will show you (step-by-step) in this troubleshooting guide.
If that sounds like what you are looking for, then let’s dive right in!
Amazon Prime Video Black Screen
Below are proven ways to fix Prime Video black screen (with or without sound).
1. Power Cycle / Soft Reset Streaming Device
A power cycle (also known as a soft reset) is one of the quickest and most effective methods in fixing streaming issues like this one.
There are various reasons why a simple power cycle works.
One, it clears up built-up cache files which might be corrupt. It helps to fix some software bugs that could cause streaming issues.
It also helps to re-establish a network connection between your network router (or internet source) and the streaming device.
With that said, here’s how to power cycle your streaming device:
- Turn off the streaming device (TV, mobile device or PC)
- Unplug the power cable from the power outlet. If you are using a streaming stick like Apple TV stick, Fire stick or Roku stick on your smart TV, just unplug the TV and not the stick.
- Leave it unplugged for 60 seconds.
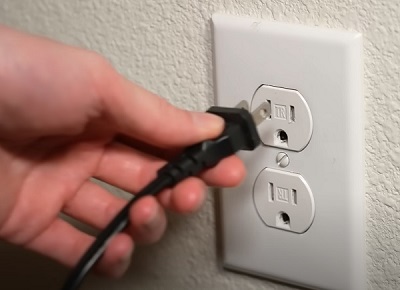
- Finally, plug the device back in and turn it on.
- Now, try to play any title on Prime Video and the black screen should no longer be an issue.
However, if the soft reset does not fix the issue for you, then move to the next fix.
2. Restart Network Router
An inconsistent (dropping) or slow internet connection can obviously impact streaming and cause Prime Video to show black screen when you try to play a title.
You are probably thinking, “All other apps are working just fine on my device without any streaming issue, so this must be an issue with Prime Video only”.
The truth is, you are probably right (in fact, anyone would think that).
However, if there’s one thing I’ve seen a lot while troubleshooting streaming-related issues like this one, it’s that restarting your network router can help fix a lot of these streaming issues even if it’s only happening on one app (while other apps work without issue).
One way to explain it is that the specific app (Prime Video in this case) might be having issue establishing a network connection with your network router, and by rebooting your router, there’s a better chance of setting up a connection which then fixes the streaming issue.
It also helps to clear the connection cache and improve your internet speed.
My point? Even if you have a fast internet connection, try restarting your network router anyway.
- To do that, turn off your router, unplug it directly from the power source and wait for 30 seconds.
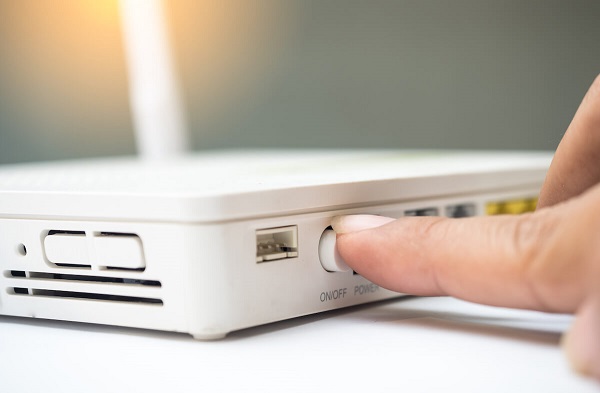
- Then, plug it back in and wait for it to be online. Once online, connect your streaming device to it and open Amazon Prime Video again.
- The Prime Video black screen issue (with sound or without sound) should now be fixed, and both audio and video should be restored.
Otherwise, try these quick steps to troubleshoot the network issue further:
- Switch to a different (preferably faster) network connection: Even if the new network is not faster, use of VPN or any type of block on your current router might be causing the black screen issue. By isolating the router, you can determine whether the issue is from your router or not.
- Use a dual-band router, and try the 5.0 GHz as well as the 2.4 GHz network bands.
- Try connecting with an ethernet cable instead of wireless connection.
Now, check the internet speed again and try streaming on Amazon Prime Video.
If the issue persists, then it’s likely not a connection issue. In that case, move to the next step.
3. Update Amazon Prime Video
Using an outdated Prime Video app can also cause the black screen issue.
Therefore, you need to check if there’s an update available, and if there is, you need to download and install it on your streaming device.
Here’s how to update Amazon Prime Video on Samsung TV, LG TV, Roku TV, Apple TV, Fire TV and Android TV (in that order).
Samsung TV:
- Click on the Home button on your Samsung TV to go back to the Home screen
- From the home screen, navigate to the bottom menu and click on ‘Apps’
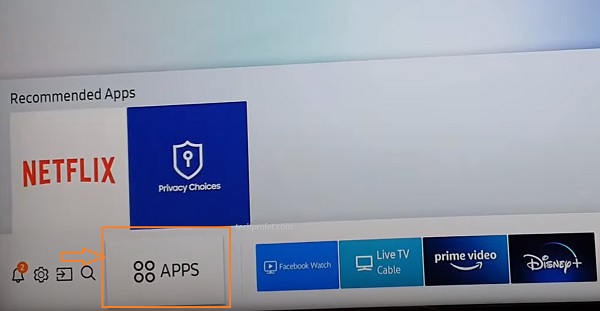
- On the apps screen, navigate and click on Amazon Prime Video icon. You can also click on the search icon at the top of the Apps library, enter ‘Amazon Prime Video’ in the search box and select the app
- On the Amazon Prime Video description page, you will find ‘Update App’ button if your Amazon Prime Video is not the latest version. In that case, go ahead and update it. Otherwise, you will find the ‘Open’ button.
LG TV:
Here’s how to update Amazon Prime Video on LG smart TV:
- Press the Home button on your LG smart TV remote controller
- Click on the LG content store

- On the LG content store, click on Apps at the top of the page

- Select Amazon Prime Video app
- If an update is available, you’ll see an ‘Update’ button, click on it to update YouTube app on LG TV. Otherwise, if the software is already up-to-date, you will see a button to launch the app.
Roku TV:
- On your Roku’s home screen, scroll to Amazon Prime Video and highlight it
- While highlighted, press the star button on your Roku remote
- Select ‘Check for updates’ from the pop-up.
- If there’s an update available, it’ll download and install right away.
Apple TV:
- To update Prime video on Apple TV, open the App Store app on your Apple TV (this is the app on your home screen that looks like a blue “A”)
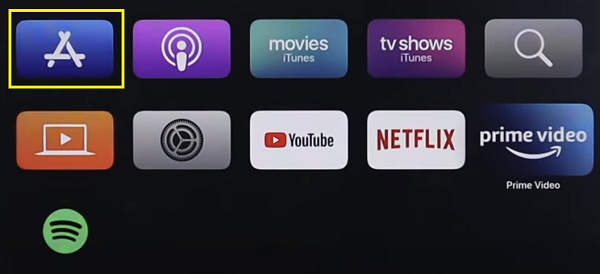
- Scroll up and select the magnifying glass icon
- Next, search for Amazon Prime Video.
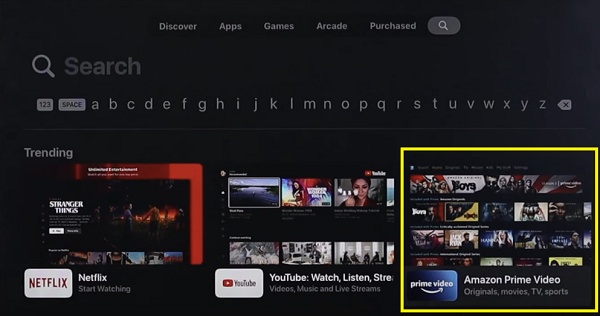
- Select the app and select ‘Update’ (if you don’t see this option, it means the app is up to date)
Fire TV:
- From the Home screen, select Apps (three squares and a plus sign) to the far right of the horizontal menu.
- Highlight Amazon Prime Video (don’t select it).
- On your Fire TV remote, press the button with three horizontal lines on it and select ‘More Info’.
- If an update is available, select ‘Update’ beside the Open button.
Android TV:
- On your Android TV, open Google Play store.
- Click on your profile icon in the top-right corner of the screen.
- Select Manage apps and games.
- Select Updates.
- Select Amazon Prime Video to update it or select Update all.
Once the app is updated to the latest version, Amazon Prime Video should start working and you shouldn’t have any issue accessing contents.
4. Update System Software on Streaming Device
Updating the system software of your streaming device is another proven way to fix the Prime Video black screen issue.
The firmware and the procedure to download varies depending on the device you are using i.e Android OS on Android TV and phones, iOS on iPhone and iPads, tvOS on Apple TV, Fire OS on Fire TV, tizenOS on Samsung smart TV, webOS on LG TV, Roku OS on Roku TV, or SmartCast on Vizio TV.
Here’s how to update the system software on Samsung TV, LG TV, Apple TV, Fire TV, Roku TV and Android TV:
Samsung TV:
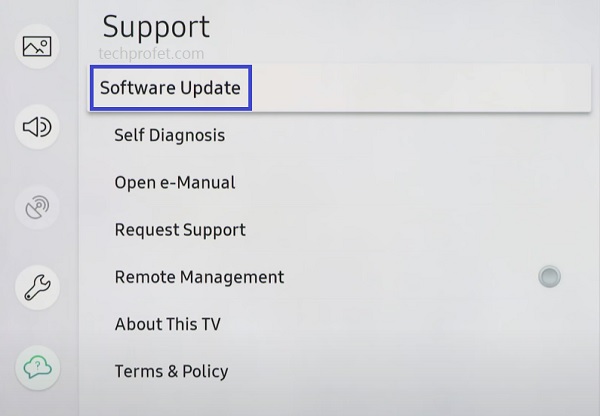
- To update your Samsung TV software, go to Settings, click on the Support tab and select Software Update.
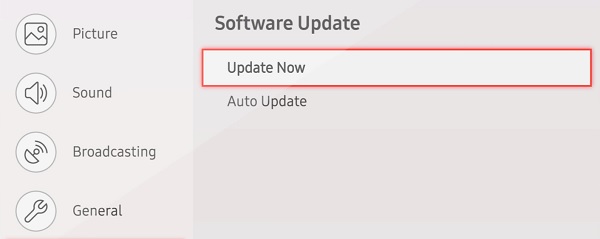
Finally, click on ‘Update Now’.
LG TV:
- Press the Home button on your remote
- Click on the Settings icon from the top right corner, then click on the All Settings icon at the bottom right corner.
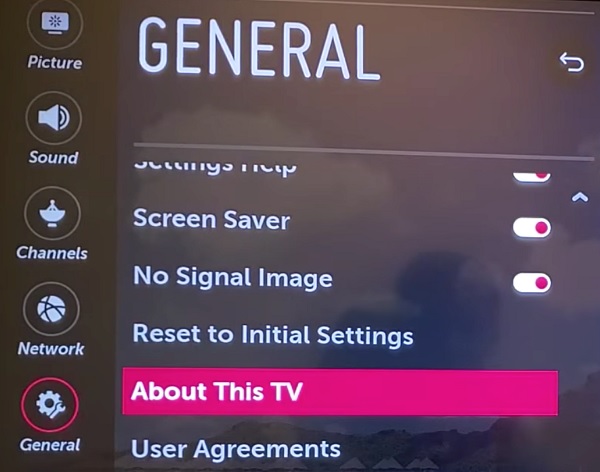
- Go to General tab, then scroll down to About This TV section and click on it
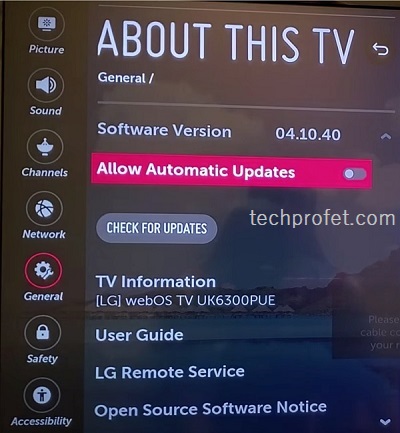
- You will see the current software version of your TV, click on Check for Updates (you can also enable ‘Allow Automatic Updates’)
- If there is any update available, proceed to download it and allow it to be install completely.
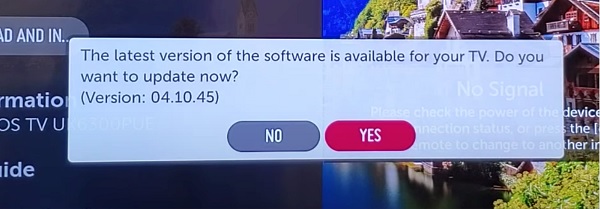
- Once installed, your TV should reboot itself and the update will be installed.
Apple TV:
- For Apple TV 4K or Apple TV HD, go to Settings > System > Software Updates and select Update Software.
- For Apple TV (3rd generation), go to Settings > General > Software Updates and select Update Software.
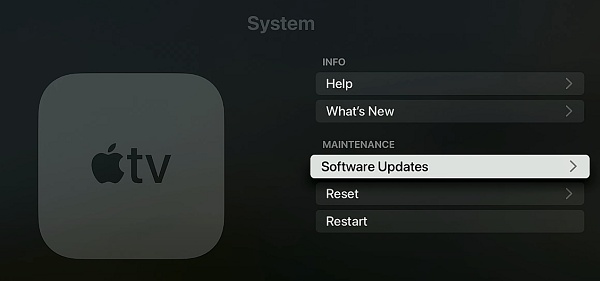
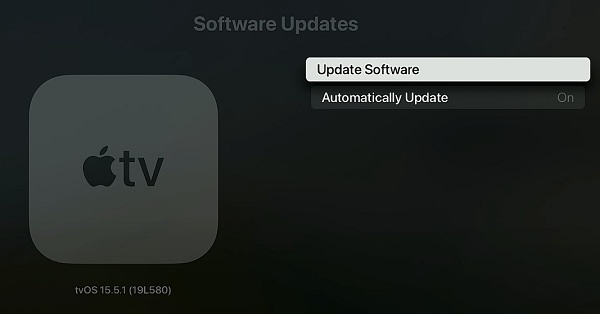
- If there’s an update, select Download and Install.
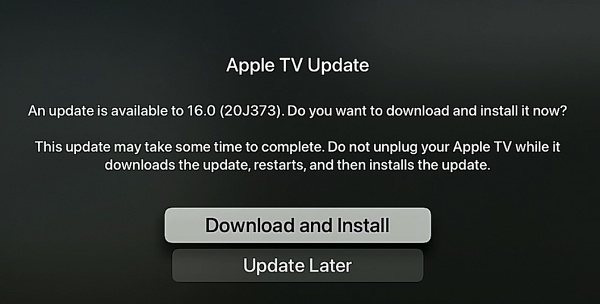
- Wait for your Apple TV to download the update.
- Don’t disconnect or unplug your Apple TV until the update completes.
Fire TV:
- Go to Settings on your Fire TV.
- Select My Fire TV.
- Select About.
- Select Check for System Update.
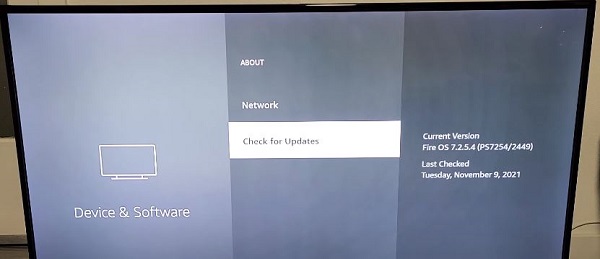
- If there’s an available update, go ahead and download it. Then, allow it to be installed and make sure the process is not interrupted until the update is done.
Roku TV:
- Click on the Home button on your Roku device remote
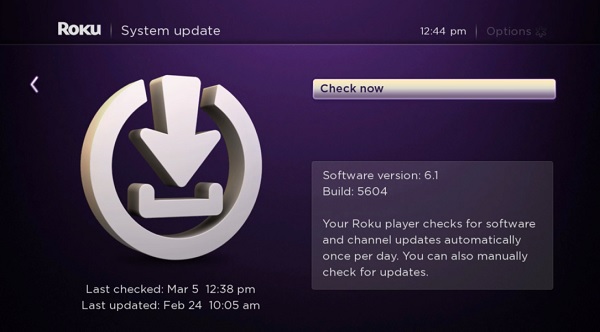
- Select Settings > System > System Update
- Click on Check Now to manually check for any update
Android TV:
- Press the HOME button on the remote.
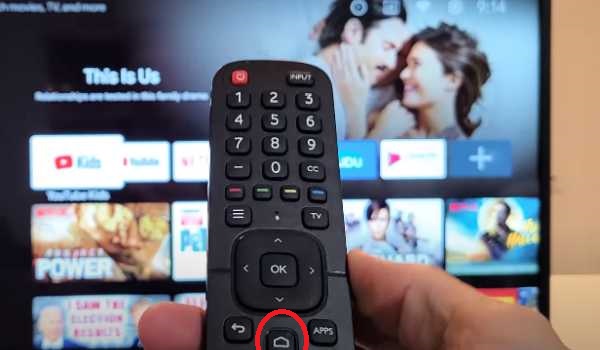
- Select the Apps icon.
- Select Help.
- Select System software update.
- Select Software update.
You may also find it under Settings > Device Preference > About > Update.
Once updated, you should stop seeing a black screen on Amazon Prime Video.
5. Check the HDMI Connection
A loose HDMI connection or a faulty HDMI cable (whether it’s due to physical damage or internal issue) can also lead to a black screen while trying to stream.
In some cases, the issue may also be caused be a faulty or incompatible HDMI port. In such cases, you can determine if the issue lies with a specific port or not by trying different HDMI ports.
Here’s what you need to do:
- First, unplug the HDMI cable from the HDMI port.
- Next, blow out any dust/debris inside the port.
- Then, plug the HDMI cable back into the HDMI port ensuring a tight connection.
- If the issue persists, you switch to switch the HDMI cable to a different HDMI port. Also, ensure that the cable is plugged in tightly and securely into the port.
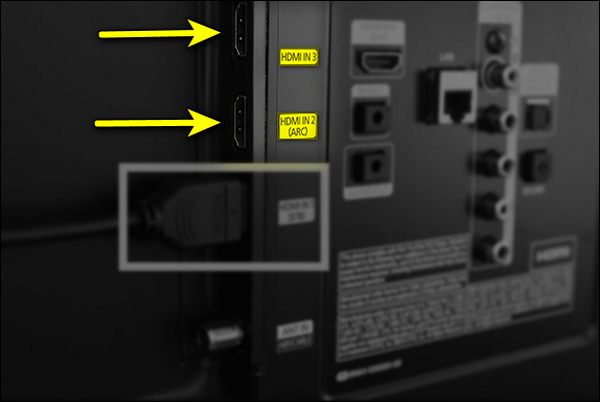
Finally, make sure that the input source on the TV matches the HDMI port where the cable is plugged into.
- If the Prime Video black screen is still not resolved, get a higher-quality HDMI cable.
6. Clear Amazon Prime Video Cache
While streaming, temporary cache files build up and are stored on your streaming device.
Sometimes, these cache files become corrupt and cause streaming issues like black screen, black screen with sound, freezing, buffering etc.
To fix such issues, you need to clear the stored cache files on your streaming device.
Here’s how to clear Amazon Prime Video cache on Samsung TV, Roku TV, Fire TV, Android TV and mobile devices (iOS and Android):
Samsung TV:
- To clear Amazon Prime Video cache on Samsung TV, go to the settings by clicking on the settings button on your remote controller or the settings icon on the home screen
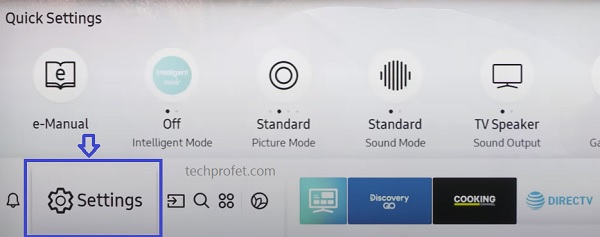
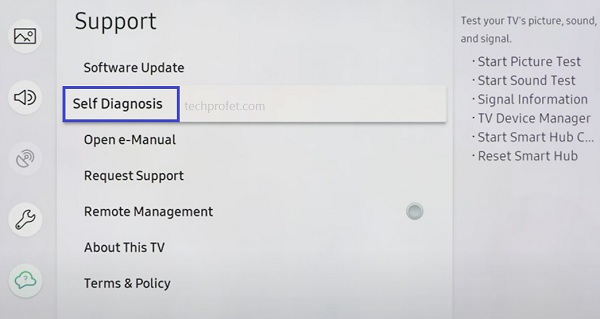
- Click on the ‘Support’ tab
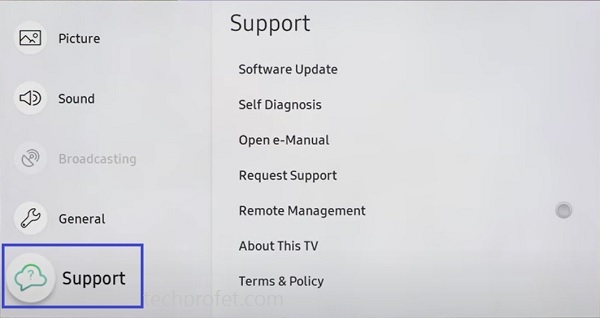
- Select ‘Self Diagnosis’ tab
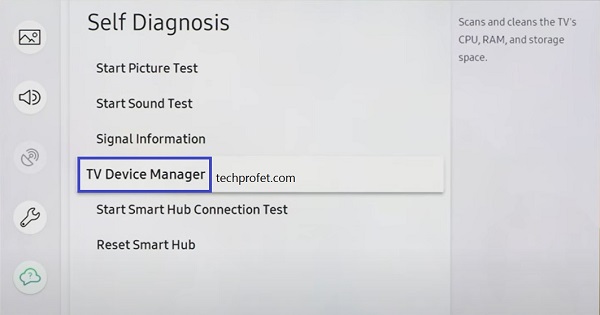
- Click on ‘TV device manager’
- On the next page, click on ‘Clean Now’ buttons under ‘Memory Boost’ and ‘Clear Running Apps’
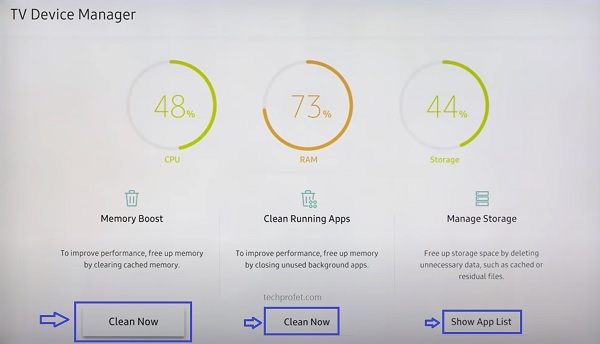
- Once cleaned, click on ‘Show App List’ under ‘Manage storage’
- On the next page, scroll through the app list until you find Amazon Prime Video, click on ‘View details’ under the app.
- Finally, click on ‘Clear Cache’.
Roku TV:
- First, select the Home tab
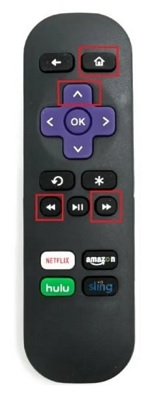
- Now, press the ‘Home’ button on your TV remote 5 times
- Next, press the ‘Up arrow’
button on your remote once
- After that, press the ‘Rewind’
button twice
- Then, press the ‘Fast forward’
button. twice
Fire TV:
- From the Home screen, select ‘Settings’
- Select Applications > Manage Installed Applications, and select Amazon Prime Video
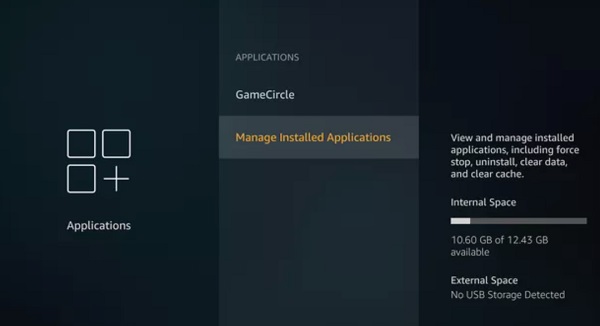
- Click on ‘Force Stop’, and then ‘Clear Data’
- When prompted to delete app data, select ‘Clear Data’ again.
Android TV:
- Select Apps, then navigate to Prime Videos
- Press and hold on the “OK” button, and the menu will appear on your screen
- Scroll down to “Info” and click on it
- Scroll down, and Force Stop the app
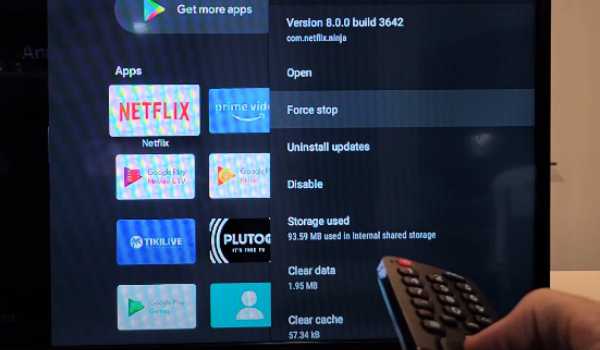
- Go on to Clear Cache before closing the menu. After this, try using Amazon Prime on your TV.
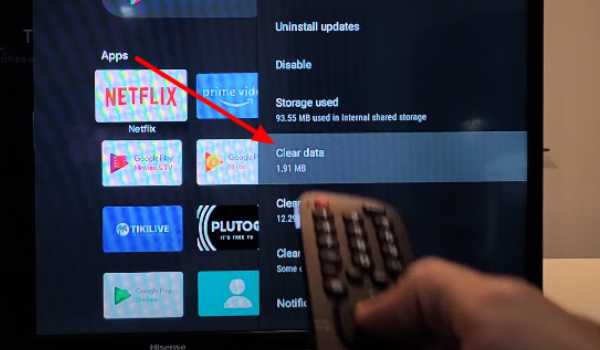
- If it doesn’t work, go back to the app info. However, instead of Clearing Cache, clear the Clear Data. This will reset your Prime Video, and you’ll lose all your data.
Android Phone:
- Open Settings and click on Apps.
- Look for Amazon Prime Video on the list of installed applications on your device and select it.
- Select on Storage and click ‘Clear Data’ and ‘Clear Cache’.
iPhone or iPad:
- Open Settings
- Tap your name/device name
- Select iCloud
- Select ‘Manage Storage’
- Look for the Amazon Prime Video, click on it.
- Click on ‘Delete Data’, then click on ‘Delete’ to confirm.
Some devices don’t offer the option to clear the app cache.
Instead, what you can do is power cycle them as I have explained earlier and that will also cache.
However, if that does not clear the app data or cache, you might need to uninstall the app and re-install the app as I will show soon.
7. Change DNS Server in Network Settings
Another way to fix Amazon Prime Video black screen with sound (or without sound) is to change your DNS server.
You can do this on your streaming device or directly on the router’s dashboard.
I personally prefer changing it on the streaming device first. However, you can use either methods (but you don’t need to change on both ends).
First, I will show you how to change the DNS server on your router, then I will show you how to change on on various streaming devices (TVs)
Changing DNS Server on Router:
- While connected to your network router, access your router dashboard by visiting the login URL. You can find this on the router manual or on your router. Some of the links can be found below:
-
- Linksys – http://192.168.1.1
- D-Link/Netgear – http://192.168.0.1
- Belkin – http://192.168.2.1
- ASUS – http://192.168.1.1/
- AT&T U-verse – http://192.168.1.254
- Comcast – http://10.0.0.1
- Depending on the manufacturer of the router, look for DNS settings on the web interface. If you are having trouble finding the DNS server settings, check the router’s manual or search on Google for how to change DNS server for your router’s brand.
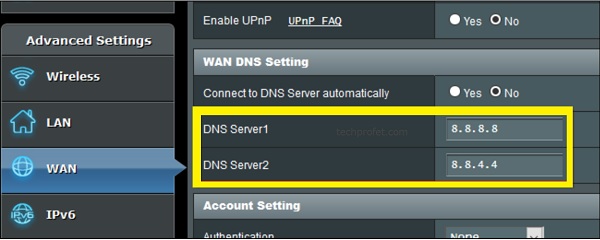
- Under DNS server 1 (or primary DNS), input 8.8.8.8
- Under DNS server 2 (or secondary DNS), input 8.8.4.4
- If there are options to input DNS server 3 and 4, leave them empty
- Save the settings
Now, try to access Amazon Prime Video or via the website, and it should start working.
Changing DNS Server on Samsung TV:
- Go to Settings with your Samsung TV remote controller.
- From the settings page, click on the General tab
- Click on Network
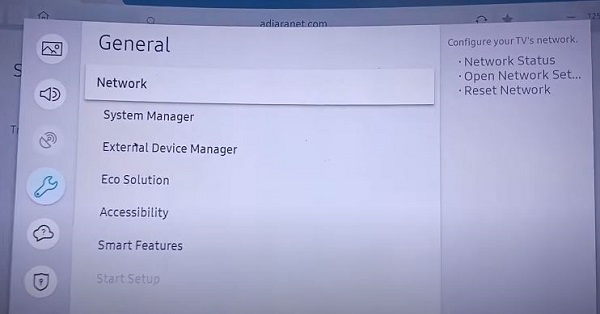
- Next, select Network Status
- Under your connected network, click on IP Settings
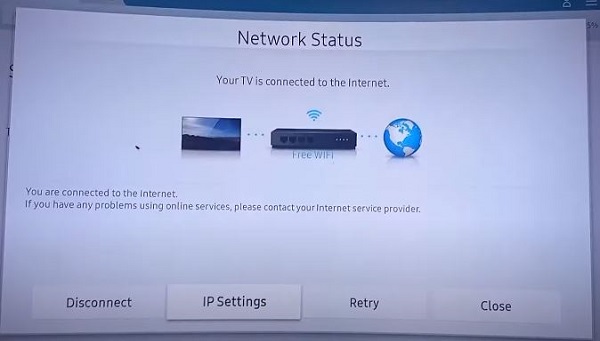
- Select the option to set DNS manually
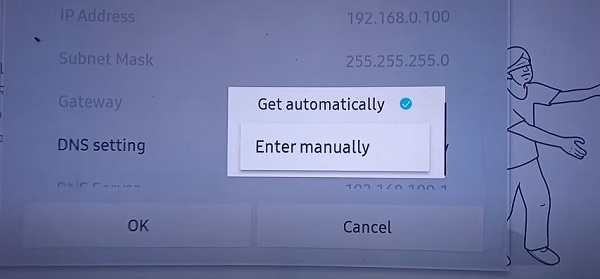
- Finally, edit the DNS Server and change it to 8.8.8.8
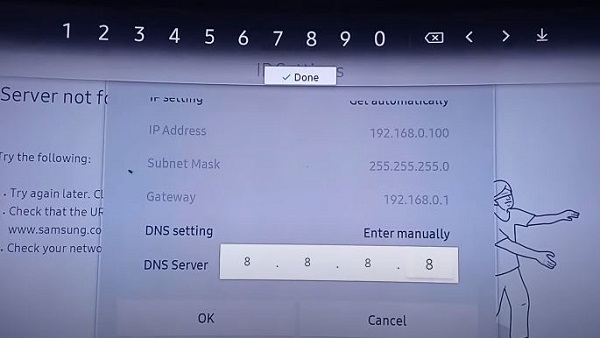
- Finally, click on OK button
- Wait for it to be reconnected to the new DNS server and then restart your smart TV.
Changing DNS Server on LG Smart TV:
- Press the Home/Start button on your LG TV remote to show the launcher bar
- Click the Settings icon at the top right corner
- Click All Settings option at the bottom right corner
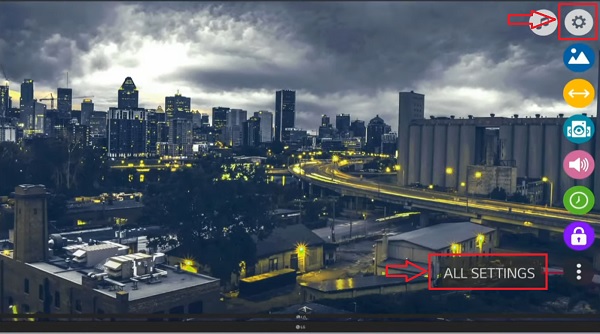
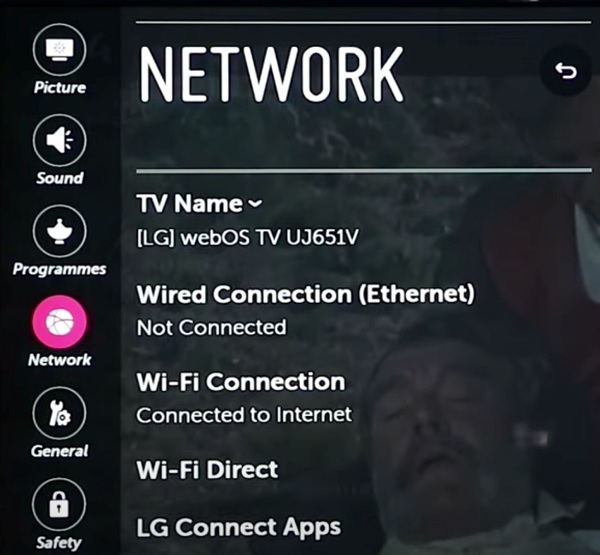
- Click on Network from the left bar options
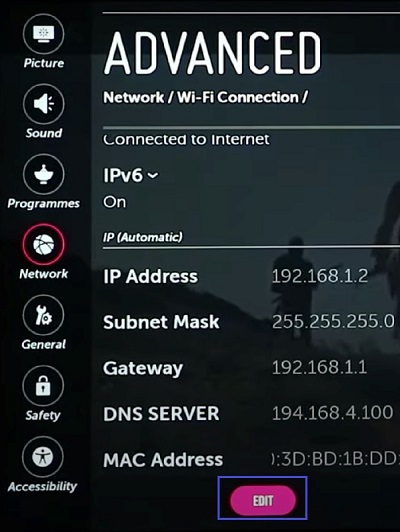
- Select any of the networks that you are currently connected to (either wireless Wi-Fi network or wired ethernet network). The network must be showing connected to the internet at this point.
- Now, we will edit the network settings.
- Uncheck the option that says Set Automatically
- Then, edit the DNS Server and change it to 8.8.8.8
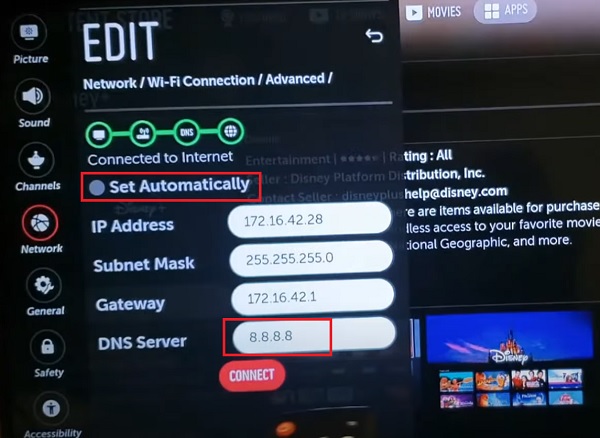
- Click on Connect
Wait for it to be reconnected to the new DNS server and then restart your smart TV.
Changing DNS Server on Apple TV:
- From the Apple TV main menu, select “Settings”
- Go to General > Network
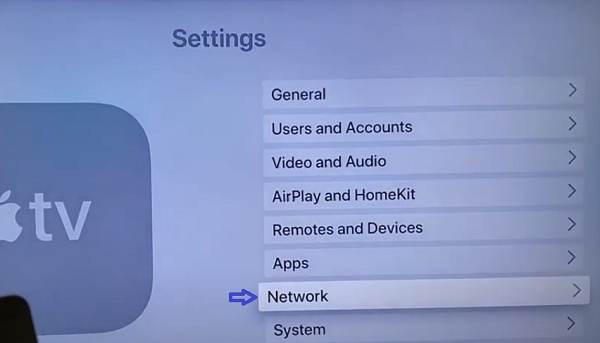
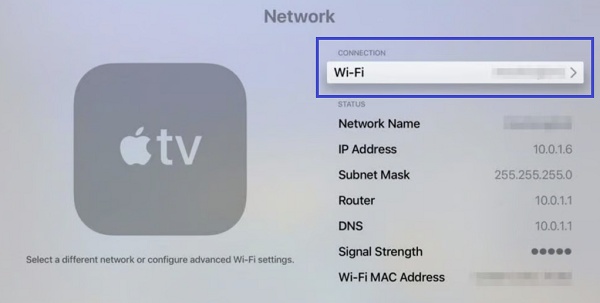
- Select “Ethernet” or your Wi-Fi network, depending on which you are connected to.
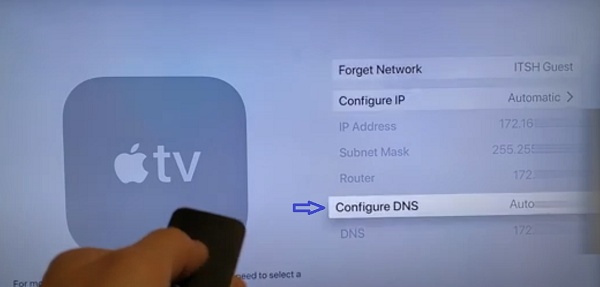
- Select “Configure DNS” and choose “Manual”
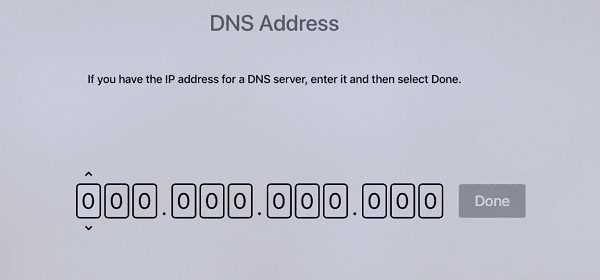
- Now, change the DNS addresses to 8.8.8.8
- Restart your TV and open the Amazon Prime Video again. You should stop seeing the black screen on Prime Video.
Changing DNS Server on Fire TV:
- Go to Settings > My Fire TV > About > Network and take a picture of all the current settings or write it down (you will need the values later)
- Now, go to Settings > Network and select your Wi-Fi network
- Click the menu button (☰) on the remote to forget this network
- Click on the connection again and enter your network password (SSID). Instead of clicking connect, click on ‘Advanced’.
- Enter the “IP address” and “Gateway” values you had screenshot or noted down in the first step
- For “Subnet Mask” there can be a few options: enter 24 if the Subnet Mask value you noted in Step 1 was 255.255.255.0, or 32 if the “Subnet Mask” value was 255.255.255.255. Click on “Next”
- Enter 8.8.8.8 as DNS 1 and 8.8.4.4 as DNS 2
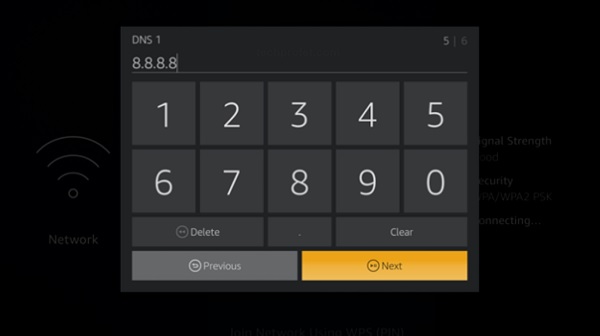
- Save the settings
- Now, restart your Fire TV, make sure it’s connected to the same network and Amazon Prime Video should start working.
Changing DNS Server on Vizio TV:
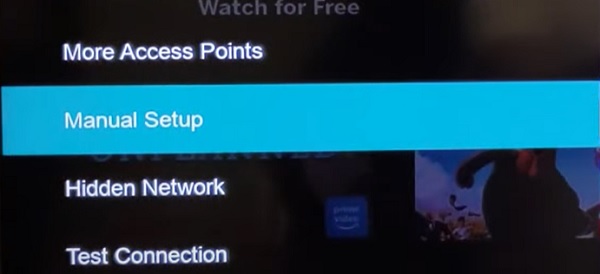
- Under Pref. DNS server, enter 8.8.8.8
- Under Alt. DNS server, enter 8.8.4.4
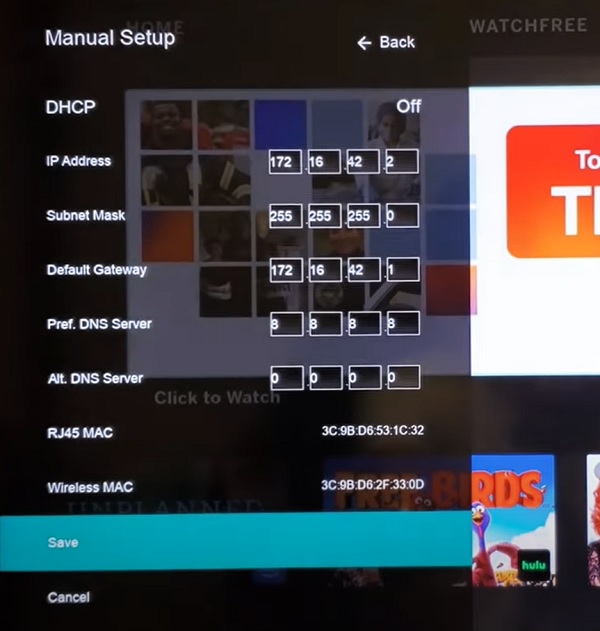
- Click on ‘Save’ check the network connection again.
Changing DNS Server on Android TV:
- Open Settings on your Android TV
- Scroll down and select “Network and Internet”
- Select the Wi-Fi Device you are connected to and scroll to “IP Settings”
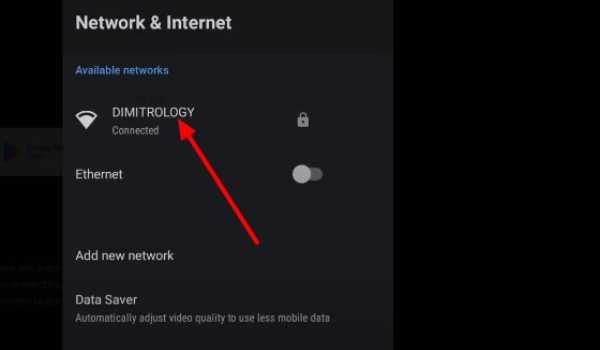
- Change IP settings from DHCP to Static
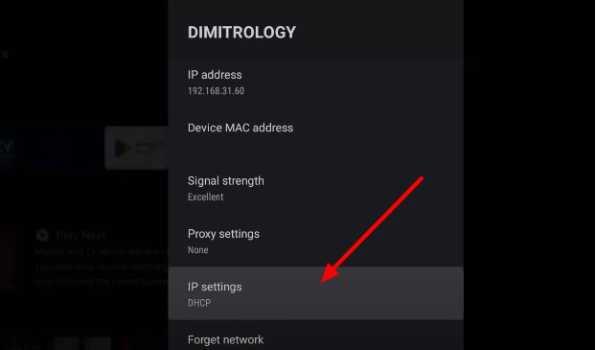
- After this, it will ask for your “IP Address” and “IP Gateway”. Do not change the information provided.
- The next screen will ask for your Network Prefix Lenght, do not change anything and press continue
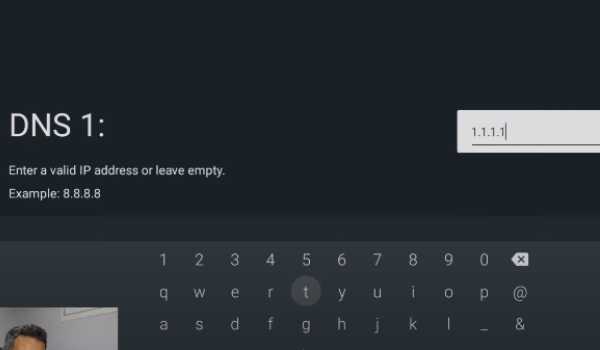
- Then you will be asked to input your DNS Server 1 and 2.
- For your DNS server 1, input 8.8.8.8
- For your DNS server 2, input 8.8.4.4 and click next.
Also, you can do the same thing on your Android or iPhone.
Once done, open up the Amazon Prime Video and you should no longer see a black screen.
8. Turn Off IPv6 on Network Router
Other than switching to manual DNS (which forces a connection via IPv4), another way to use IPv4 and fix Prime video black screen is to simply turn off IPv6 on your network router.
You can do this directly from your network router’s dashboard (web or mobile app), or you can contact your ISP to help you disable it.
- While connected to your network router, access your router dashboard by visiting the login URL. You can find this on the router manual or on your router. Some of the links can be found below:
-
- Linksys – http://192.168.1.1
- D-Link/Netgear – http://192.168.0.1
- Belkin – http://192.168.2.1
- ASUS – http://192.168.1.1/
- AT&T U-verse – http://192.168.1.254
- Comcast – http://10.0.0.1
- Depending on the manufacturer of the router, look for IPv6 settings on the dashboard.
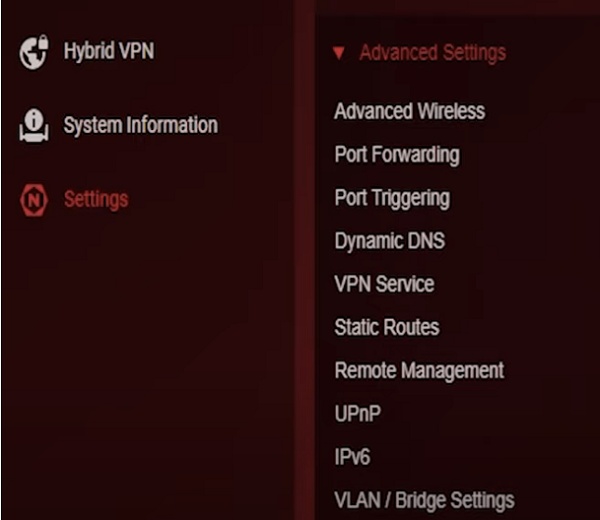
- Disable IPv6

Once done, you can carry test for IPv6 here (just access the link from a device that is connected to the same network as your streaming device).
If the result shows that you do not have IPv6, then you have successfully disabled it.

The black screen issue should now be resolved, and Prime Video should now load without any issue.
9. Change the Video Output Format / Reset Picture Settings
If the video format selected/available on your streaming device is not compatible with the format of the title you are trying to play on Prime Video, you may see a black screen with sound.
To resolve this, you simply need to switch the video output format to a compatible one.
Obviously, the procedures to do this will vary depending on the streaming device you have.
Here’s how to do that on Apple TV:
On Apple TV:
- Go to Settings > Video and Audio > Format
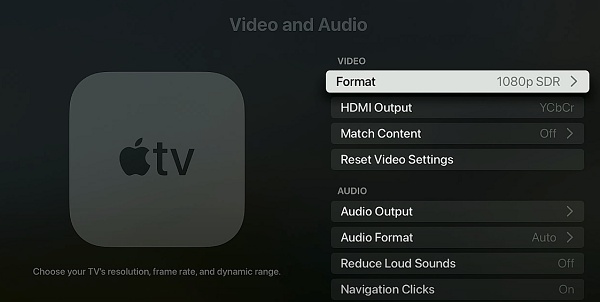
- Now, select a different format until the audio and video are in sync
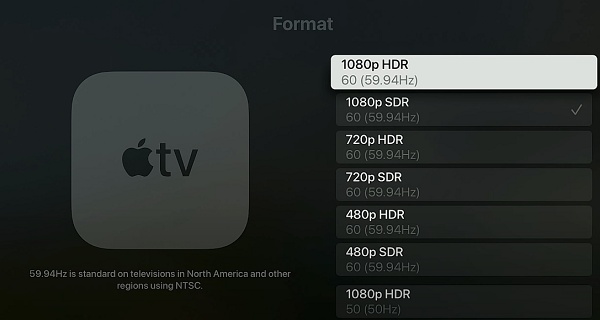
If that does not work or the option is not available on your TV, try switching between the various picture modes instead until you find one that is compatible. You may also reset the picture settings on your TV.
10. Delete & Re-install Amazon Prime Video
Another way to get rid of Amazon Prime Video black screen with sound (or without sound) is to simply delete the app, restart your streaming device and reinstall the app after the restart.
Depending on the streaming device you are using, the procedure to remove and reinstall Amazon Prime Video app may vary as shown below.
Samsung TV:
- Click on the Home button on your Samsung TV
- From the home screen, navigate to the bottom menu and click on ‘Apps’
- Click on the Settings icon at the top right corner of the apps page
- Scroll until your find Amazon Prime Video icon, click on ‘Reinstall’ under it.
- Once re-installed, restart your Samsung TV, go to the apps page and open the Amazon Prime Video.
LG TV:
- On the Home menu panel, scroll all the way to the right until you see the edit button (pencil icon). This will switch the app panel to edit mode.

- Scroll to the app you intend to uninstall and navigate to the ‘X’ icon floating on it. Click on it.
- You will get a prompt asking you if you want to delete the app, click on ‘OK’ to remove the app.
Now, to re-install the app on your LG smart TV:
- From the Home menu, select LG Content Store. Browse to the Search box on the LG Content Store to find a new app, and type in ‘Amazon Prime Video’. Scroll to the apps category, select the app and click on Install. Once installed, click on Launch.
Apple TV:
- On the tiles screen, navigate to and hover on the app you want to uninstall (don’t click on it)
- Now, press and hold the “select” button on your Apple TV remote for a few seconds until the app icon starts to jiggle.
- Then, press the play/pause button to show the options.
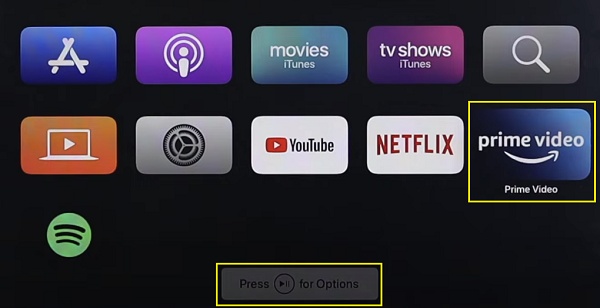
- Next, click on “Delete”.
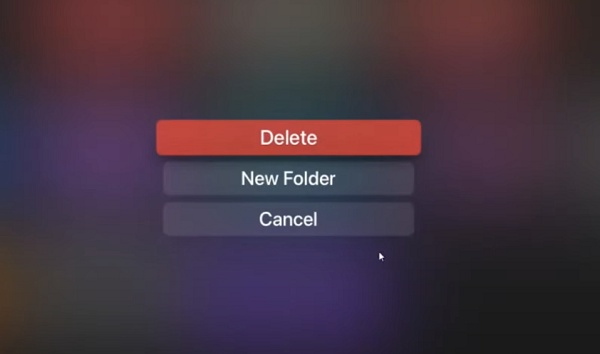
- Finally, click on “Delete” again to confirm the process.
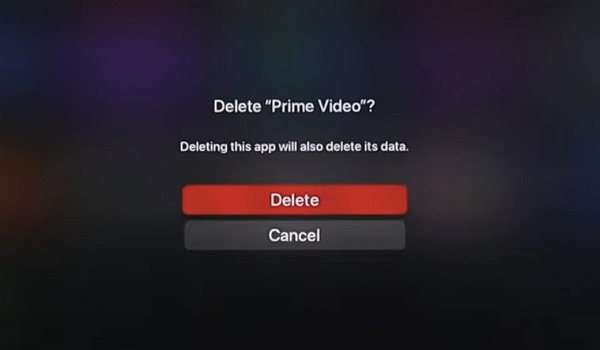
Once deleted, restart your Apple TV box first to ensure the app cache and data are all cleared.
- Now, go ahead and reinstall it from the app store.
Roku TV:
- On the Home Screen, click on ‘My Channels’
- With your remote controller, hover on Amazon Prime Video channel
- Press the * (star) button on the remote to bring up the options menu
- Select ‘Remove channel’ and then, click on ‘Remove’ to delete the channel
- Next, restart your Roku device.
- Now, go back and reinstall Amazon Prime Video on Roku channel store
Fire TV:
- On your Fire TV remote, press and hold down the Home button and select “Apps”
- On the “Your Apps & Games” page, highlight Amazon Prime Video.
- While your app is highlighted, press the menu button on your Fire TV Stick remote (the button with three horizontal lines on it)
- In the menu that opens, choose “Uninstall” and select “Uninstall” again in the prompt.
- Now, restart your Fire TV
- Go back to the app store and reinstall Amazon Prime Video
Android TV:
- From the Android TV Home screen, go to settings.
- Select “Apps”.
- Under “Downloaded apps”, select Amazon Prime Video
- Select “Uninstall”
- Now, restart your Android TV
- Open the Google Play store on your Android TV, search for Amazon Prime Video and reinstall it
Now, Amazon Prime Video should start working without any black screen.
11. Wait For a Few Minutes
A number of users have reported that simply leaving the app untouched while on showing the black screen actually resolves the issue after a few seconds or minutes on standing.
This could be due to the black screen being caused by a temporary bug, software glitch or server downtime that is then resolved after some time.
Therefore, if you’ve tried everything so far and you still keep a black screen on Prime Video, then try leaving it untouched for some time and let it resolve itself.
However, if the issue doesn’t resolve itself after waiting for a few minutes, then try the fix.
12. Check for Amazon Prime Video Server Downtime
The next thing you need to do is check if Amazon Prime Video server is down.
You can quickly check that here on downdetector.

If there is a report of downtime globally or in certain locations, it means the issue has nothing to do with any of your devices.
In such case, all you can do is wait. You may also contact Amazon Prime Video support to report the issue.
13. Turn Off VPN
If you are using a proxy or VPN while trying to access Amazon Prime Video, then you may see a black screen with or without sound.
This can be VPN on your device or used via your network router.
Sometimes, you also get the error message, “Your device is connected to the internet using a VPN or proxy server.”
To fix this, you simply need to turn off the VPN.
14. Check Prime Video Subscription
If your Prime Video subscription expires or is cancelled, movies and series on the streaming app will become unavailable to access and may cause you to see a black screen when you try to play a title.
To check the last day of your Amazon Prime subscription, follow the steps below:
- Go to the Amazon website and sign in to your account.
- Hover over the “Accounts & Lists” section on the top right corner of the page and click on “Your Prime Membership”.
- On the next page, you will see your Prime Membership details, including the renewal date.
- If your Prime membership is still active, you will see the renewal date. This is the date on which your current subscription ends.
if your subscription has expired, you need to renew it before you try to access Prime Video on again.
15. Contact Prime Video Support
If Prime Video is still showing a black screen with sound after trying all the fixes discussed in the guide, then you need to contact Amazon Prime support team for further assistance.
Here are the contact details for Amazon customer support:
- Website: Visit the official Amazon Prime Video support website.
- Phone: You can also call the support via 1–888-280-4331
Bottom Line
A number of things can be responsible for Amazon Prime Video black screen issue (with sound or without sound).
These include slow internet connection, DNS configuration, use of VPN or proxy, corrupt cache files, outdated software or even downtime on Amazon Prime Video server.
By following the fixes discussed in this troubleshooting guide, you should be able to get rid of the black screen.
If you found this guide helpful, let me know which of these methods worked for you in the comment section.
