If you have a Roku that won’t connect to internet even when other devices connect without any issue, then you are not alone.
Whether this is happening on a network you’ve used with your Roku or on a new Wi-Fi network, this guide has you covered either ways.
You might see the error message “Unable to connect to wireless network” with error code: 014.41 at the bottom right corner.

It may also show some other connection-related error codes like 14.10, 14.11, 14.20, 14.30, 14.50 and other error codes that start with 14.
In this quick and easy troubleshooting guide, I am going to show you how to fix the issue permanently in no time.
Without any further ado, let’s dive right in!
Why Won’t Roku Connect to Wi-Fi?
I mean, why does this issue even happen to begin with?
There are many reasons why this happen, ranging from Roku system cache issues, network ping issues, network band incompatibility, network mode incompatibility, use of DFS channels, software glitches, network connection bandwidth limit to DOS protection logs against Roku device.
Don’t worry about any of those technical terms at all.
I will explain them in an easy-to-understand way, as I show you how to fix them in the troubleshooting section below.
Roku Won’t Connect to Internet But Other Devices Do
Follow the step-by-step troubleshooting guide below to fix the internet connection issue on your Roku:
1. Clear Roku System Cache
If your Roku won’t connect to internet but other devices do, the first thing you need to do is to clear your Roku system cache.
There’s a special key combination you can use to do this using your remote controller.
Here’s the key combination to clear your Roku and restart it:
- First, go back to the home screen on your Roku device.
- Press the ‘Home’ button on your Roku remote 5 times
- Next, press the ‘Up arrow’ ⬆️ button on your remote once
- After that, press the ‘Rewind’ ⏪ button twice
- Then, press the ‘Fast forward’⏩ button twice

Once your Roku restarts, try connecting to the internet again and there shouldn’t be any issue.
If the issue persists, try to perform a soft reset instead. Here’s how to do that:
- While your Roku device is on, unplug it directly from the power outlet
- Leave it unplugged for 60 seconds
- Finally, plug it back in and turn it on
- Check if it now connects to Wi-Fi
If that fixes the connection issue for you, great! Otherwise, move on to the next step.
2. Power Cycle Your Network Router
You see, I understand that all other devices connect to your Wi-Fi network except your Roku device.
It’s very easy to think that the issue can only be with your Roku instead, and that it can’t be from your network router.
Believe, that’s not necessarily true.
A quick power cycle of your network router (as well as some other router-related fixes which I will also show later in this guide) has proven very effective in fixing the issue for so many users who had the same issue.
Here’s how to power cycle your network router:
- Turn off your network router and unplug it from the power source.

- Wait for 30 seconds and plug it back into the power source.
- Next, turn it on and allow up to 2 minutes for the router to be online.
- Once online, restart your TV and connect it to your Wi-Fi network.
Now, your Roku should connect to the internet without any issue.
However, if the issue still persists, try the next method.
3. Disable Network Pings from Secret Roku Menu
Roku devices have a secret system operations menu where you can do a lot of things that aren’t accessible in normal settings menu.
In this case, you need to do two things to fix the network connection issue:
- Access the Roku secret system operations menu and disable network pings
- Perform a system restart
I will show you how to do both of these in a few seconds.
First, what exactly is this network ping and why does it actually work?
A ping (Packet Internet or Inter-Network Groper) is a basic internet program that allows a user or device to test and verify if a particular destination IP address exists and is reachable.
If your Roku device pings the W-Fi network and for whatever reason, it is “unreachable”, then your TV might not connect to the WiFi.
By disabling this, you are essentially skipping the “check” which is not in any way necessary for the WiFi network to work anyway.
Now, let’s take a look at this 2-step process fix.
A. Disable Network Ping:
To disable the network pings, you need to press a combination of keys on your Roku remote which will bring up the secret menu. If you don’t have one, you can get a replacement.
- First, make sure your TV is on and is on the home dashboard

- Using the remote, press the ‘Home’ button 5 times
- Press ‘Fast forward’ button once
- Press the ‘Play’ button once
- Press the ‘Rewind’ button once
- Press the ‘Play’ button once again
- Then, press the ‘Fast forward’ button once again
- Now, your TV should show the platform secret screen, select ‘System Operations Menu’

- On the next screen, select ‘Network menu’

- Click on ‘Disable network pings’

Once it is disabled, it should be showing ‘Enable network ping’, make sure it is left that way (don’t click it again).
- Now, press the ‘Home’ button to return to the home menu.
That’s not all, there’s one more thing left to do – clear the Roku cache and restart it.
B. Perform a System Restart
- Using your Roku remote, press the Home button to access the main menu.
- Scroll up or down and select “Settings” using the arrow buttons on the remote.
- In the Settings menu, select System > System restart.
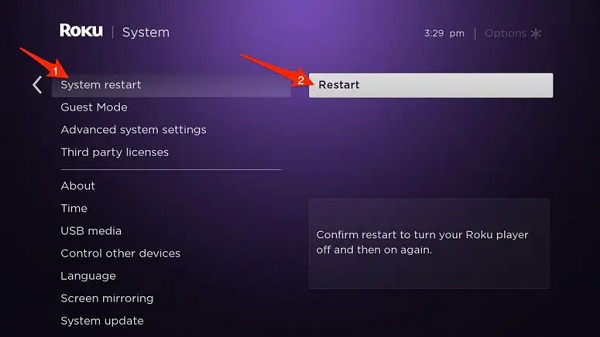
- You’ll see a prompt asking you to confirm that you want to restart the system. Select “Restart” to confirm.
Once done, your Roku should now be able to connect to the internet without issue.
4. Switch to 2.4 GHz Network Band
Some Roku models are known to only be able to connect to the 2.4 GHz network frequency band.
Therefore, if you are trying to connect to the 5.0 GHz network frequency band, your Roku TV may not connect at all or may keep disconnecting from the Wi-Fi network even when other devices connect without issue.
Roku Express is commonly known to have this issue.
Some older Roku models are also known to experience this issue.
However, the newer Roku Express devices are all capable of using both dual-band networks (2.4 GHz and 5 GHz).
Hence, if you have a dual-band network router, you need to ensure that the 2.4 GHz band is what you are trying to connect to.
Here’s how to do that:
- First, ensure that both bands of your network router are being broadcast (or at least the 2.4 GHz band). You can check this on your Router dashboard or contact your ISP for help.
- Press Home button on Roku remote
- Scroll and select Settings
- Select Network
- Select Set up connection
- Choose Wireless
- Select your Wi-Fi network (2.4 GHz band) from the list of available networks. If you do not see your network, select Scan again to see all networks.
- Enter your correct network password.

- Finally, select Connect
Your Roku device should now connect to your Wi-Fi network. Otherwise, move to the next step.
5. Switch Network Mode on Router to b/g/n
So, you switched to the 2.4 GHz network band, but your Roku Express, Ultra or Streambar still won’t connect to Wi-Fi even when other devices connect.
That’s probably because the network mode is set to g/n, which some Roku devices are known to have network connectivity issues with on the 2.4 GHz band.
Even if you’ve been using the same router with your Roku without issue before, you need to understand that the network mode can change automatically when the router software is updated, either manually or directly from your ISP.
What you need to do is simple – change the network mode for the 2.4 GHz band from g/n to b/g/n on your router dashboard (mobile app or website). 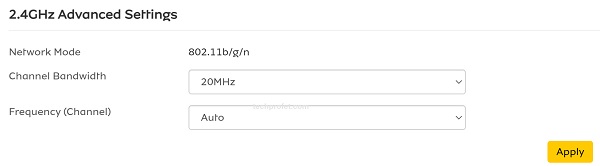
If you don’t know how to do this, you can reach out to your router provider to help you with it.
By manually switching the wireless mode on your network router, you should be able to fix the issue and your Roku should now connect to internet without issue.
6. Manually Switch Channel Selection
Recall that I mentioned that newer Roku models are compatible with 5.0 GHz network band?
However, even if you want to use the 5.0 GHz network band, there are certain channels that Roku devices are not compatible with.
If your Wi-Fi network is setup to one of the DFS channels (52-140) on the 5.0 GHz network band, your Roku device might not connect, as Roku devices are known to have issues with those channels.
Therefore, if you are using the 5.0 GHz network band on a newer model and your Roku won’t connect to internet, you have two options:
- Disable DFS on the 5.0 GHz band
- Manually switch to a wireless channel that’s more stable with Roku
First, you can view the channel that is currently assigned to your network when the issue happens via the Roku network connection test.
That way, you can switch the channel to one of the other channel options that work well with Roku (1, 6 or 11).
- To do a network connection test, go to Settings > Network > About
- You can see from the screenshot below that it is connected to Wireless channel 36.

- So, if you check yours and it’s connected to other channels like the one above, switch it to Channel 1, 6 or 11.
You can do this directly on your router’s dashboard (app or web).
You may also contact your ISP (Xfinity/Comcast, Cox, Spectrum, AT&T, Verizon etc.) to help you with this.
7. Change the Wi-Fi Password
Before you jump right to the next fix, I am not saying that you’ve been entering the wrong password.
Well, while that’s a possibility, I want to assume that you’ve done your best to check that.
However, a number of users have reported that changing the password to their Wi-Fi network.
Also, even though non-alphanumeric (special) characters are often used to better security, you may want to get rid of them in the new password you assign to your Wi-Fi network.
Here’s what you need to do:
- Change the Wi-Fi password to contact only letters and numbers only.
- Then, try to connect your Roku to the network router again via the new password.
- If you are not asked to enter the new password, then you need to reset the network settings again (as shown earlier).
- That way, your Roku forgets the old connections and asks for a password again.
Once done, that should fix the issue. Otherwise, move to the next step.
8. Reset Roku Network Settings
If your Roku still won’t connect to network while other devices do, then you need to reset the network settings.
A network reset will disassociate the network access point and reset the Roku TV network driver.
That way, a fresh connection will be made when you connect your Roku back to your Wi-Fi.
Here’s how to reset network connection on Roku TV:
- Press the settings (gear icon) on the remote.
- Under settings, select System > Advanced System Settings > Network Connection Reset and press the OK button.

- Your Roku will restart
Since the network reset will forget all the network(s) you’ve connected to before, you need to set up the network connection again. Here’s how:
- Press Home button on Roku remote
- Scroll and select Settings
- Select Network
- Select Set up connection > Wireless
- Select your WiFi network from the list of available networks. If you do not see your network, select Scan again to see all networks.
- Enter your correct network password.
- Finally, select Connect
Now, you should be able to connect to Wi-Fi on your Roku.
9. Update Roku System Software
A system software update is another proven way to fix this connection issue on Roku device.
Since you can’t connect to your Wi-Fi, you have two options here:
- Try to connect via ethernet cable/phone hotspot, so you can use the first method
- Use the manual system update method which doesn’t require your Roku to be connected to the internet
Method 1: System Software Update from Settings Menu
To use this method, your Roku TV needs to be connected to the internet.
You may try using an ethernet cable for this, or check if your Roku actually connects to your phone hotspot.
To check and update your Roku software:
- Click on the Home button on your Roku TV remote
- Select Settings > System > System Update
- Click on Check Now to manually check for any update

If there is any available software update, your Roku device will download it, install it automatically and then reboot once completed.
This will also automatically update the apps and channels on your Roku TV to the most recent available versions.
Otherwise, try the manual update method.
You may also use the manual method if your Roku TV becomes stuck on software update while using the first method.
Method 2: Manual System Software Update
If you can’t use the first method, then you can update your Roku system software manually by following the steps below:
Step 1: Download the Latest Roku OS Software
- Open a web browser on your computer and visit tvupdate.roku.com.
- Under TV brand, select Roku

- Enter your Roku Model Number and Serial Number. To find these, go to Settings > System > About on your Roku TV. The model appears as 4 numbers followed by a letter (e.g. 6104X), and the serial number is a combination of 12 numbers and/or letters. Then, click on ‘Next’.
- Click on ‘Download Software’ to get the installer file on your computer (it will be named ‘update.roku‘)
Step 2: Format the USB Drive
Like I mentioned earlier, if your USB drive is already formatted as FAT32, FAT16 or MS-DOS (FAT). So, if you don’t want to format your USB drive, go ahead and jump to the next step. If a format is required, you can copy your files to another location, come back to this step and proceed onwards from here.
On windows:
- Plug the USB flash drive into your computer.
- Open the File Explorer and go to ‘This PC’.
- Right-click the USB flash drive and select ‘Format’.
- If the flash drive capacity is more than 2GB, select FAT32. If it is less than 2GB, select FAT16.
- Then, select ‘Start’

On Mac:
- Plug the USB flash drive into your computer.
- Open Finder and search for ‘Disk Utility’
- Select the USB flash drive from the left panel.
- Click on the Erase tab on the right panel.
- Select MS-DOS (FAT) from the drop-down menu.
- Click the Erase button and click Erase button again when prompted to format your drive.
Step 3: Copy the Downloaded Software File to USB drive
- Now, locate the update.roku file on your computer (should be in the Downloads folder by default unless you changed the storage location)
- Insert the USB flash drive and copy the update.roku file to the flash drive (do not put it in a subfolder)
- Eject the flash drive and remove it from the port of your computer
Step 4: Insert USB Drive Into Roku TV & Update
- Insert the flash drive into the USB port on your Roku TV
NOTE: If you see the message “Update file could not be opened. Please try again”, the format of the USB flash drive is likely not recognized. In that case, you need to format it. To do that, go back to step 2 above (if you skipped it earlier and proceed from there).
- Press the Home button on Roku remote on your Roku TV remote, and select Settings > System > System update > I can’t connect.
Your Roku TV validates the file on the USB flash drive and displays a 12-digit code on the TV screen. If you see the message “Contents of the update file are invalid”, your Roku TV is already running the latest software version.
- Go back to your computer and enter the code and click on next.
- After you enter the code correctly, a new 6-digit code appears on your computer screen
- Return to your Roku TV and enter the 6-digit code using your Roku TV remote. The software update begins immediately, and your Roku TV restarts once the software update is complete.
- After your Roku TV restarts, you can remove the USB flash drive.
The video below will show you the whole process:
10. Troubleshoot Your Network Router
At this point, you need to troubleshoot your network router if your Roku is still not connecting to internet.

Step 1: Try a Different Wi-Fi Network
Next, you should try to connect to a different Wi-Fi network to see if the issue happens with a different network as well.
If possible, make sure it’s from a different ISP.
Also, ensure that you are using the 2.4 GHz band, b/g/n network mode and channel 1, 6 or 11.
Alternatively, you may try using your phone hotspot as well.
If your Roku is able to connect to another Wi-Fi network or to your phone host, then you know the issue is coming from the first Wi-Fi router.
In that case, try the following troubleshooting steps.
Step 2: Reduce the Number of Devices Connected to Wi-Fi
The first thing you need to do is to check the number of devices already connected to your Wi-Fi and disconnect some of the devices.
The idea is to ensure that your Wi-Fi hasn’t already been connected to by the maximum number of devices allowed, which will prevent further connections (in this case, from your Roku).
Also, make sure that your router is close enough to your Roku device for the best signal and that there’s no interfering object in the path of connection.
Step 3: Update Your Router Firmware
If the issue just recently started on the same network router you’ve been using before without such issue, then try updating the firmware on your network router.
You can do this directly from your router dashboard or you may contact ISP to help you do it directly.
If your Roku still won’t connect to Wi-Fi after the router firmware update, check the network settings again (band, mode and channel) after the update.
This is because any of these settings may change after the firmware update.
Step 4: Change DNS Server on Router
The next step is to change the DNS server on your network router.
To do that, you need to access your router dashboard and change the DNS server.
Here’s how to do that:
- While connected to your network router, access your router dashboard by visiting the login URL. You can find this on the router manual or on your router. Some of the links can be found below:
-
- Linksys – http://192.168.1.1
- D-Link/Netgear – http://192.168.0.1
- Belkin – http://192.168.2.1
- ASUS – http://192.168.1.1/
- AT&T U-verse – http://192.168.1.254
- Comcast – http://10.0.0.1
- Depending on the manufacturer of the router, look for DNS settings on the web interface. If you are having trouble finding the DNS server settings, check the router’s manual or search on Google for how to change DNS server for your router’s brand.

- Under DNS server 1 (or primary DNS), input 8.8.8.8
- Under DNS server 2 (or secondary DNS), input 8.8.4.4
- If there are options to input DNS server 3 and 4, leave them empty
- Save the settings
- Now, restart your network router to ensure that it establishes a new connection from the new DNS server
The issue should now be fixed. Otherwise, move to the next step.
Step 5: Check for DOS Protection Logs Against Roku
Do you have an automatic DOS protection enabled on your network router? Then, it may also be responsible for the issue.
You want to look through your router logs, and check if your router registers a DOS attack every time your Roku tries to connect, which then stops it from connecting,
In that case, the issue will be fixed by turning off the automatic DOS protection feature on your network router.
You should be able to find it under the security settings or advanced settings on your router dashboard.
If you don’t understand any of these (DOS protection, checking the logs, advanced security), just contact your ISP and tell them to help check if there’s anything blocking your Roku from connecting to your router network.
Step 6: Reset Your Network Router
At this point, you need to reset your network router if the issue still persists.
This is not the same as simply restarting your network router like I showed earlier – this is an actual reset.
Although every router has a different way of resetting it, most of them have a small hole at the back of the router where you can insert a pin or a similar thin object to press and hold the tiny reset button inside.

You may have to hold the reset button for up to 30 seconds and then restart the router for the reset to be done – you can check the router’s manual or contact your ISP to know the exact procedure to reset the router.
Alternatively, you may also contact your Internet Service Provider (ISP) to help you ping the router and reset it remotely for you. Then, all you need to do is to restart the router after you’re told to do so.
Step 7: Change or Upgrade Your Network Router
Some users have also reported that the issue only started after changing their network router.
Similarly, a number of users have also reported that the issue stopped once they switched to a different network router.
Whether this is happening on a new network router or you’ve been using it for a while without issue, you cannot rule out the possibility of some incompatibility between your router and Router device.
So, if you’ve reset your network router (as shown earlier) and your Roku still won’t connect to internet, then you may want to consider upgrading or changing your network router.
Once you update your router and/or mesh system or get a new one, the issue will most likely be fixed if it’s coming from your router.
11. Reset Roku to Factory Settings
At this point, the next thing you want to do is restore your Roku to factory settings.
Here’s how to factory reset your Roku:
- Click on Home button on Roku remote
- Scroll and select Settings
- Select System > Advanced system settings > Factory reset

- Enter the code displayed on the TV and click on ‘OK’
Alternatively, you can reset your Roku without remote by using the reset button on the back or bottom of your Roku device.
It is either tactile or a pinhole design that requires a straightened paperclip.

- Once you locate the reset button, press and hold the button firmly for 10 seconds while your device is powered on. When the factory reset is complete, an indicator light or status LED will blink rapidly on most Roku devices.
- After a successful factory reset, your Roku device will restart in the same state as a factory-new device.
- Go ahead with the configuration (which also includes the network setup step).
You should now be able to connect to the Wi-Fi on your Roku.
12. Switch to an Ethernet Cable
If your Roku still keeps disconnecting from Wi-Fi even after a factory reset, then you may want to consider switching to hardwired connection instead.
NOTE: Even though some Roku models do not come with an ethernet port, you can still use an ethernet cable by using a USB 2.0 ethernet adapter.
Moreover, ethernet cables are generally faster than Wi-Fi connections. The only limitation could come from the location of your Wi-Fi router and your TV.
However, if you have your TV and network router in the same room (which is the best anyway to avoid wireless signal interference), and you have a good ethernet cable, then you are very good to go.

To use the ethernet connection, connect one end of an ethernet cable to your network router and the other end of the cable to the ethernet port on your Roku TV, Roku Express, Roku Ultra or Roku Streambar.
- Go to Settings > Network > Network Connection > Wired.
- Plug the USB-to-ethernet adapter to the USB port on your Roku device, then plug the other end into your ethernet port on your router
- Next, reset your network connection as shown above (this will remove the current Wi-Fi connections)
- Restart your Roku device, and it will automatically be connected to the internet via ethernet
You can check the demonstration in the video below:
13. Contact Roku Customer Support
If you have tried all the methods discussed in this guide and your Roku still won’t connect to internet, then you may want to contact Roku support.
You will be asked to provide the following:
- Roku Model
- Serial Number
- Device ID
- Channels with issue (all or specific ones)
- Issue ID
To generate an Issue ID, press the Home button 5 times and then the Back button 5 times in quick succession on the remote. You’ll see an Issue ID pop up on your screen.
They have a team of experts that can help you further on the issue.
If you found this troubleshooting guide helpful, let me know which of these methods worked for you in the comment section below.