Are you looking for how to check your mouse DPI on your PC? Are you looking for the most accurate DPI analyzer tool? If yes, then you are on the right page.

Your mouse Dots per inch (DPI) will determine how fast your mouse will be when you scroll.
Depending on what you want to use it for, you might want to go for a mouse with high DPI or low DPI.
Mouse with higher DPI will also score higher at the click speed test. Usually, gamers will go for a mouse with high DPI for quick sensitivity.
There are several ways to check the DPI of your mouse easily which I will show you in this guide.
No time to waste, let’s dive right in!.
Contents
How To Check Mouse DPI
To check your mousi DPI, you can check the product description or package box of your mouse or use Paint software method. You can also analyze your mouse DPI by using online DPI analyzer tool (or DPI tester) or through the DPI settings software.
Now, I will show you how to use each of the methods easily.
METHOD 1. Check Product Description Or Box
This method does not always work but it is worth checking before you use the other methods below.
What you want to do is to check your Product (mouse) box for DPI to see if it is written there.
You can also check the product description page on the sales websites.
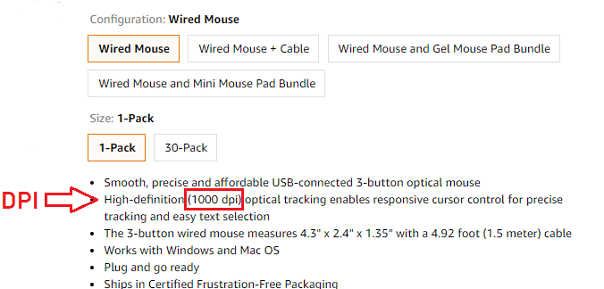
For example, when I checked out this mouse below on Amazon, the mouse DPI is stated clearly on the product page.
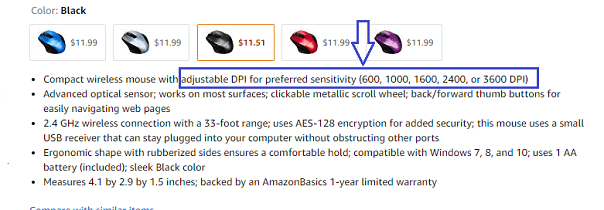
And this one even has an adjustable mouse DPI ranging from 600 to 3600. 😉
This method didn’t work for me.
However, popular mouse brands like Logitech or Corsair will most likely include it,
If this method does not work for you, quickly move to the second method.
METHOD 2. Use Microsoft Paint Software
It is very easy to get your mouse DPI using this method.
Like I said earlier, a mouse with higher DPI will also score higher in the CPS test.
So, here’s how it goes.
First, you want to get a ruler and mark two points separated by a distance of 1 inch (2.54 cm).
You can do that on your mouse pad or any surface you are going to place your mouse (I used pencil on my table).
Next, disable pointer precision on your PC.
To do that, follow the procedures below.
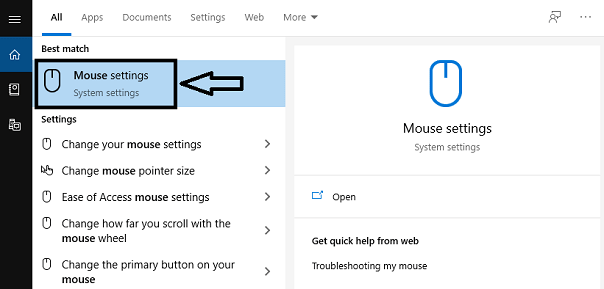
- Type and search for Mouse on your PC.
- Next, click on Mouse settings
- Now, click on Additional mouse options.

- Switch to the Pointer Options tab
- Untick the pointer precision box to disable it.
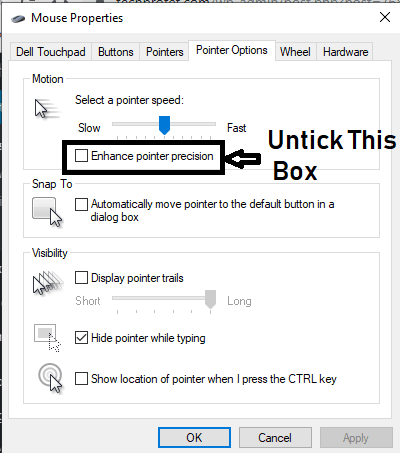
- Click on Apply, then OK.
Now that you have disabled pointer precision, open Paint software on your PC.
- Make sure that the Zoom option at the bottom right corner is set at 100%.
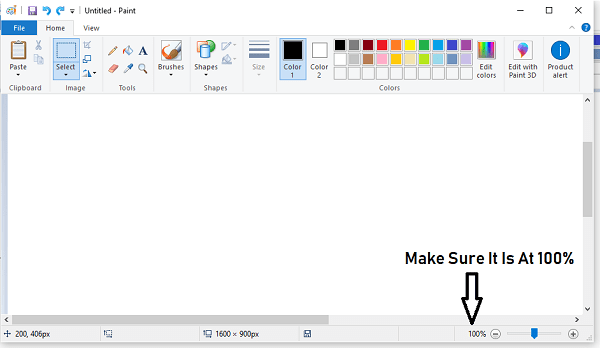
- STEP 1: Click on the Pencil tool in MS Paint.
- STEP 2: Move your mouse so that the Pencil icon is set at the leftmost side (immediately before it disappears) of your working area where it reads 0 pixel as seen in the bottom left corner of MS paint.
PS: You will see a number like “0, 200px” when try to do this. Make sure to check the first one is set at 0 because that is what you will be using.
The second pixel dimension is for the vertical height (you will observe it increase as you scroll down and vice versa – That’s not what you should check.
Remember the two points I said you should mark on your Mouse pad or table or paper? Here’s where you will use it.
- STEP 3: Now, try to place your mouse on the first mark you have on your mouse pad or table or white paper. (you can also place your mouse directly on your ruler at the Zero, 0 inch mark).
Make sure that your Pencil icon is still at the zero pixel point (the leftmost side of your working area) on MS Paint.
What I’m trying to say is “Your mouse on your mouse pad/table/paper/ruler should be at the zero or first part while your Pencil icon should be at the leftmost corner just before it disappears – That is the 0 px point.
Now, this is where most people get it wrong.
- STEP 4: Left-click on your mouse and try to draw a line until you reach the second mark (the 1 inch mark ON YOUR TABLE/MOUSE PAD/PAPER!
Use the two marks on your mouse pad/table/paper to draw a line until you reach the 1 inch, as measured with your rule. DO NOT TRY TO USE 1 pixel on MS Paint.

NOTE: I read 679 px, 671 px, 662 px and 684 px using first dimension at the bottom left corner after placing my Pencil icon where the line ends at 1 inch (as measured by my ruler after moving the mouse).
Click on the Pencil icon again and do this as many times as possible.
Then find the average to get your mouse DPI.
That gives me an average of 674 pixels, and that makes my mouse DPI around 674.
METHOD 3. Use a DPI Analyzer
Some online DPI analyzer will help you detect your mouse Dots per inch (DPI) really fast.
One online tool that I personally used is the Mouse sensitivity tool.
- First, click https://www.mouse-sensitivity.com/dpianalyzer/ to go to the page.
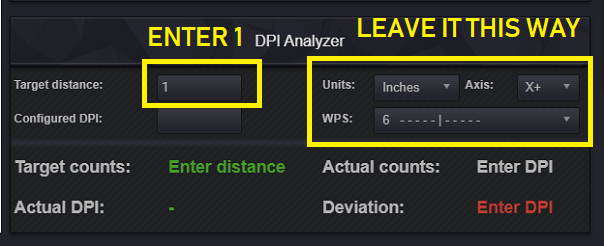
- Enter 1 as the Target distance and leave Inches as the units. Leave other settings unchanged. You may enter the DPI if you know if already for a more accurate measurement. Otherwise, leave it empty too.
Now, you will see a red crosshair under this settings as seen below.

- Click the red crosshair, hold on it and move your mouse to the right on your mouse pad/table/white paper/ruler until you reach the 1 inch mark.
- The goal is NOT to try to move the red crosshair on top of the blue one, this is just an indicator of where 0% deviation is. The goal is to move your mouse physically the target distance and see where the red crosshair ends up. Release the mouse button to stop recording the movement.
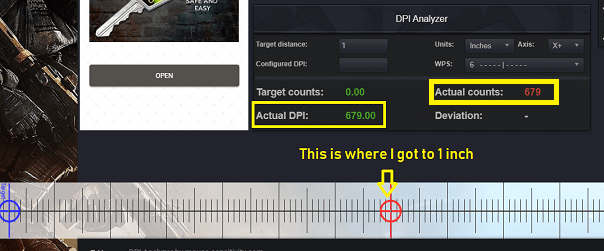
As you can see, I got a DPI of 677 using this method, which is almost the same thing as the average I got using MS word – 674.
METHOD 4. Use The DPI Settings Software
You can also check your mouse DPI by downloading the appropriate software from the manufacturer website.
In fact, if your mouse DPI is adjustable, you can use this method to change your mouse DPI to the one you want in real life.
Popular brand mouse companies like Logitech, Bloody or Razer, they have dedicated softwares that allow you to control and change the Mouse DPI in real time.
You can download the software for Logitech mice (Windows & Mac OS) on Logitech G hub here.
If you are using Windows (without another brand), download the Mouse and Keyboard center here.
Bottom Line
The higher your DPI, the more sensitive your mouse is.
If your mouse has a DPI of 1600, it will move 1600 pixels for every 1 inch you move it.
Depending on what you need your mouse for, you might want to know your mouse DPI (especially when you are just about to buy it).
I believe checking and testing for your mouse DPI could not be any easier if you follow this guide very well.
Frequently Asked Questions
What does DPI mean?
DPI stands for Dots per inch. It is a measure of how sensitive a mouse is.
How does mouse DPI reading work?
The higher the DPI of a mouse, the farther it will move when you move it through a particular distance. A mouse with higher DPI is more sensitive and reacts more to smaller movements. If a mouse has a DPI of 1600, your mouse will move by 1600 pixels when you move it through 1 inch.
Is it better to have high or low mouse DPI?
It depends on what you need it for. For example, gamers usually want a high DPI mouse for quick sensitivity and fast scrolling.
What is the best DPI for a gamer?
If you want to play games that require very fast response (like shooting games), you should look for a mouse with DPI of at least 1600.
How can I check my mouse DPI?
There are several ways to check your mouse DPI. I have explained 4 of those methods in this guide. I am very sure you will find it helpful.
If you have any question, feel free to use the comment section below. Found this page helpful? Then, don’t forget to share now so others can enjoy.

Thanks for this post, I have been struggling with this for a while.
After reading this guide, I was able to use the online analyzer tool easily.
I am glad you found in helpful Williams.