Have you ever been in a situation where you mistakenly deleted photo, audio or video file(s) permanently without any way to recover? Or maybe your storage device became corrupted with virus or formatted without backup, making your important media files inaccessible?
If you have been in any of the situations described above, then you will understand when I say that it’s a very terrible one.
Luckily, you are not alone.
With the help of Stellar Photo Recovery Software, you can easily recover your lost media files, whether it was due to deletion, formatting or corrupted storage devices (such as memory cards, SD cards, Flash drives, internal and external hard disk, digital cameras e.t.c)
Not only can this software help you recover your lost/deleted files, it can also fix corrupted audio and video files that are not working properly.
The best part? It supports a wide range of media (photos, audios & videos) file formats.
If any of those sound like what you are looking for, then you are on the right page.
I will take you through how Stellar photo recovery software works, how to use it to recover your files and many key features you don’t want to miss out on.
So, without any further ado, let’s dive right in!
Contents
How Stellar Photo Recovery Software Works
Stellar photo recovery software works via a 3-step process:
1. Scan
First, the software requests that you the target storage drive that should be scanned. Then, the software, though its algorithm does a scan to find all recoverable media files on the selected storage device.
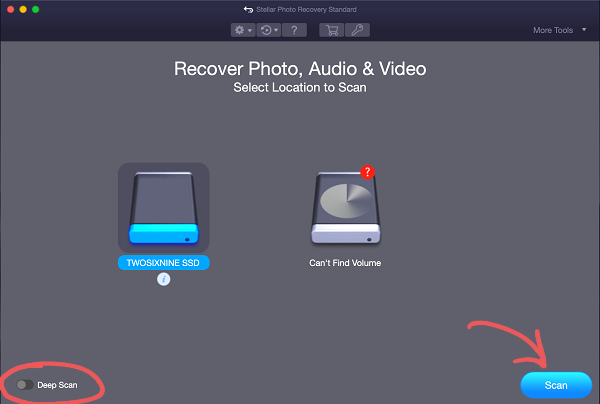
In addition, you also have the option to select the Deep Scan option, in the case where you can’t find the missing/lost file(s) when the ordinary scan is performed.
2. Preview
Next, you can actually preview each item before you choose whether or not to recover.
Once the scan is complete, you can choose any of the item to preview it before you decide to recover it or not.
NOTE: In the demo version of the product, you cannot see the preview of files having size greater than 10 MB. In the full version of the product, you cannot see the preview of files having size greater than 100 MB.
3. Recover
Once the recoverable files have been scanned (and maybe previewed by you), you can then go ahead to recover the ones you wish you recover. When you click on the Recover button, you will get a prompt asking you to select a target location you want the recovered file(s) to be saved.
How to Recover Media Files with Stellar Photo Recovery Software on Mac
Recovering your media files using the Stellar photo recovery software can’t get any easier. Follow the procedures below to quickly get and use the software on your Mac laptop.
1. Download & Install the Software
First, click here to download the software file for your Mac from the official download page on the official website.
Once download, you will have the .dmg.zip file in your selected download location.
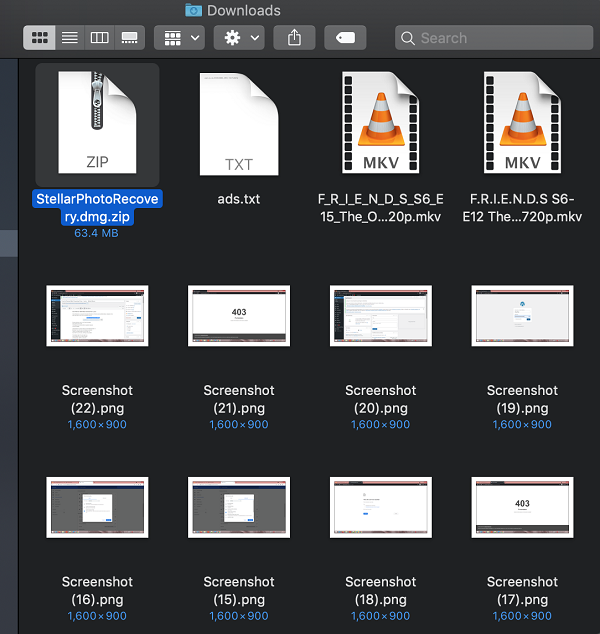
Double click on the zip file to extract and open the .dmg file inside it.
Drag and drop it into the Applications folder to install it.
Once dropped, allow the installation to be completed.
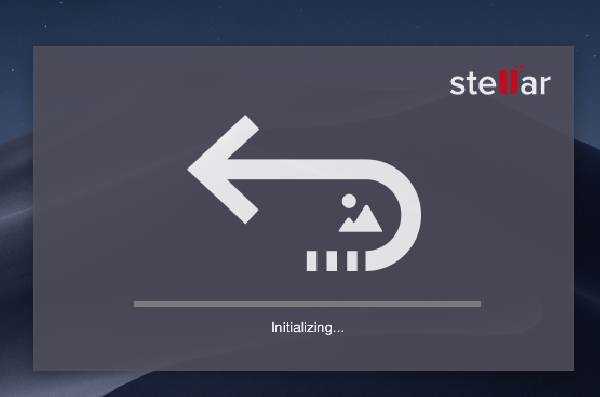
Once you have installed the software, open it and allow it to initialize (this should take a few seconds).
2. Select a volume and click on Scan
Select a storage device (volume) you will like to scan. Then, click on the ‘Scan
3. Allow Stellar Data Recovery Extension
The software will require that you allow the data recovery extension for you to be able to use it to scan and recover files (as shown in the popup, the extension is safe to use and authorised by Apple)
Once you get the pop-up, click on ‘Next‘ at the bottom of the screen. Then, click on ‘Open Security Preferences‘.
Click on the lock icon, enter your system password to proceed to unlock so you can make changes.
Finally, click on ‘Allow‘ button in front of the text, System software from the developer “Stellar Data Recovery Inc.” was blocked from loading.
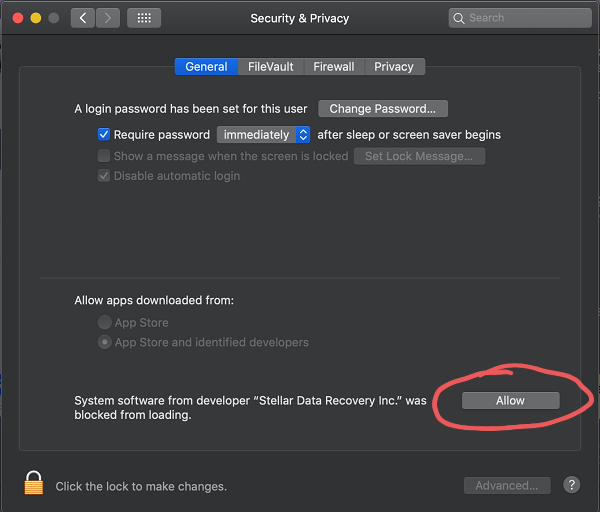
Once allowed, click on ‘Next‘ button again on the Stellar dashboard. It should proceed to scan now. If it doesn’t, click on the ‘Next‘ button one more time.
4. Scan for recoverable files
Once you have allowed the Stellar Data Recovery Extension, the scan should start on the earlier selected volume.
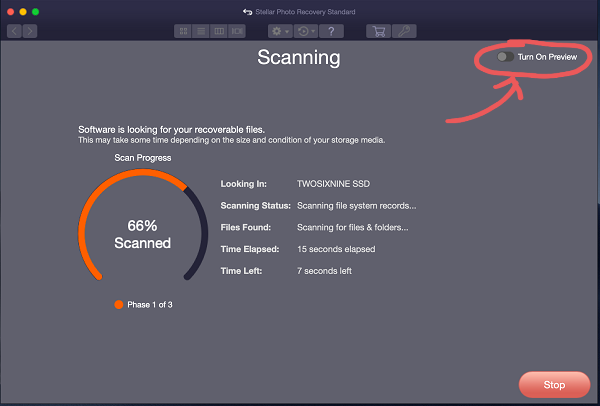
There are options available to you when you want to scan.
- First, you can also use the Deep scan option if the normal scan method show the desired files you wish to recover.
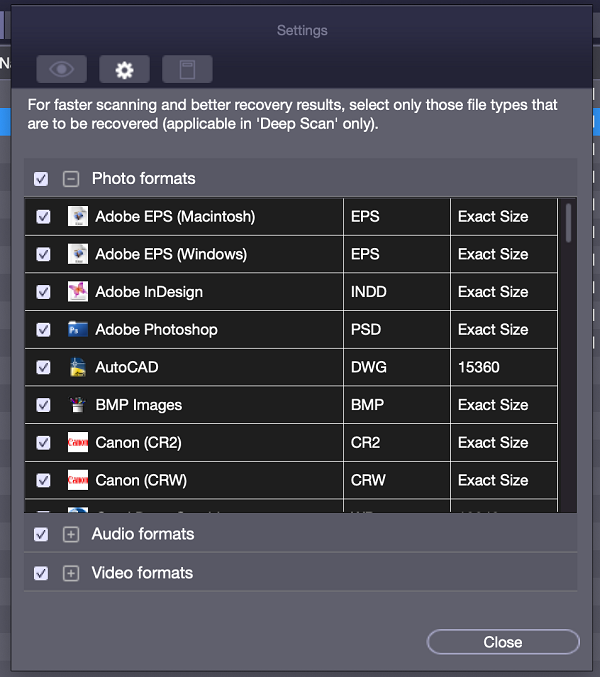
- Also, you can select what file formats to scan (& recover) via advance settings. This feature makes scanning faster and more targeted to specific file formats.
To do that, follow the steps below:
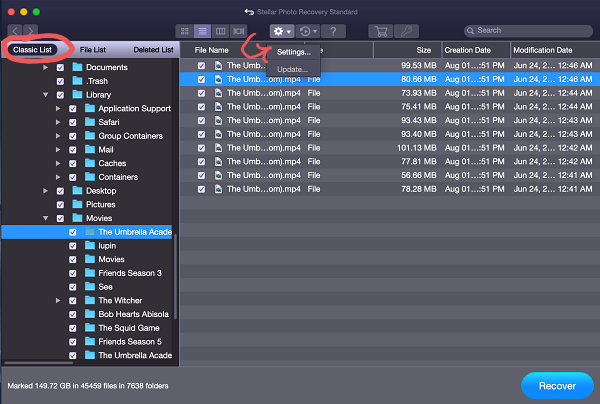
- Click on the Settings icon at the top menu, then click on Settings.
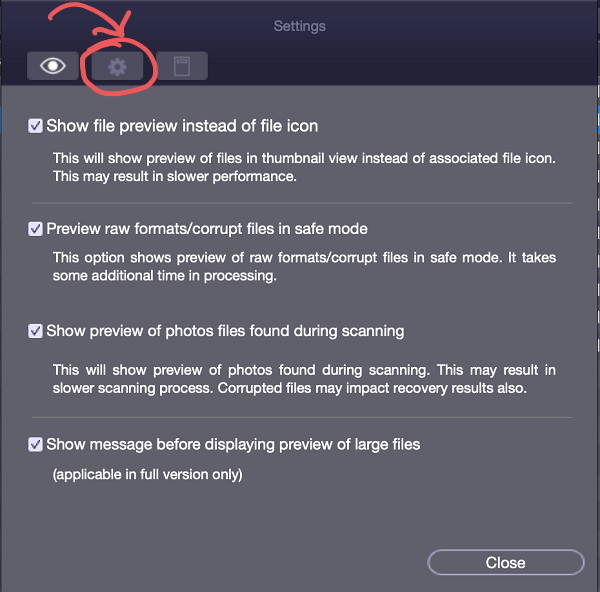
- Switch to the second tab (settings icon)
- Tick the file formats you want to be displayed, and untick other ones you don’t want to be scanned/previewed.
5. View and Preview the scanned files
Once the files have been scanned, you will get a prompt that shows ‘Scanning Completed Successfully!’. Click on OK. You will be shown the list of all the recoverable files.
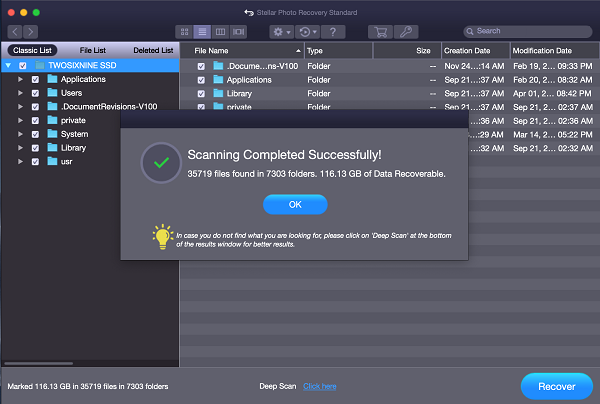
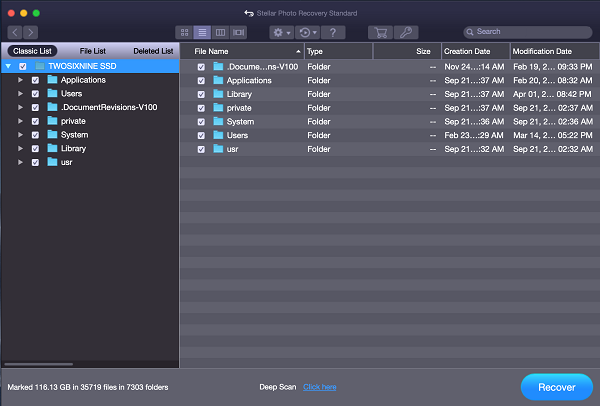
There are more than one way to view the files. You can either use the Classic list, the File list or the Deleted Files list.
With the Classic List view, files are arranged in Nested folders. Basically, use this view when you are trying to locate files based on the folders they were saved in.
With File List view on the other hand, files are arranged based on the file type into:
- Photo
- Audio
- Video
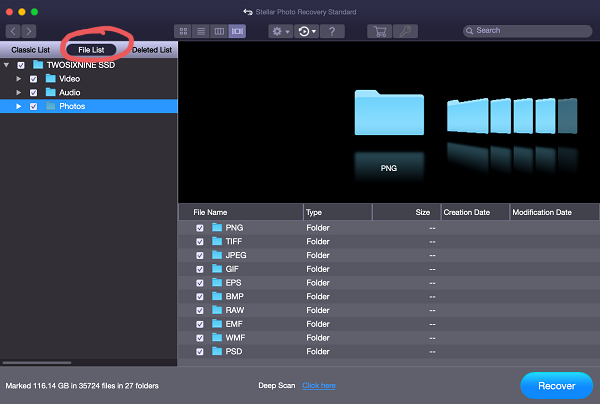
That’s not all. You can also view each of the file type based on the particular extension i.e you can choose to view .JPEG files only and not view .PNG files even though they are both Photo extensions.
The Deleted Files shows the files that were lost due to deleted, but this is only available when you use the Deep scan option.
Personally, I prefer the Classic list and File list views depending on what I’m trying to recover.
From any of the list views you choose to use, you can easily click on a particular file (photo, audio or videos) to preview before you actually choose whether to restore or not. That way, you don’t restore the wrong file(s).
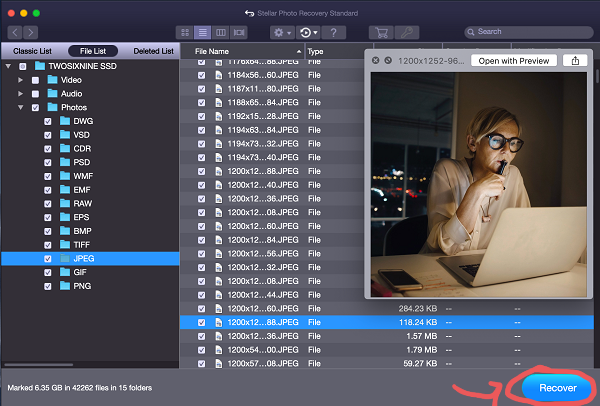
As for files larger than 25MB (usually videos), the preview will not load immediately as when you are trying to preview an image.
However, from my personal experience, even such files take just a few seconds to load (took less than 5 seconds to load a video of over 100MB).
6. Recover the file(s)
Once you have previewed the file, you can click on the Recover button.
You will be asked to select a target location to save the recovered file to. Click on the Browser button to select a location.
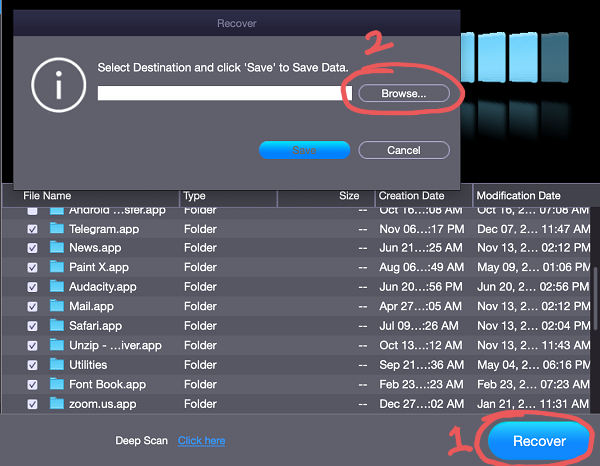
NOTE: You cannot save a file for restoration into the same volume (storage device) you are trying to restore it from.
That is, if you are restoring deleted files from your internal hard disk, you have to restore (save) it into another storage location, say your flash drive, external hard disk e.t.c.
Once you do that, wait for the file to be saved into your selected location and your file will be easily accessible once again.
In the case where your audio/video file has been corrupted, you can fix the corrupted audio and video file(s) with the professional and premium version of the software respectively.
How to Activate Stellar Photo Recovery Software on Mac
The demo version of the software is for evaluation purpose only. You need to activate the software to use its full functionality.
To activate the software, click on the Key icon at the top bar.
Paste the activation key in the space provided, then click on Activate.
If you don’t have the activation key, you can purchase it on the official website, or by clicking on the Get it now button on the software’s activation page.
There are 3 payment options available:
- Standard: Recover all formats of media files, with preview option
- Professional: Standard features + Photo repair tool
- Premium: Professional features + Video repair tool
You can compare the full features of the packages and also purchase the license for any of them on the official website here.
Supported Storage Devices
- SD card, storage devices or hard disks
- Digital Cameras
- USB sticks & other Portable storage devices
- Internal & External Hard Drives
Supported File Formats
Image Formats
BMP, JPEG, GIF, TIFF, MOS, MEF, PSP, DJVU, TGA, PGM, DNG, PNG, PSD, INDD, JP2, PCT, PBM Paint Shop Pro Image File (PSP), Picture File (PCT), Adobe EPS (Windows) and more.
Audio Formats
ACD, AIFF, AMR, AT3, AU, CAFF, DSS, IFF, M4A, M4P, MIDI, MP3, NRA, OGG, RA, RM, RPS,SND, WAV, WMA.
Video Fomats
3G2, 3GP, AJP, ASX, AVCHD Video File (MTS), AVI, Divx Encoded Movie File (DIVX), F4V, HDMOV, M4R, Matroska Video File (MKV), MOI Video File, MP4, MPEG, MQV, OGG Media Player (OGM), SVI, TOD, VID, Video Object File (VOB), MXF movies.
Camera Raw Formats
Nikon(.NEF,.NRW), Olympus(.ORF), Sony(.ARW,.SRF,.SR2), Kodak(.KDC, .DCS, DRF,.D25), Fuji(.RAF), Sigma(.X3F), Panasonic(.RAW, .RW2), Pentax(.PEF), Minolta(.MRW), and Canon(.CRW)
Stellar Photo Recovery Software: Pros & Cons
Pros
- Digital Photo Recovery
- Interactive User Friendly Interface, Easy to Use
- Supports Raw Recovery
- Option to Add File Headers
- Compatible with M1 & T2 chip-enabled Macs
- Deep Scan Recovers Every Bit of Lost Data
- Supports Recovery of Various Formats of Photo, Audio and Video Files
- Recovers files with detailed information such as thumbnails, original date timestamp, camera model/name, resolution and file name, if available
- Works smoothly with large sized storage devices up to 5TB
- Option to stop a running scan, save scan information as Disk Image (.dmg) file and resume recovery at a later stage
- Supports recovery of Unicode Files
- Supports Disk Imaging for Quick Recovery
- Supports multiple languages such as English, German, French, Italian, Spanish, Japanese
- Supports adding your Own File Type for Recover
- 24×5 free support for paid users
Cons
- Limited to media files i.e to photo, audio and video files
Bottom Line
Compared to many other media file recovery softwares, Stellar photo recovery software is relatively cheap for the value, has a very user-friendly interface and very effective in recovering a wide variety of lost/deleted files types.
With the deep scan, you can easily recover files that you never thought could be restored. One of my favourites features is the option to choose which file type/extension to scan/restore, making the search way faster and also targeted at specific files types without having to go through other unrelated file types/extensions.
Finally, with the professional and premium paid packages, you can easily fix corrupt audio or video files.
Now, it’s up to you.
What are your thoughts, opinions or feedback regarding this software? I will love to hear from you.
If you found this content very resourceful, make sure you share using the share buttons.
